Power Editor Interface
- Log in to Free App Analytics.
- Select the desired Account and App.
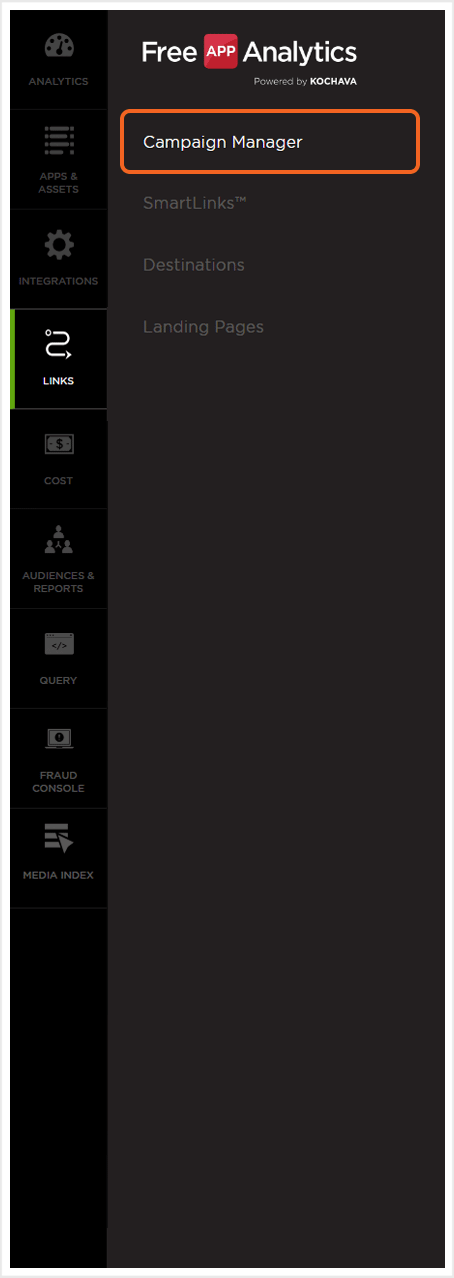
- Select Links > Campaign Manager.
- Click Power Editor.

Arrange Trackers
Trackers can be arranged in several different ways in order to easily locate and thereby edit single or multiple trackers.
Live Search:
- Enter a partial or full tracker name into the Live Search box.
- Click “X” to remove the search text.
NOTE: Trackers that partially or fully match the entered text within the Live Search box will be displayed.
Sort By:
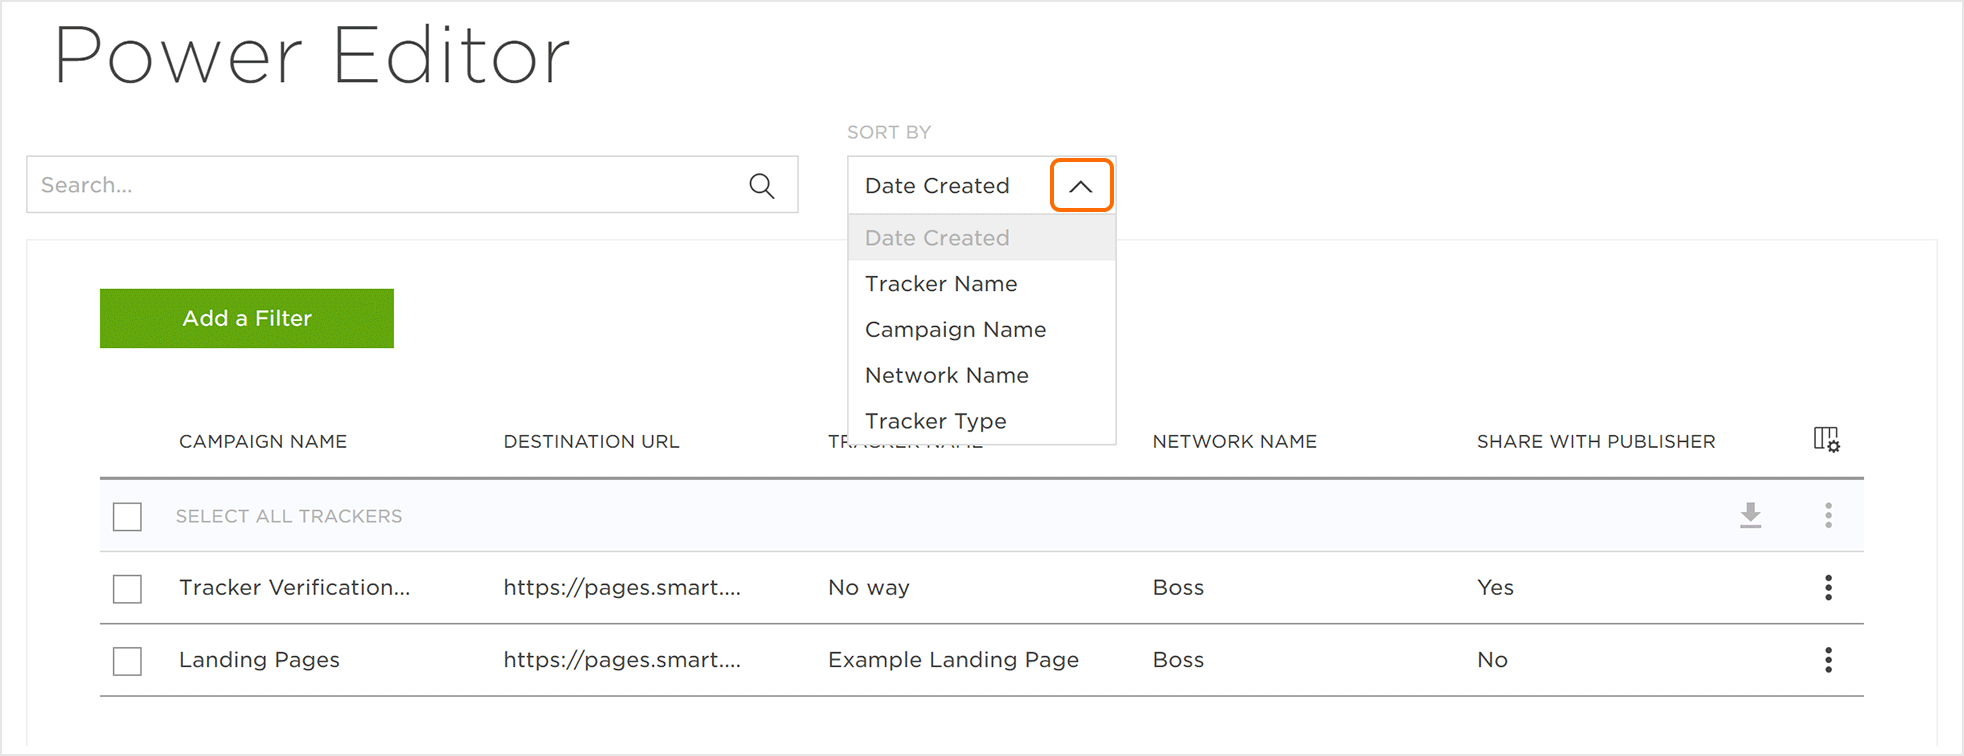
- Click the Sort By drop-down menu and Select one of the following:
- Date Created (default) — This option will sort the trackers by the date that they were created.
- Tracker Name — This option will sort the trackers by the user-defined tracker name in alphabetical order.
- Campaign Name — This option will sort the trackers by the user-defined campaign name in alphabetical order.
- Network Name — This option will sort the trackers by the network name in alphabetical order.
- Tracker Type — This option will sort the trackers by the tracker type.
NOTE: The column headers that are visible within Power Editor may be changed, however, the Sort By function will still sort trackers regardless if a corresponding column header is visible or not.
Adding a Filter:
Filters may be used to quickly locate a specific tracker or groups of trackers based upon specific metrics.
- Click Add a Filter.
- From the Tracker Type drop-down menu, Select one of the following:
- Campaign Name
- Network Name
- Pricing
- Segment Name
- Traffic Override
- Traffic Verification
- Type
- Select whether filter results will be In or Not In.
NOTE: For filtering on Traffic, Rules may also be applied.
- Click “+” and Select the desired metric.
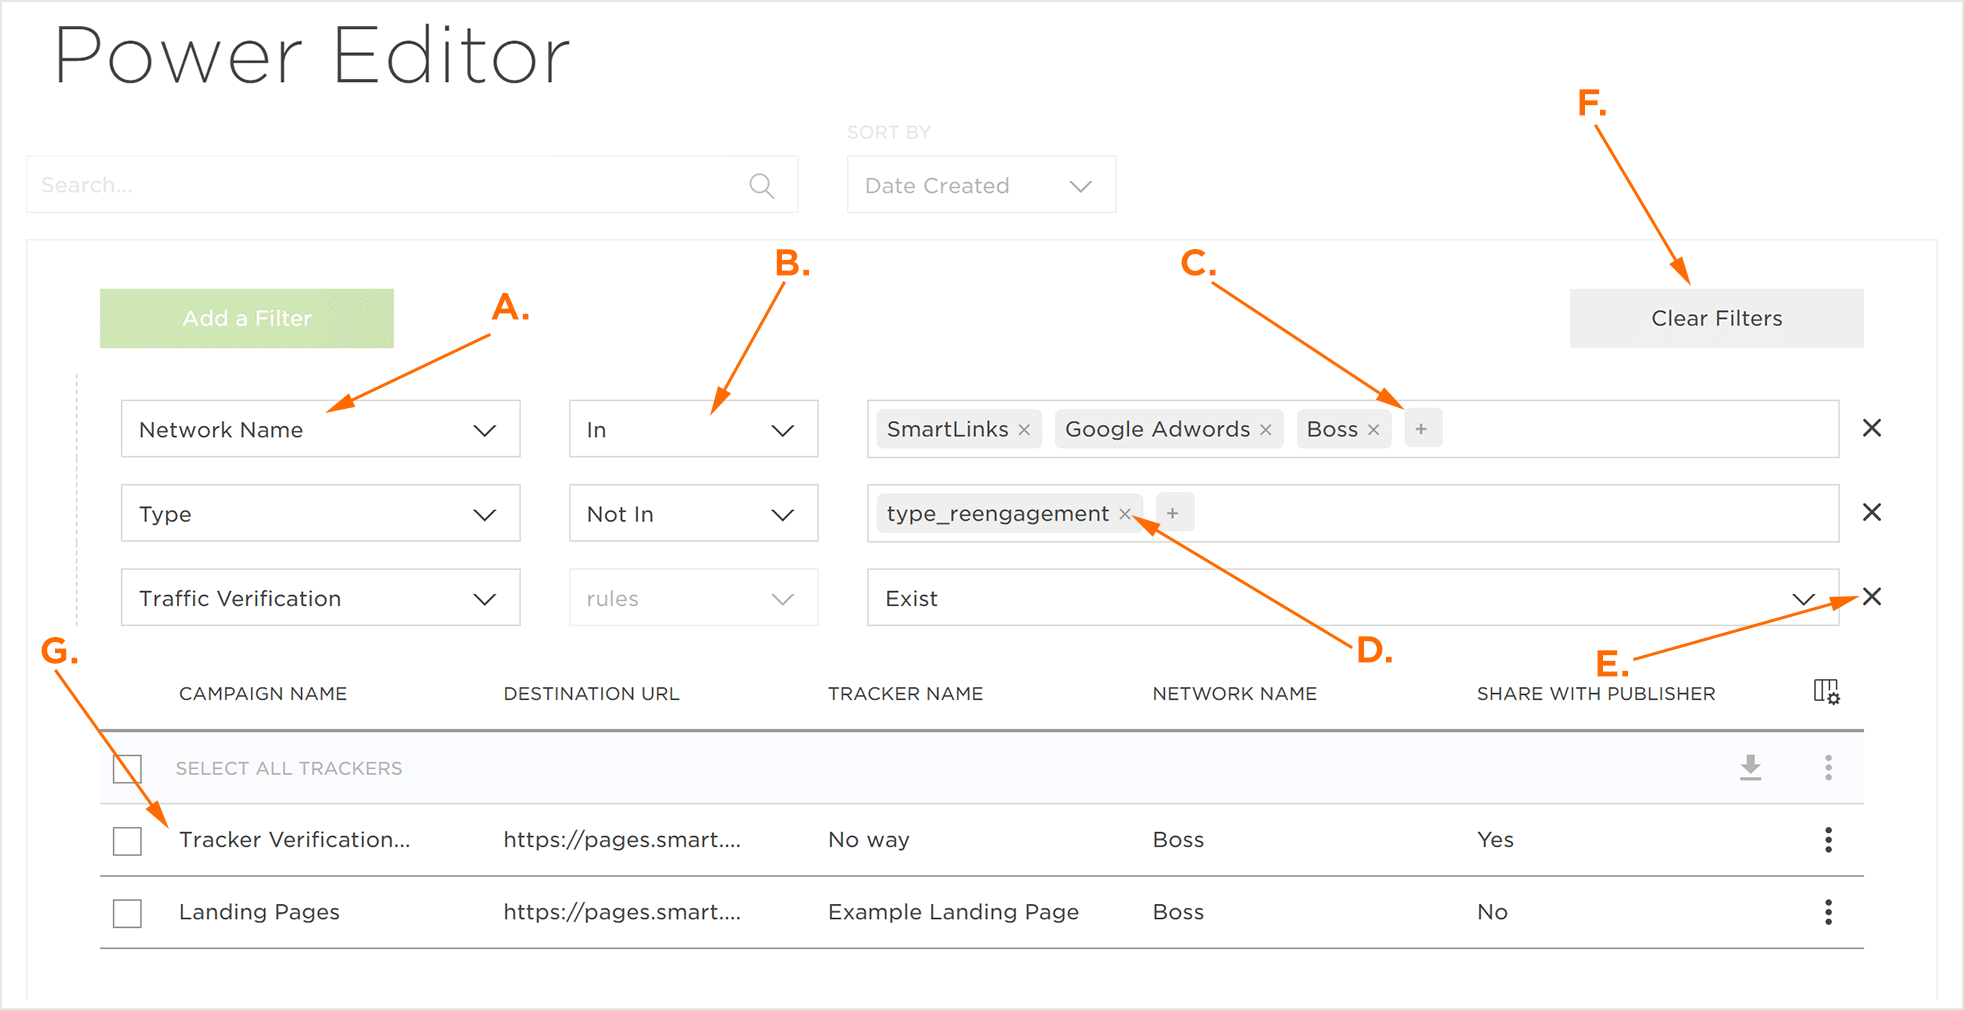
A. Filter Type
B. Filter trackers In, Not In, or by Rules.
C. Click ”+” to add metric.
D. Click ”X” to remove metric.
E. Click ”X” to remove filter and associated metric(s).
F. Click Clear Filters to remove all filters.
G. Trackers that fit within selected filters.
Clearing Filters —
- Clicking “X” can remove the desired metrics.
- Clicking “X” can remove the desired filter.
- Clicking Clear Filters will remove all filters.
Modify Displayed Tracker Column Headers:
The tracker column headers that are displayed within the Power Editor may be selected on a per user basis in order to display and organize trackers in accordance to user preferences.
- Click the Tracker Column Settings button.
- Select the desired column headers to be displayed within the Power Editor.
NOTE: A maximum of five (5) column headers may be displayed within the Power Editor. If the maximum number of column headers have been selected, one or more column headers must be deselected before new column header(s) may be selected.
![]()
A. Tracker column headers currently selected to be displayed.
B. Check tracker column headers to be displayed (max of 5).
C. Indicates the number of tracker columns selected (e.g., max columns selected).
Editing Trackers
Single or multiple trackers may be modified allowing the editing of tracker settings, Traffic Override settings, Traffic Verification settings or the ability to create a copy of the selected tracker.
Modify Single Trackers:
- Locate the desired tracker.
- Click on the Tracker Edit (⋮) button.
- Quick Edit
- Modify desired settings.
- Click ✔ to accept the changes.
- Click “X” to discard the changes and exit the Quick Edit mode.
- Edit Tracker
- Modify desired settings.
- Click Save to accept the changes.
- Click Cancel to discard the changes.
- Delete Tracker
- Click Proceed to delete tracker.
- Click Cancel to cancel the deletion of the tracker.
- Traffic Overrides
- Modify desired settings.
- Click Save to accept the changes.
- Click Cancel to discard the changes.
- Traffic Verification
- Modify desired settings.
- Click Save to accept the changes.
- Click Cancel to discard the changes.
- Create Copy
- Select the desired number of duplicate trackers.
- Click Proceed.
![]()
Modify —
Provides quick access to modify the displayed tracker headings.
Provides access to modify all tracker settings.
NOTE: If Cancel is clicked, the user will be navigated to the Power Editor main page.
NOTE: For more information on Install Campaign tracker settings, refer to our Create an Install Campaign support documentation. For more information on Reengagement Campaign tracker settings, refer to our Create a Reengagement Campaign support documentation.
Provides access to delete the selected tracker.
Provides access to modify all Traffic Overrides settings.
NOTE: If Cancel is clicked, the user will be navigated to the Power Editor.
NOTE: For more information on Traffic Overrides settings, refer to our Tracker Override Settings support documentation.
Provides access to modify all Traffic Verification settings.
NOTE: If Cancel is clicked, the user will be navigated to the Power Editor.
NOTE: For more information on Traffic Verification settings, refer to our Traffic Verifier support documentation.
Copy —
Creates a duplicate copy of the selected tracker.
Modifying Multiple Trackers:
Power Editor provides the ability to edit multiple trackers at the same time.
- Select the desired trackers for bulk editing.
- Click the Tracker Bulk Edit (⋮) button.
![]()
A. Select trackers by checking the associated box.
B. Indicates the number of trackers selected.
C. Selected trackers will be indicated in green.
D. Non-selected trackers.
Modify Selected Trackers —
Provides access to modify the displayed tracker heading settings.
- Click Edit Tracker Properties.
- Modify the desired settings.
- Click Save.
NOTE: If Cancel is clicked, the user will be navigated back to the Power Editor main page.
NOTE: During the editing process, single or multiple trackers may be removed by unchecking the selected tracker(s).
![]()
A. Selected trackers. Trackers may be removed by unchecking.
B. Tracker column headers which may be updated.
C. Settings that may be updated.
D. Settings that cannot be updated.
Copy Traffic Settings —
Provides the ability to copy the Traffic Overrides or Traffic Verification settings from a source tracker to multiple target trackers.
- Select the Target Trackers (i.e., the trackers that the Traffic Settings will be applied to).
- Click the source Tracker Edit (⋮) button (i.e., the tracker that the Traffic Settings originate).
- Select Traffic Overrides Settings.
- Review the Traffic Overrides Settings.
- Click Save.
- Select Traffic Verification Settings.
- Review the Traffic Verification Settings.
- Click Save.
- Select Custom Parameters.
- Review Custom Parameters.
- Click Save.
![]()
A. Trackers that the new settings will be applied to.
B. Tracker that the settings will be applied from.
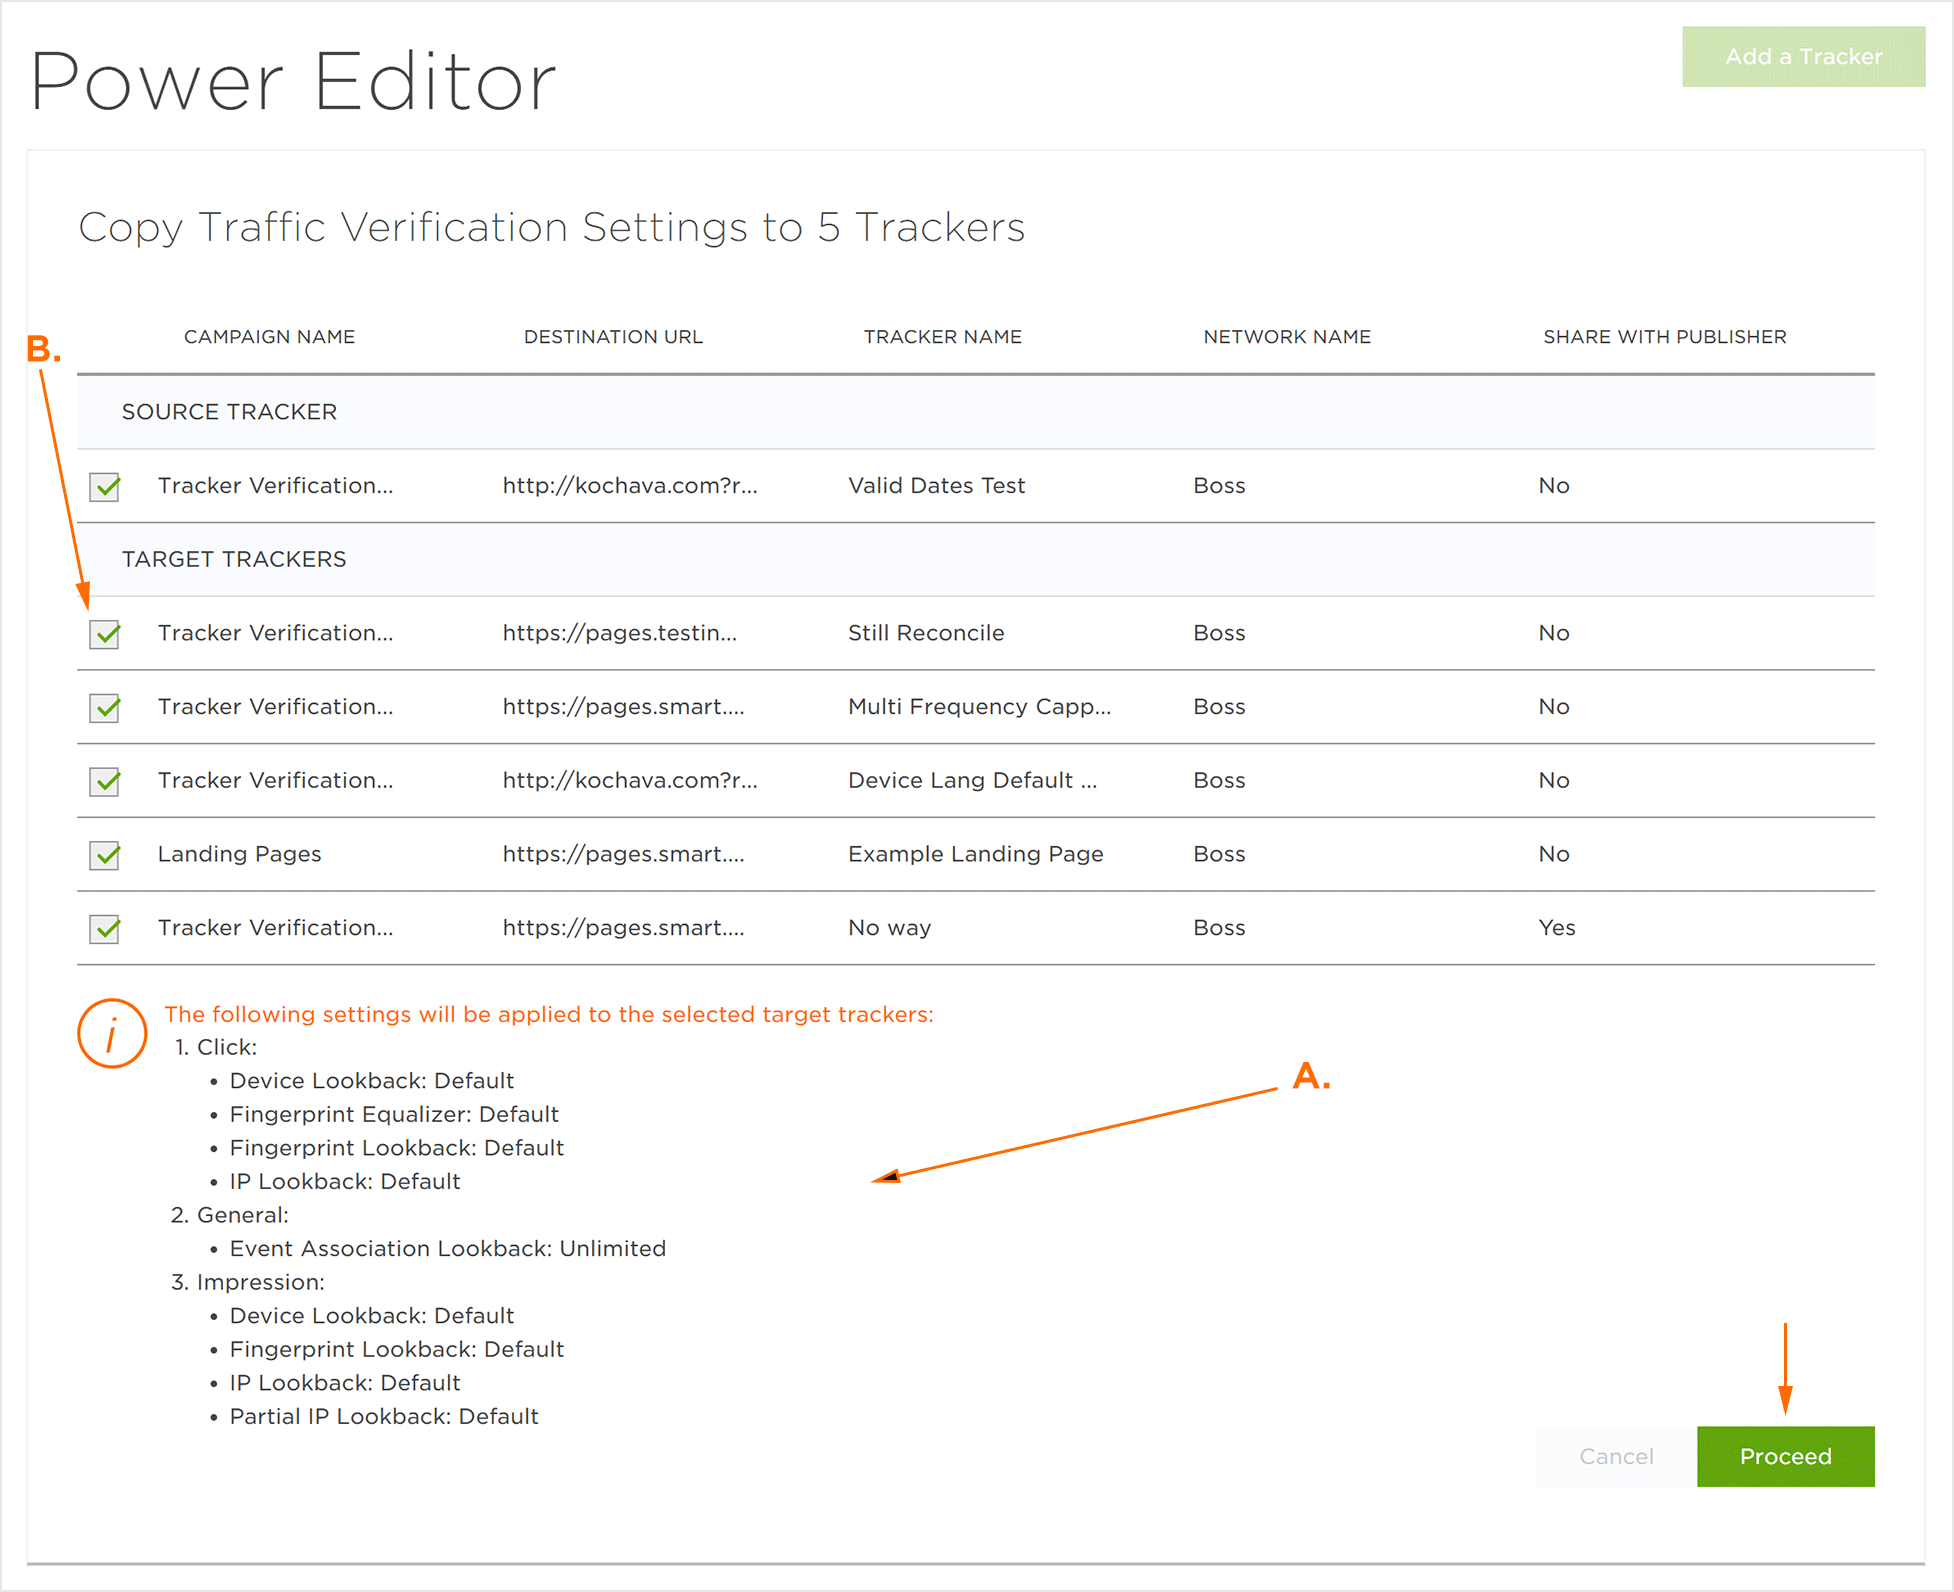
A. Settings being imported into target trackers.
B. Target trackers may be removed from import process by unchecking the desired tracker(s).
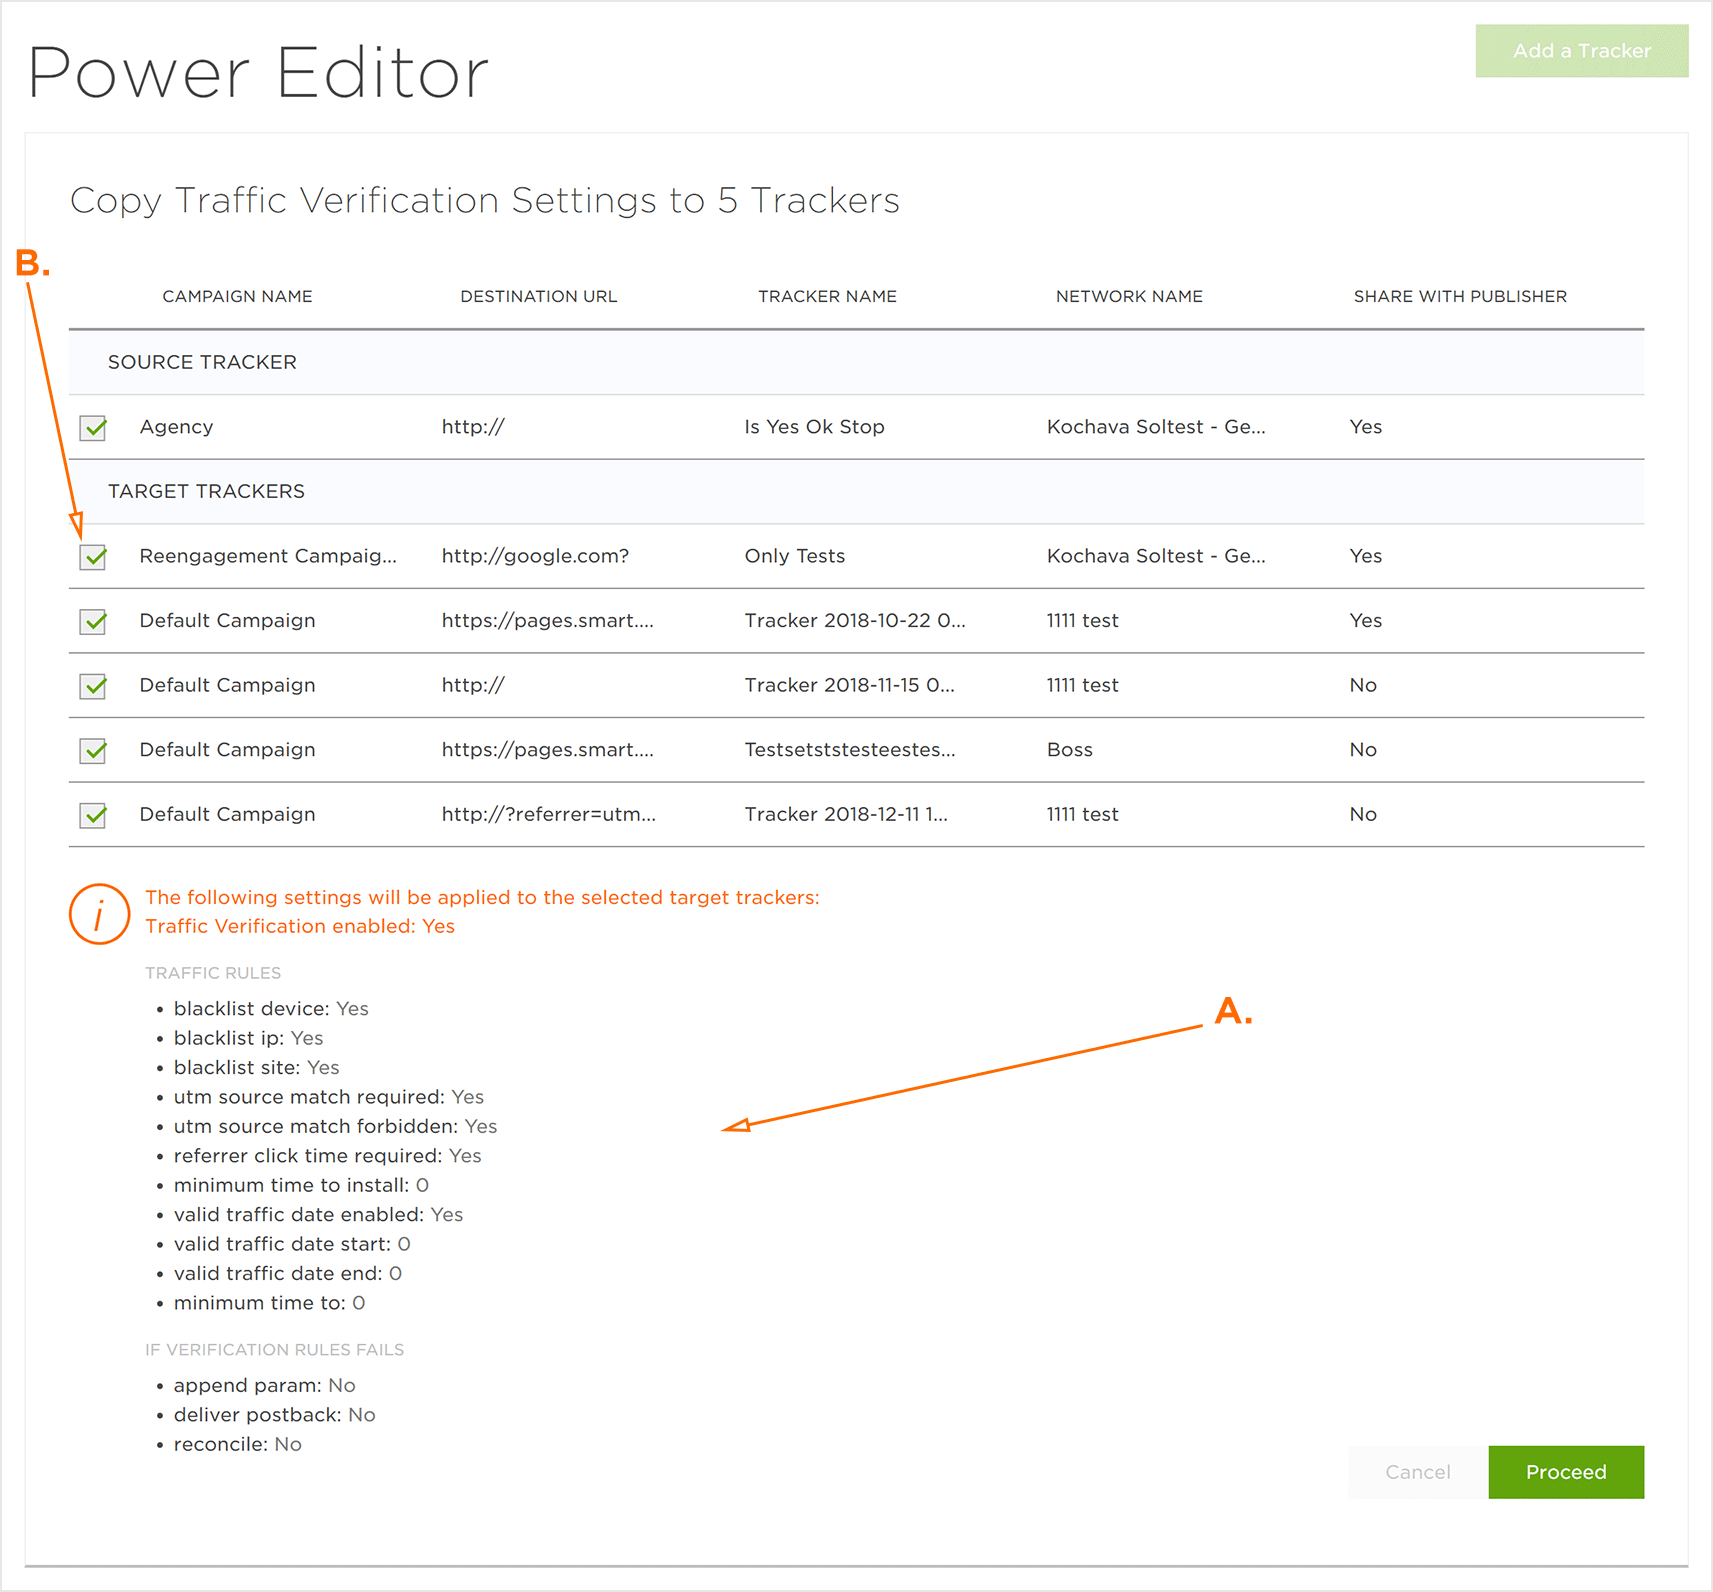
A. Settings being imported into target trackers.
B. Target trackers may be removed from import process by unchecking the desired tracker(s).
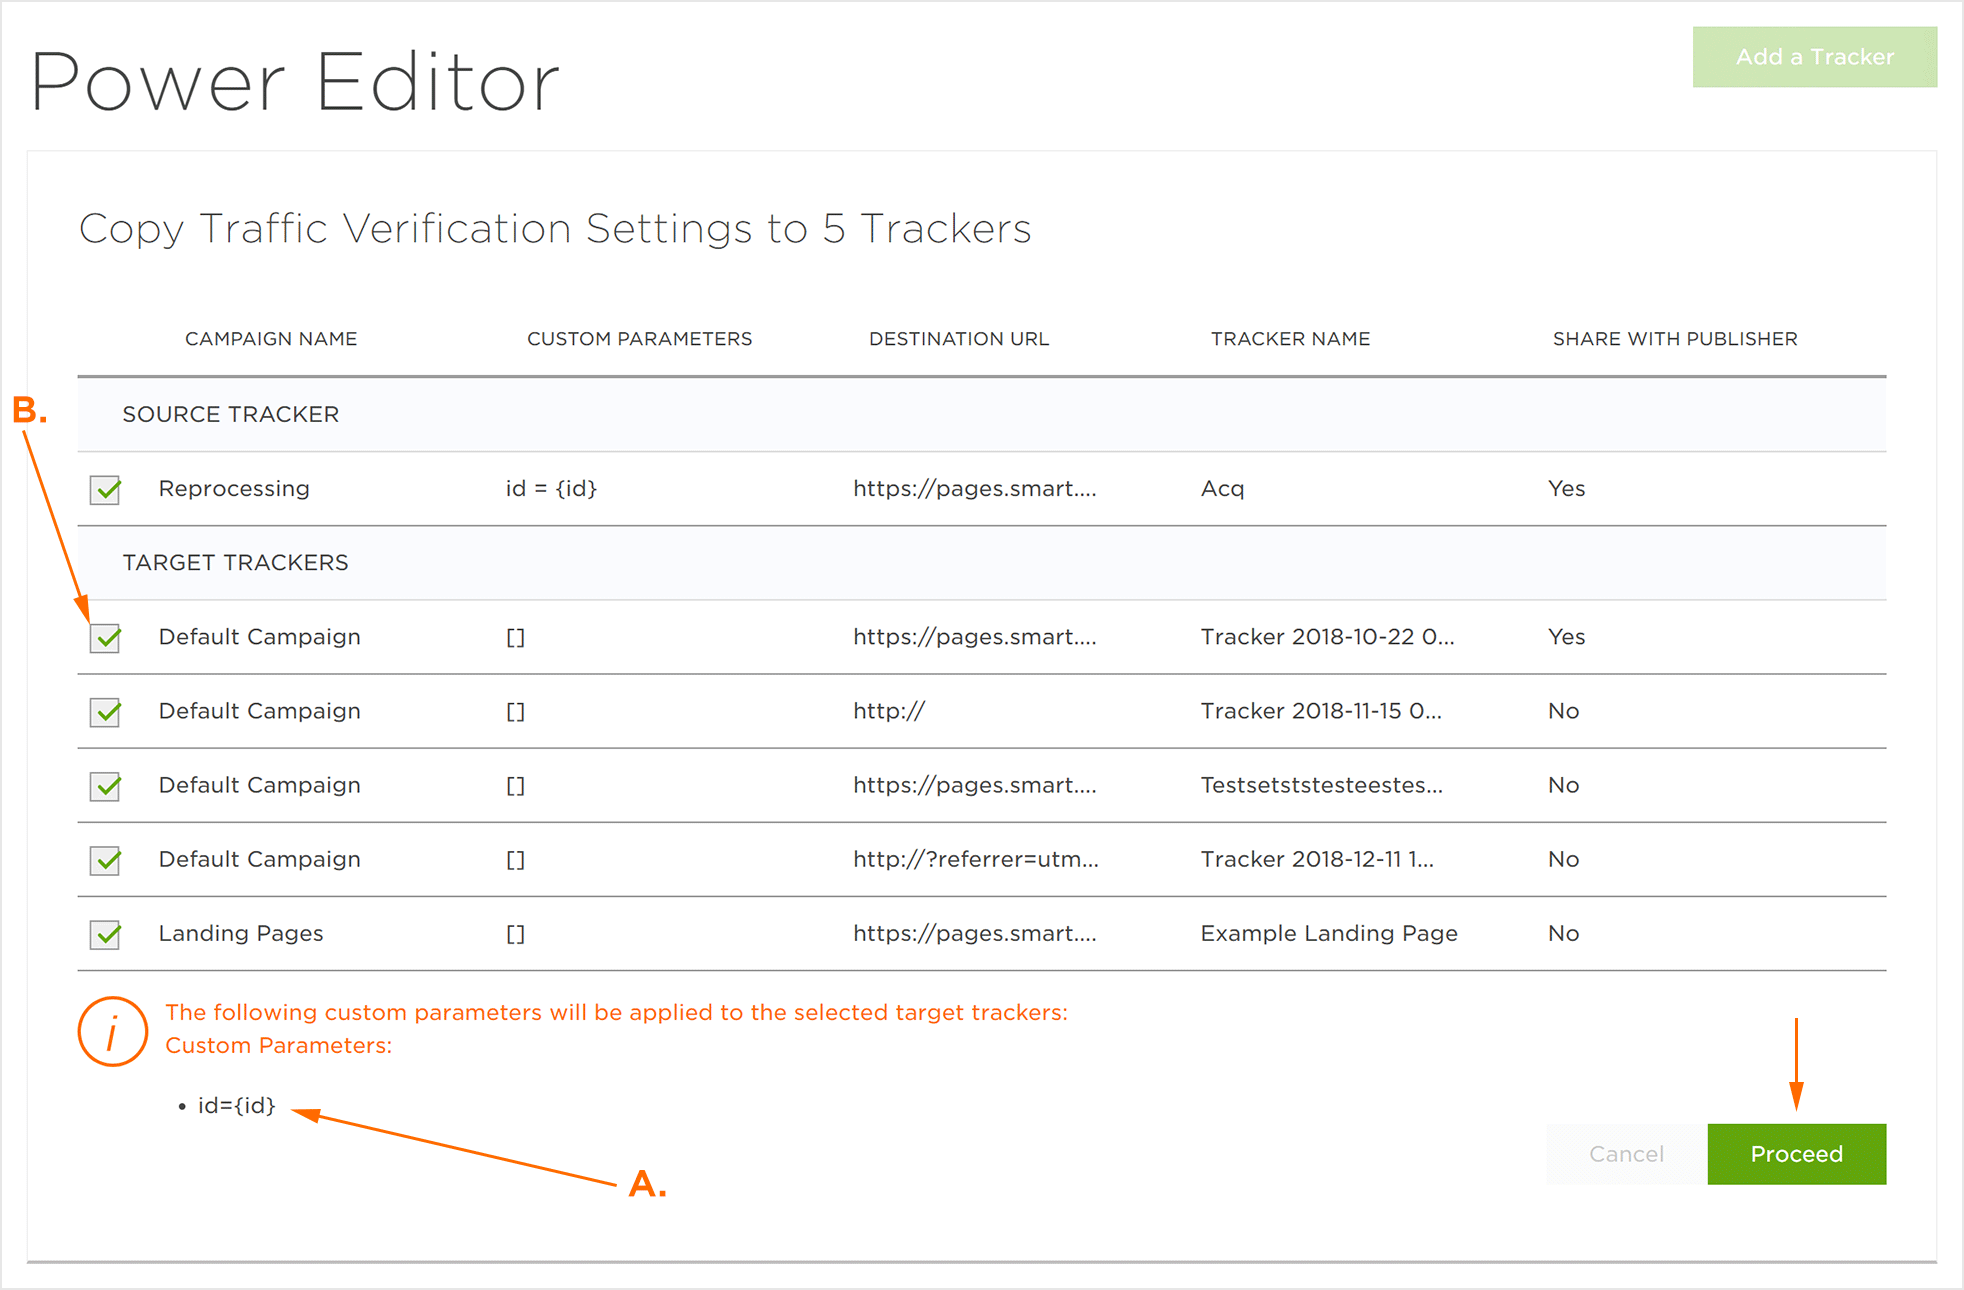
A. Custom Parameters being imported into target trackers.
B. Target trackers may be removed from import process by unchecking the desired tracker(s).
Delete Selected Trackers —
Provides the ability to delete the selected trackers.
- Click Delete.
- Click Proceed.
Export Selected Trackers —
Provides the ability to export the data associated with the selected trackers.
- Click CSV.
NOTE: An Excel document will be downloaded with the selected tracker data. All columns will be present regardless of the custom displayed columns.
Export Tracking and Destination URLs
Power Editor provides the ability to export the data for all of the trackers associated with the selected app.
- Click the Export button.
NOTE: An Excel document will be downloaded with all of the associated tracker data. All columns will be present regardless of the custom displayed columns.
![]()
