
This feature is available only with paid Kochava accounts. Contact us to learn more.
Use Cases for SmartLink™ Creation:
A SmartLink™ enables Kochava users to perform tasks such as:
- Create a single link for off-network marketing (email, SMS, company website, social) enabling customers from different mobile platforms to reach the correct app store or download destination.
- Use a single link to redirect customers to geo-specific app stores.
- Create device OS version conditions to offer users the best experience for their device.
- Monitor performance of Campaigns utilizing SmartLinks™.
- Create a dynamic QR Code for use in OTT/CTV.
- Create a dynamic QR Code for print media.
NOTE: The following instructions provide the procedures for creating a basic SmartLink™ for two apps of different operating systems (i.e., iOS and Android).
NOTE: Amazon devices will be redirected to the Google Play Store when an Amazon App is added to a Smartlink™ App Group. For more information, contact your Client Success Managers.
NOTE: Windows devices will be redirected to the Catch-All Destination URL when a Windows App is added to a Smartlink™ App Group. For more information, contact your Client Success Managers.
NOTE: At this time, SmartLink™ does not support BlackBerry due to the fact that the BlackBerry user agent cannot be parsed. For more information, contact your Client Success Managers.
- If not previously setup, create an app. For more information on creating an app, refer to Create/Edit Apps.
NOTE: An app must be created within Kochava for each app that will be associated with the SmartLink™.
App Group User Interface
App Group Location and Organization Tools
App Groups can be easily located by utilizing the search and organization tools.
Live Search Tools:
App Groups can be located using the live search tool by typing part of all of the name of the app group.
App Group Organization:
App Groups can be organized by using one of the following:
Sort –
- Created (Newest)
- Created (Oldest)
- Name (A-Z)
- Name (Z-A)
- SmartLink Count (Asc)
- SmartLink Count (Desc)
- App Count (Asc)
- App Count (Desc)
Creating an App Group
- Click Add an App Group.
- Enter a unique App Group Name.
- Select at least two (2) apps from the drop-down lists.
- Click Submit.
NOTE: More than two (2) apps may be selected, for more information on using SmartLinks™ for more than two apps contact your Client Success Managers.
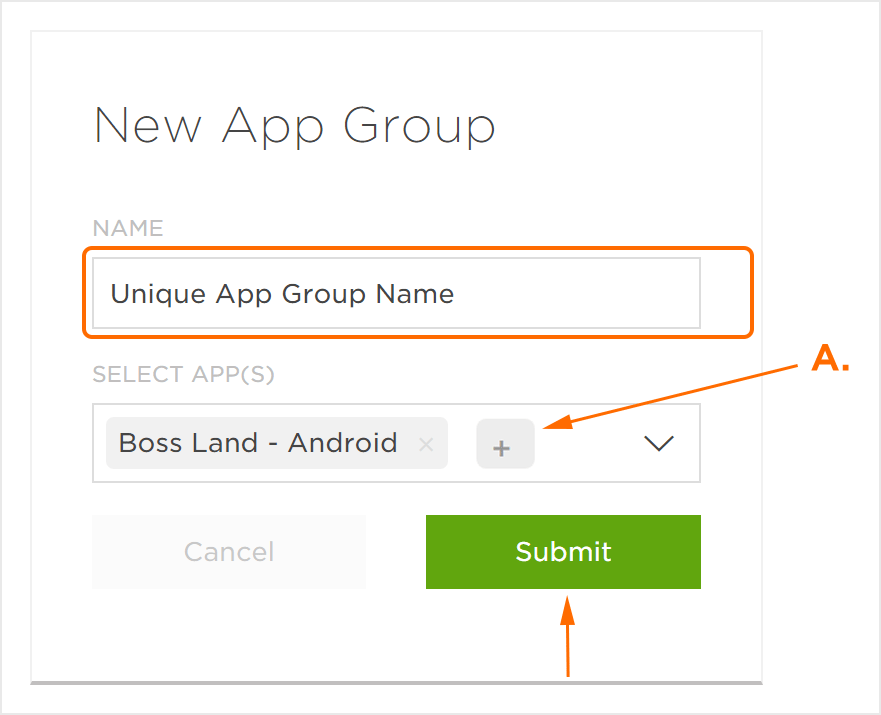
A. Select Apps to Group
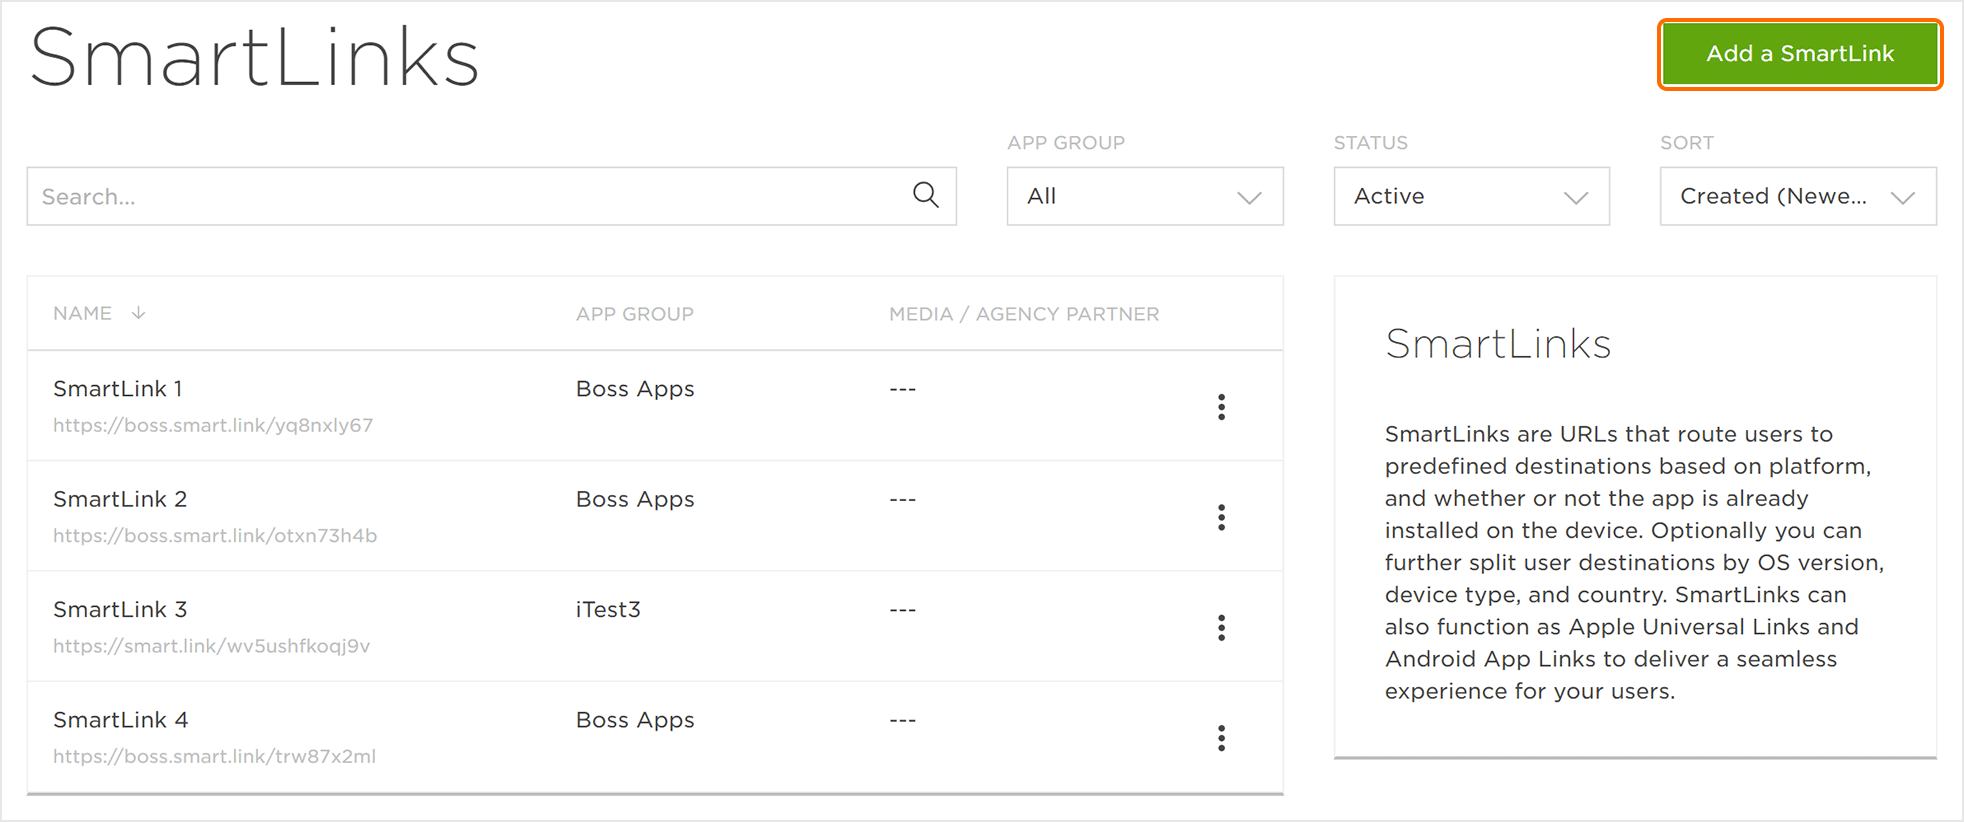
Create a SmartLink™
- Click Add a SmartLink.
- Enter a unique SmartLink™ Name.
- Select an App Group.
- Select a Campaign.
- Select a Media Partner. (optional)
- Check Paid Media. (optional)
- Select an Agency Partner. (optional)
- Select the Domain.
- Select the Universal Link or App Link Destination. (optional)
- Enter the Link Destination.
- Select if the Destination is Supported in the App Clip and Instant App.
- Select the Ad Pricing Model:
- CPI
- CPC
- CPM
- CPA
- CPC/CPI
- CPM/CPI
- Hardcode Cost > Enter a Price manually
- Check Use iOS Universal and Android App Link. (optional)
- Select the Universal Link and App Link Destination if App is Installed:
- App Default
- Custom
- User Created Universal Link or App Link
- Select the desired Conversion Events.
- Enter the Tracker Name.
- Select the Destination if App is Not Installed:
- App Default
- Custom
- App Store Link
- Install Link
- Edit the UTM Parameters. (optional – Android Only)
- Select the desired Conversion Events.
- Enter a unique Tracker Name.
- Select the Destination if App is Not Installed:
- App Default
- Custom
- App Store Link
- Install Link
- Select the Destination if App is Installed:
- Custom
- Deeplink
- Click Add a Destination.
- Enter a Tracker Name.
- Select the Destination if App is Not Installed:
- App Default
- Custom
- App Store Link
- Install Link
- Select the Destination if App is Installed:
- Custom
- Deeplink
- Select a Filter:
- Device > Type
- Device > OS Version
- Geo > Country
- Select a Condition:
- Matches
- Dosen’t Match
- Select the desired Values.
- Enter a Destination.
- Enter a Target App for tracking.
- Add a Custom Parameter. (optional)
- Click Save.
NOTE: If Create New is selected, enter a unique campaign name.
NOTE: If a QR code is needed, do not select a Media Partner. If a media partner is selected, a QR code will not be generated.
NOTE: These are separate integrations from app specific integration. You need to set up postbacks for the universal integration network in partner configuration. Similarly, if they are using custom reconciliation settings for networks, you will need to create these as well.
NOTE: By checking Paid Media, the SmartLink will be managed under the iOS 14 rules and regulations when applicable.
NOTE: By default the domain is set to https://smart.link. If additional domains are required, contact your Client Success Management team for further deails.
NOTE: This option will only appear if Universal Link or App Link support has been setup for the corresponding app.
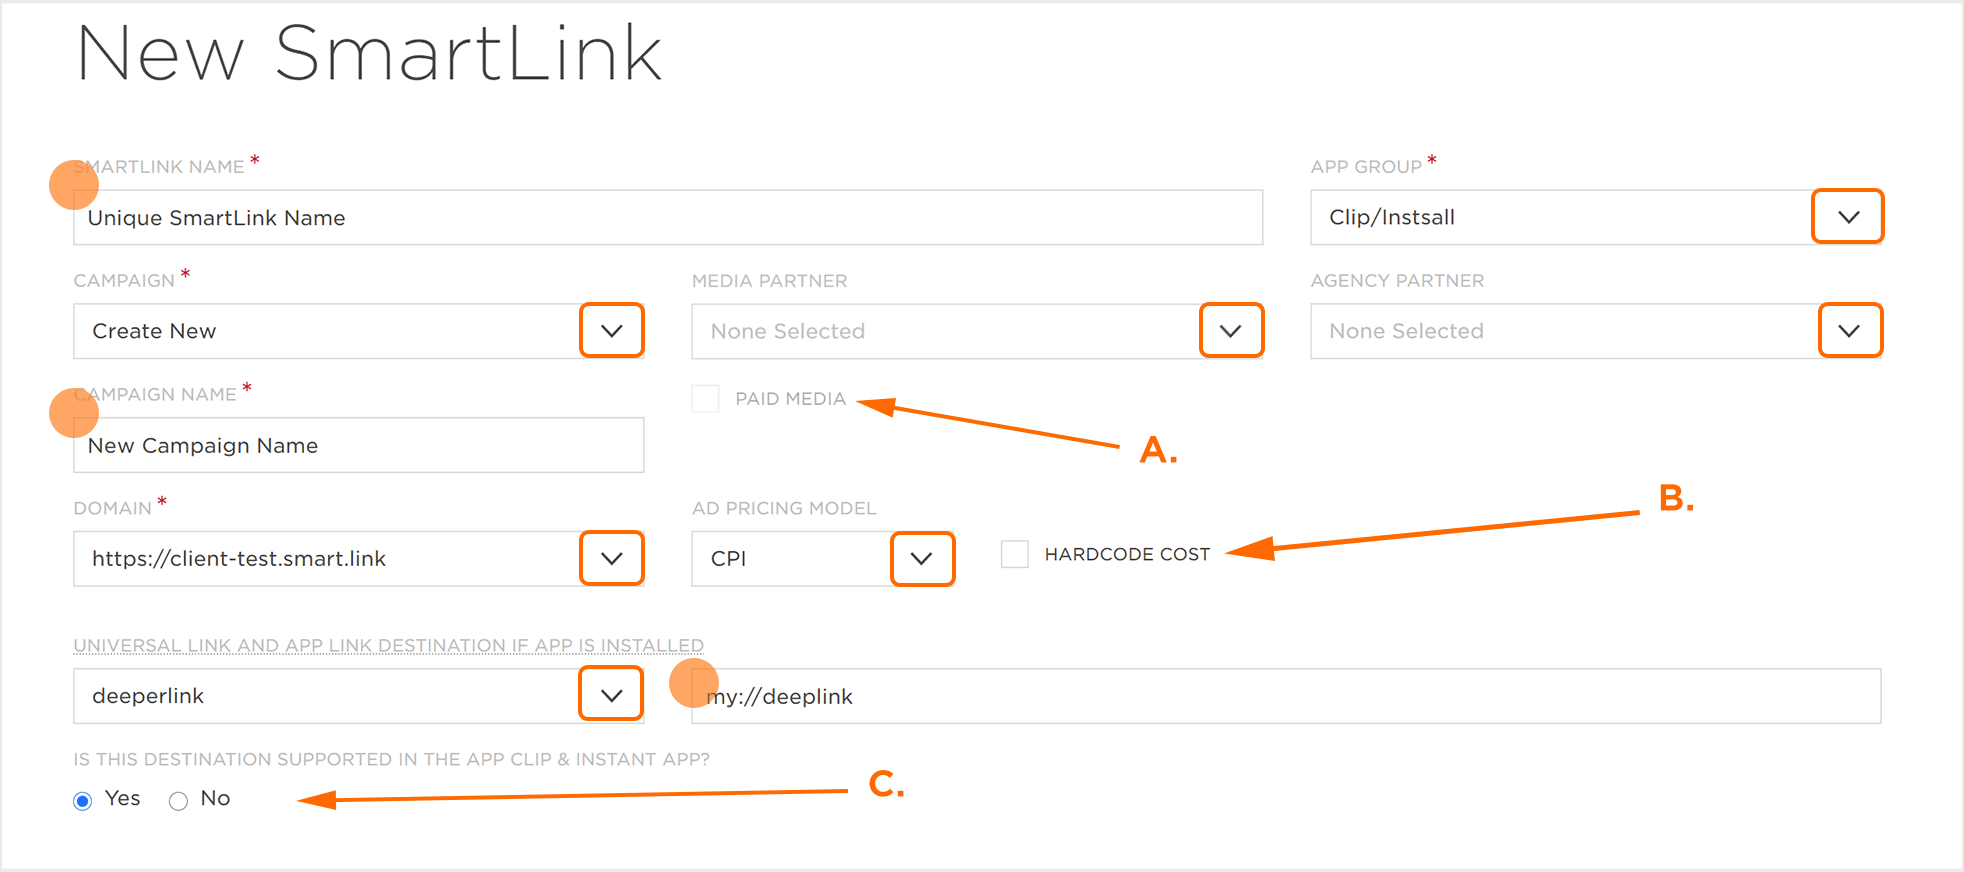
A. Check to indicate Paid Media.
B. Check to enter price manually.
C. Select Yes if the destination is supported in an App Clip or Unstant App.
NOTE: Ensure that the minimum iOS and/or Android SDK version is installed.
NOTE: For information refer to our Adding Universal Link or App Link Support documentation.
NOTE: For more information on Google UTM parameters, refer to our Google UTM Parameters and Install Referrer support documentations.
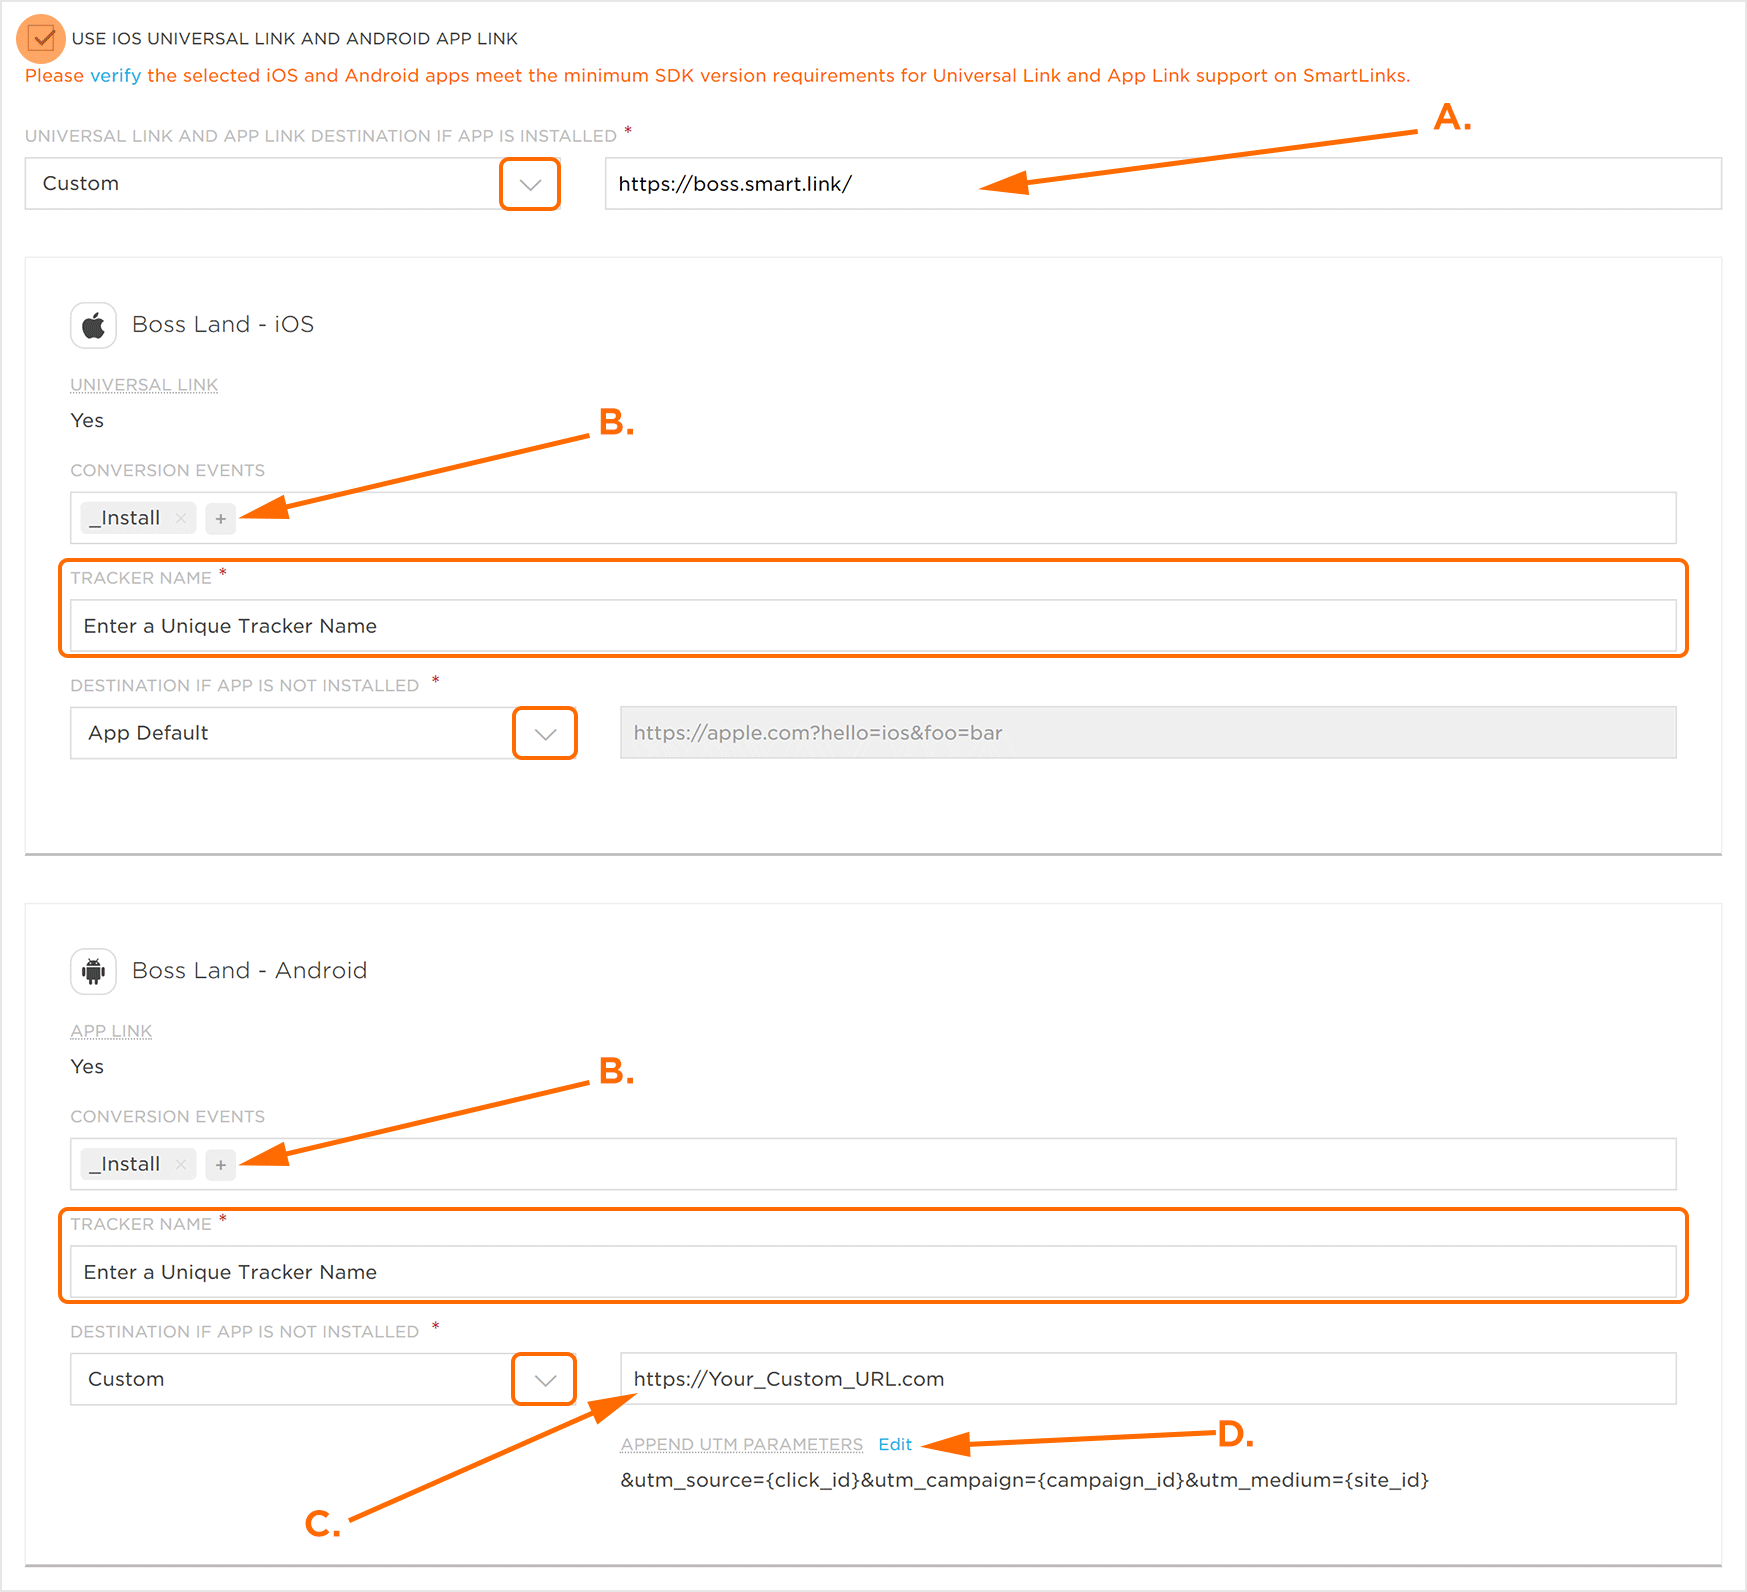
A. If Custom Destination is selected, enter a destination.
B. Click “+” to add a Conversion Event.
C. If Custom Destination is selected, enter the destination.
D. Click to update UTM Parameters.
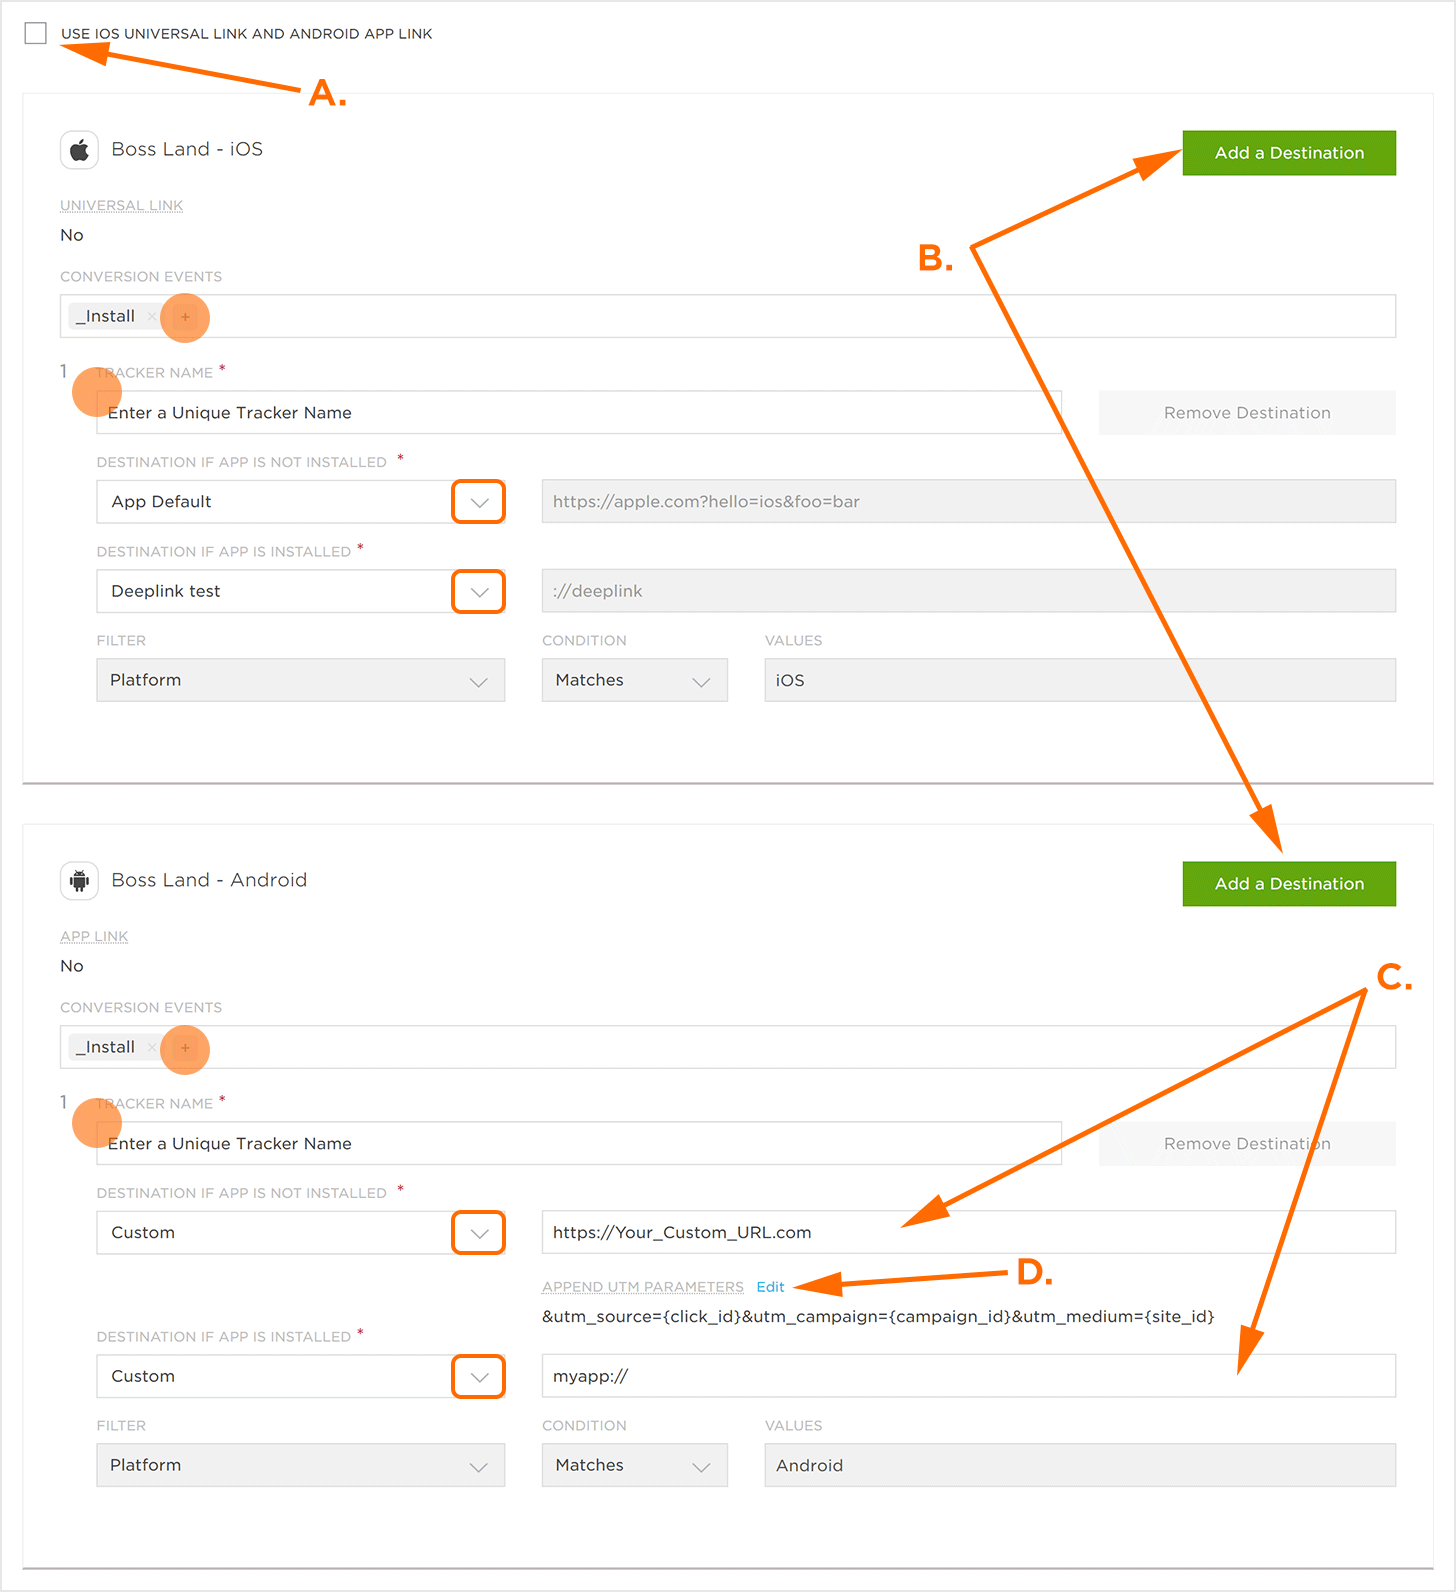
A. Uncheck to enter SmartLink properties manually.
B. Click to add an additional destination.
C. Enter Custom Destination.
D. Click to edit UTM Paramters.
Add A Destination:
NOTE: Filters can be removed by clicking “X”.
NOTE: Destinations may be removed by clicking on Remove Destination.
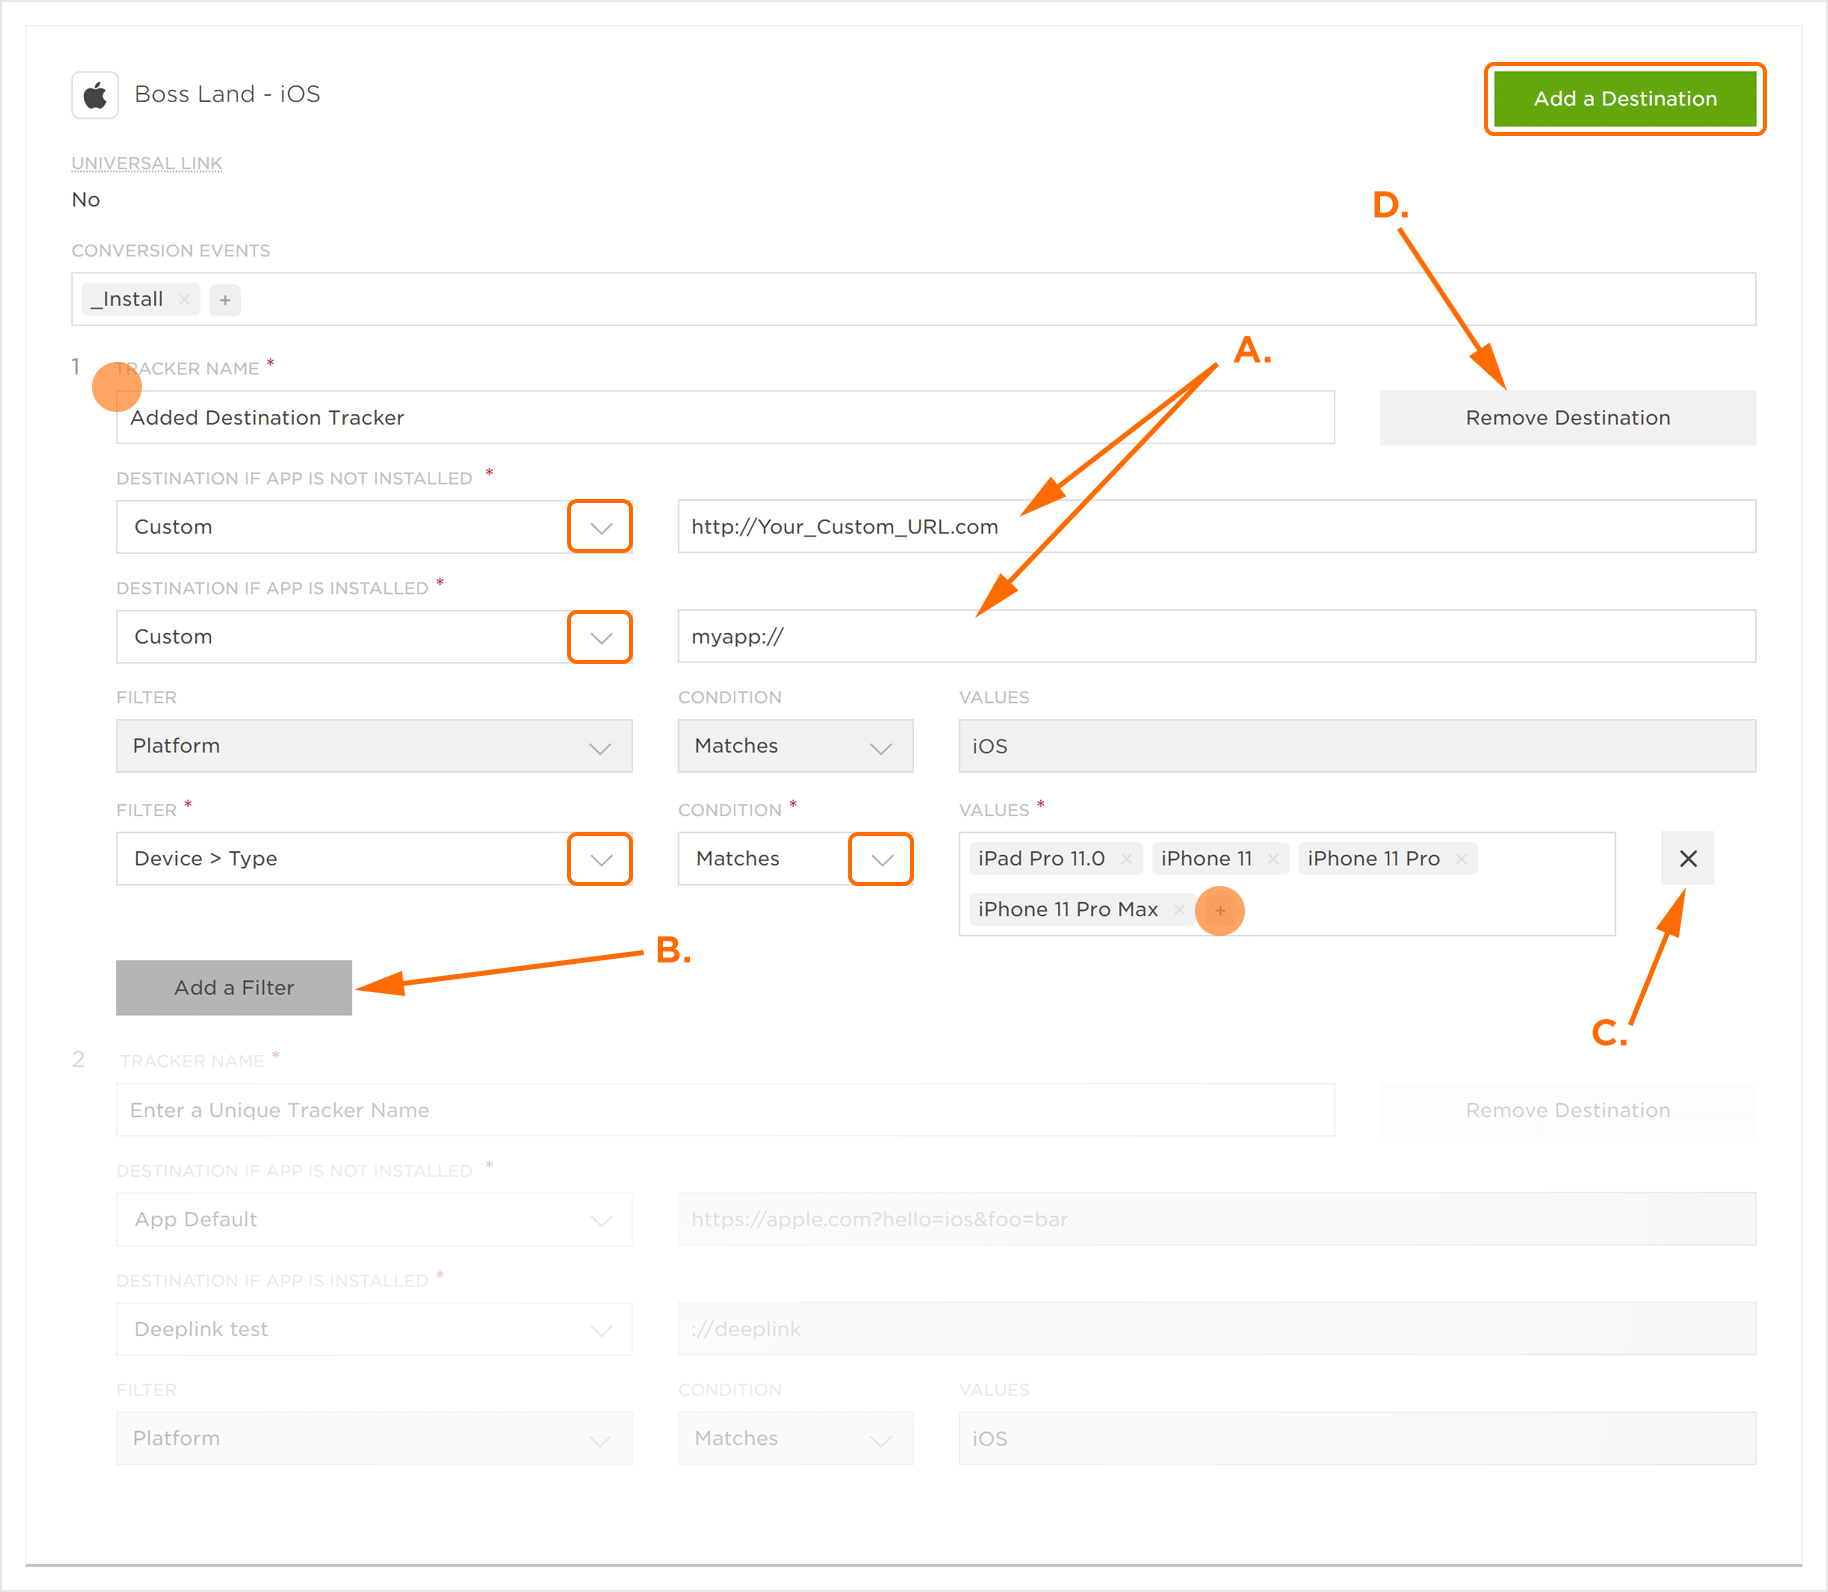
A. Enter Custom Destinations if needed.
B. Click to add an additional filter.
C. Click to remove the filter.
D. Click to remove the destination.
All Other Platforms (Catch-all):
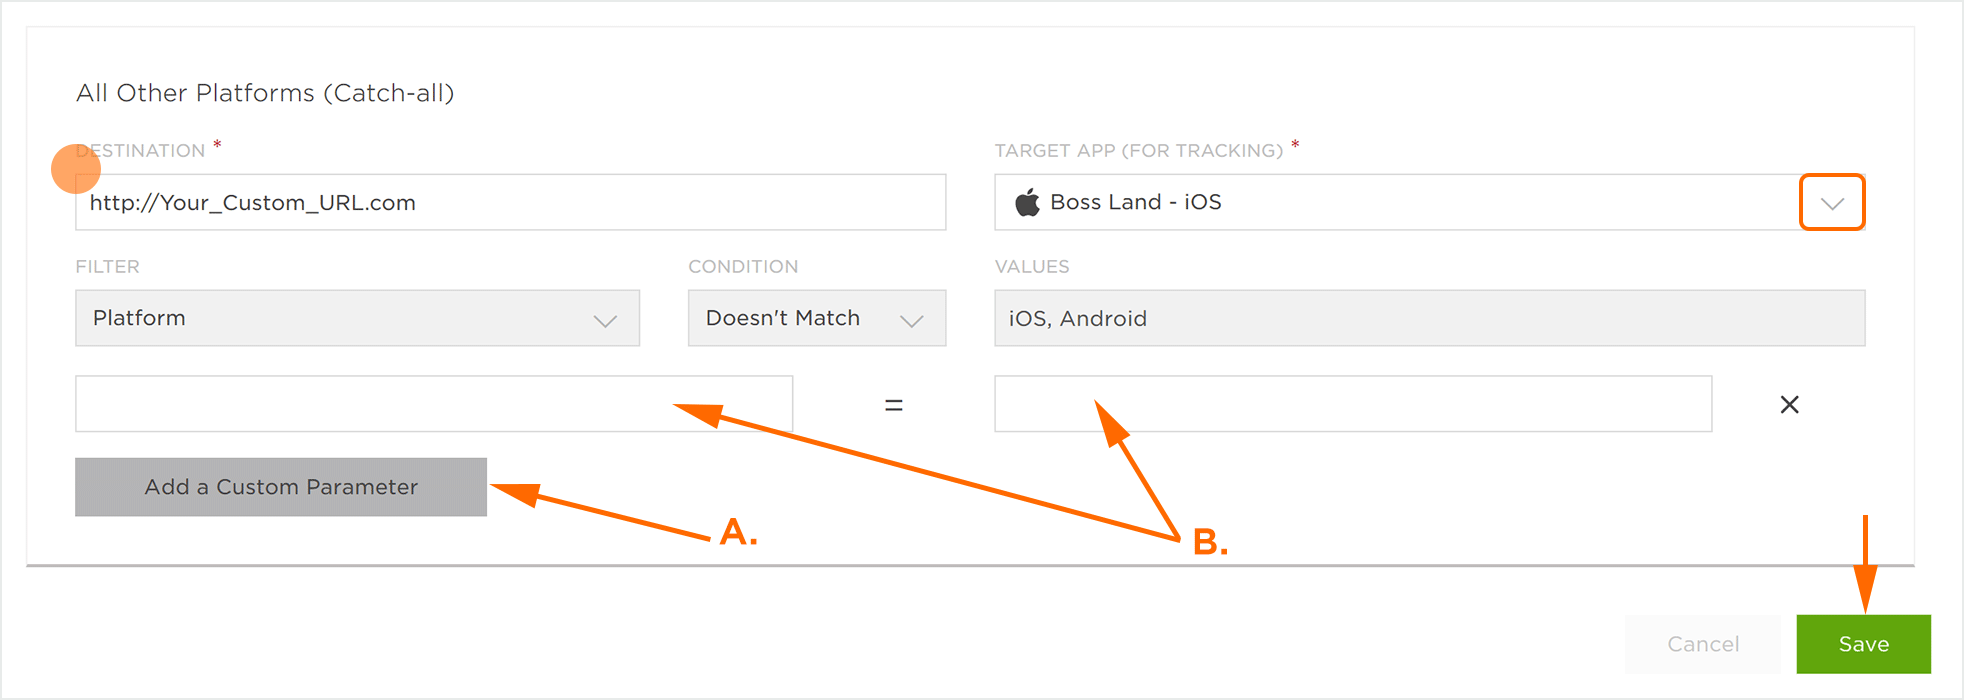
A. Click to add a Custom Parameter.
B. Enter Custom Parameter.
Locating SmartLink™ Click and Impression URLs, and QR Codes
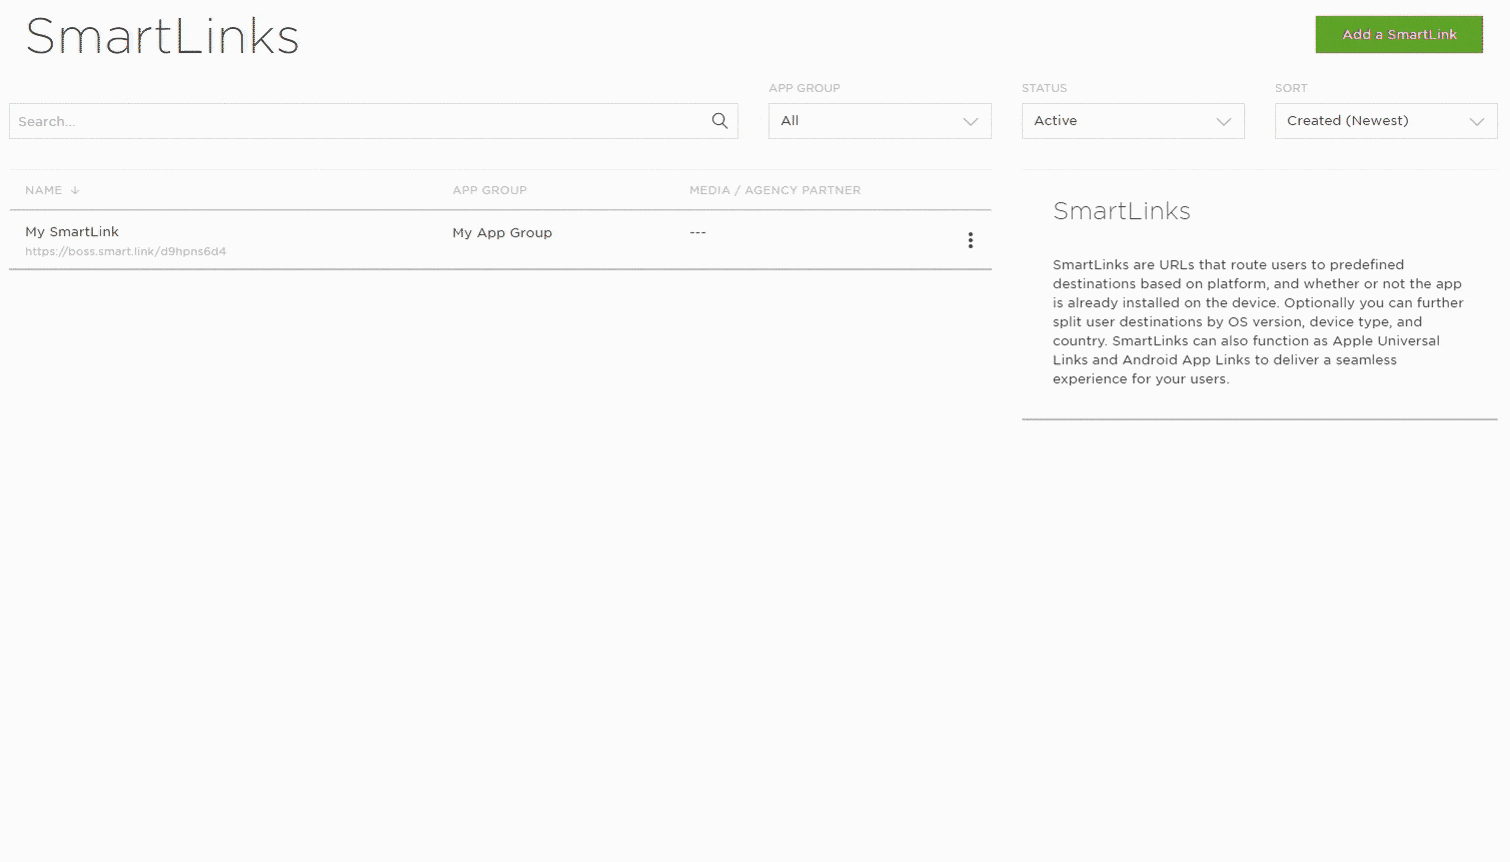
Once a SmartLink™ has been created, the associated Click, Impression URLs and QR code can be easily located from the main SmartLinks™ page.
- Click on the desired SmartLink™.
- The associated SmartLink™ URLs and QR code will be displayed in the detail card.
- Click Copy URL to copy the URL to your local clipboard.
- Click the SVG or JPEG button next to the QR code to download the image.
- Click the QR Code to see a larger preview.
NOTE: QR code will be in the style format dictated by the account settings; either Black and White (Generic) or SmartLinks™ (Kochava-branded).
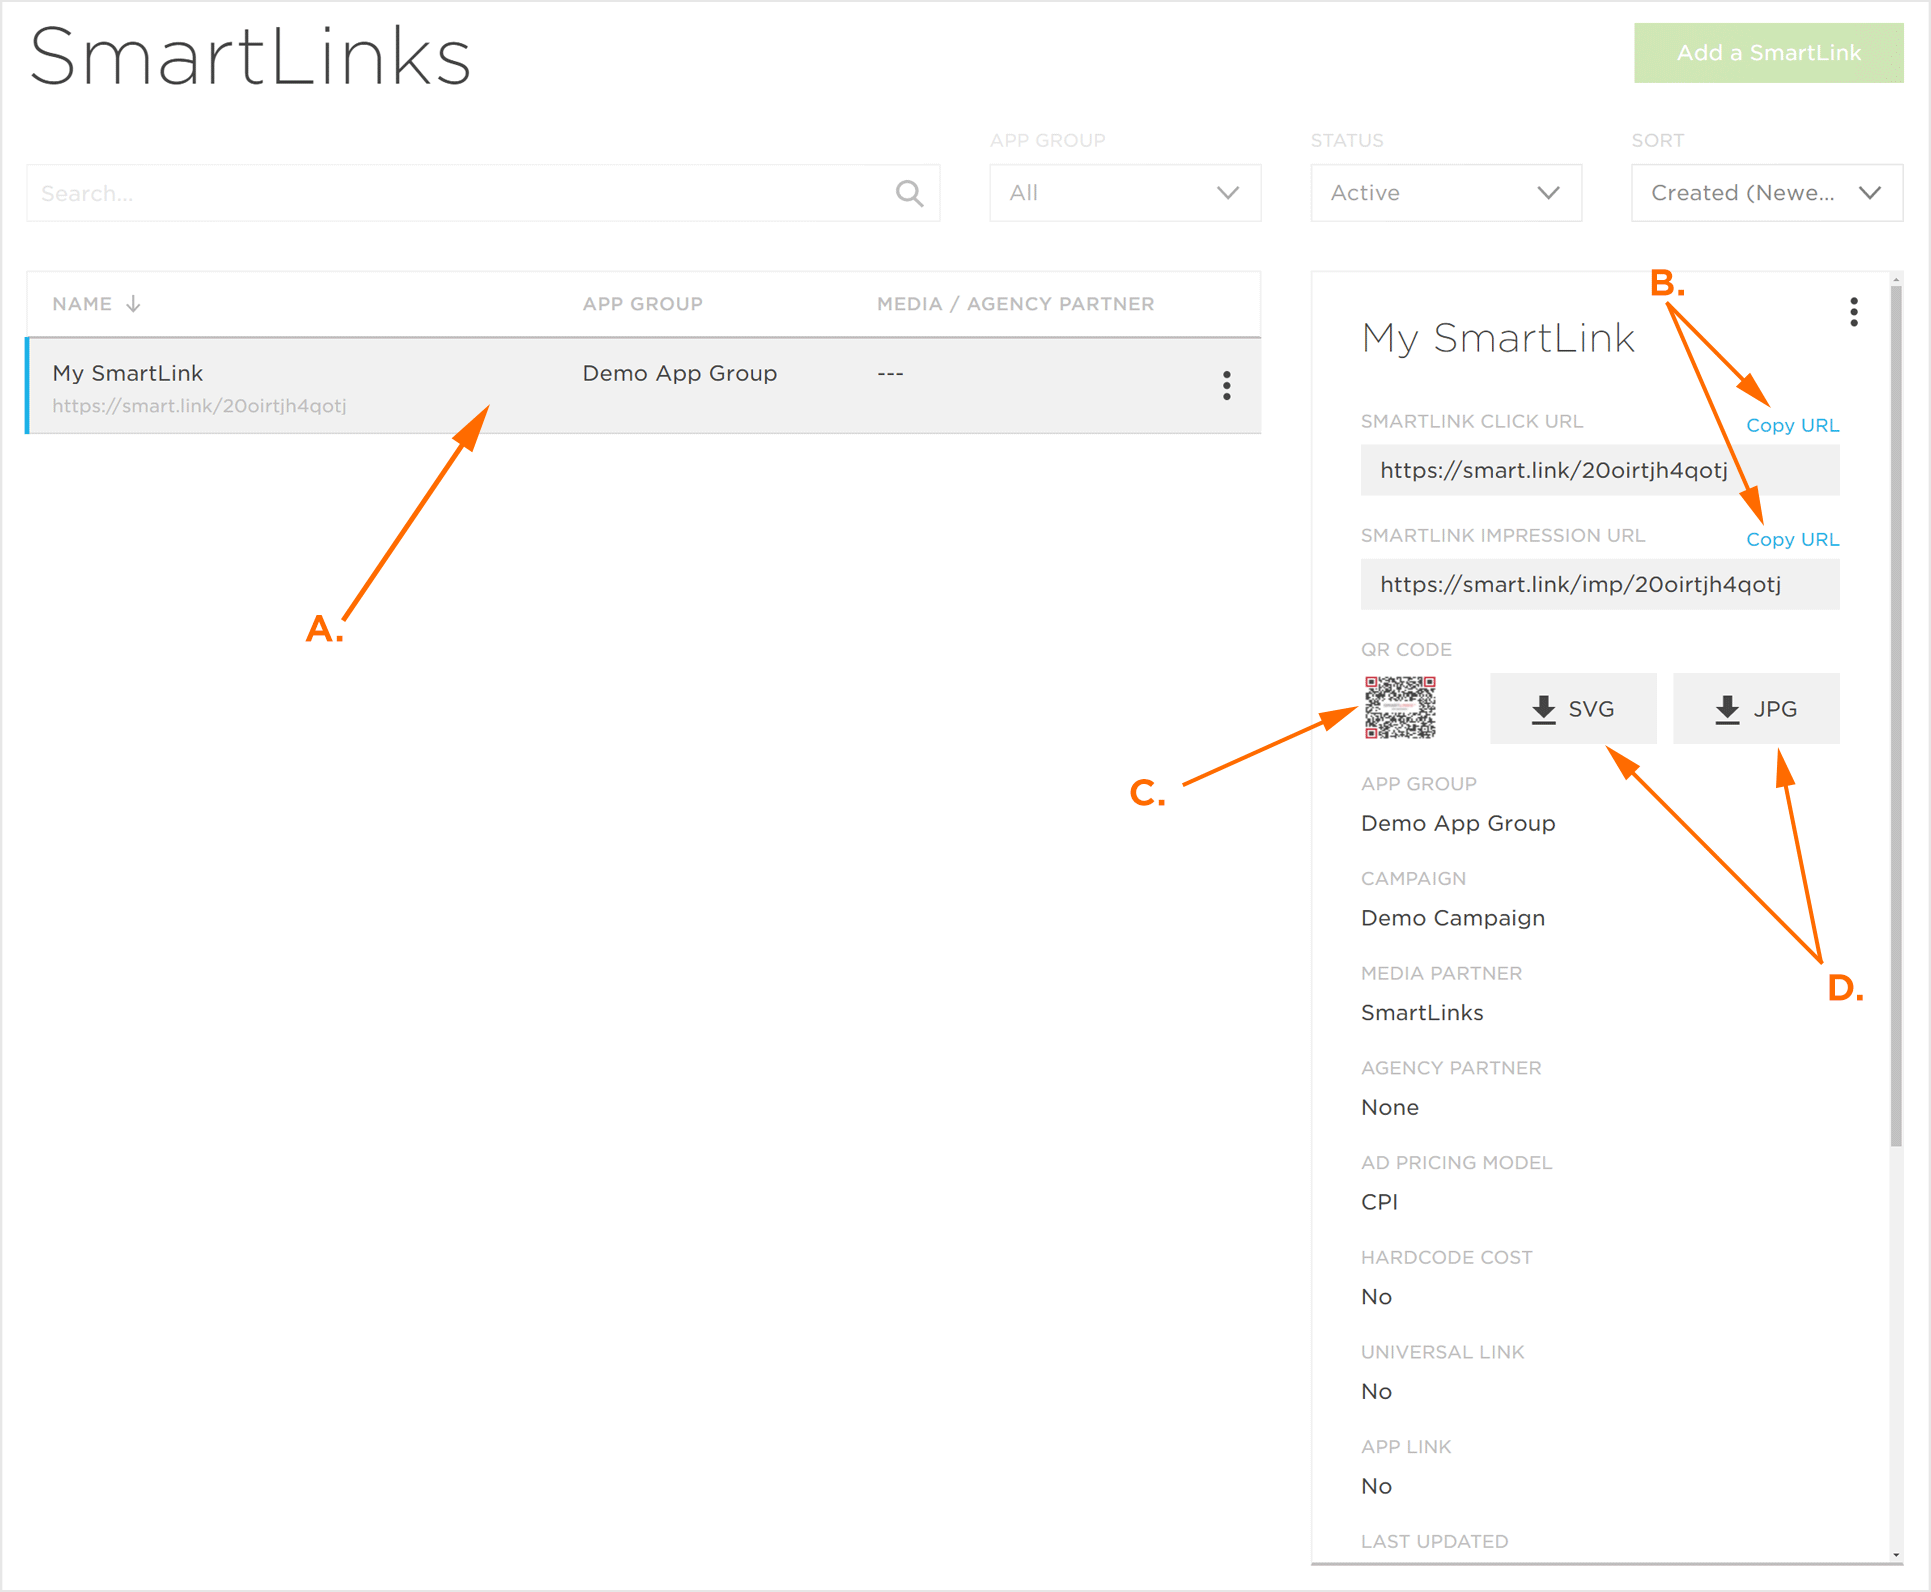
A. Click on desired SmartLink™.
B. Click to copy associated SmartLink™ URL.
C. Click on the QR code to view a larger image. Right-clicking on the image provides the ability to download the QR code.
D. Click to download the QR code in SVG or PNG format.
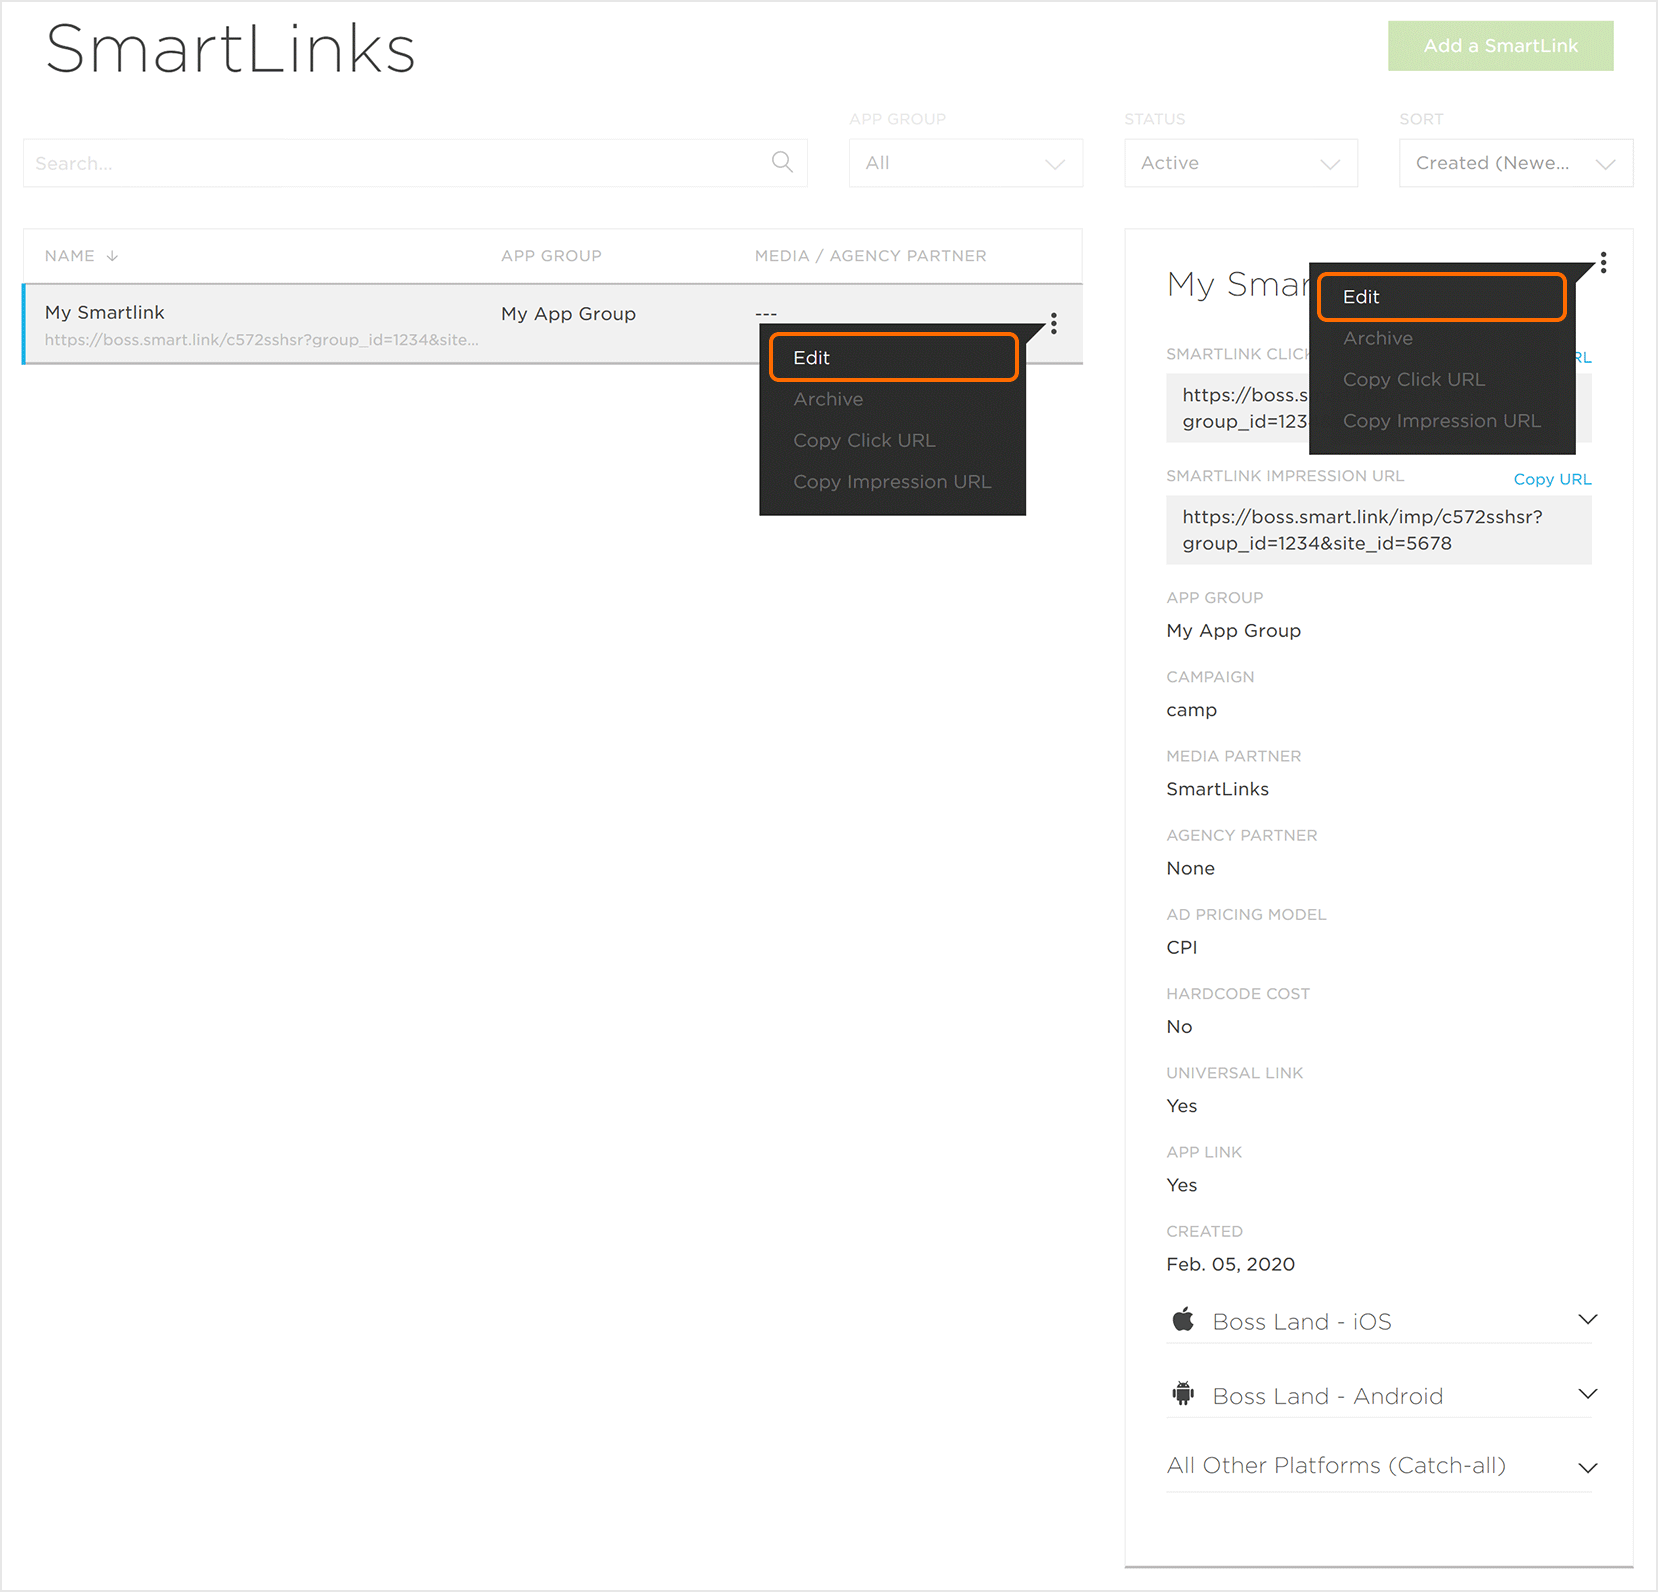
Editing a SmartLink™
NOTE: If not already on the SmartLinks™ page, navigate to the Links > SmartLinks™ page.
- Log in to Free App Analytics.
- Select the desired Account and App.
- Select Links > SmartLinks™.
- Locate and Click on the desired SmartLink™.
- Click the SmartLink™ Tools menu (⋮) > Edit.
- Update the desired settings.
- Click Save.
Tracking SmartLinks™
Once a SmartLink™ has been created, a tracker for the SmartLink™ and All Other Platforms (Catch-all) will be created, and those trackers can be easily viewed through the Campaign Manager.
- Locate and Click on the desired SmartLink™.
- At the bottom of the SmartLink™ detail card, Click the SmartLink™ Detail Chevron.
- Click on the Jump to Campaign.
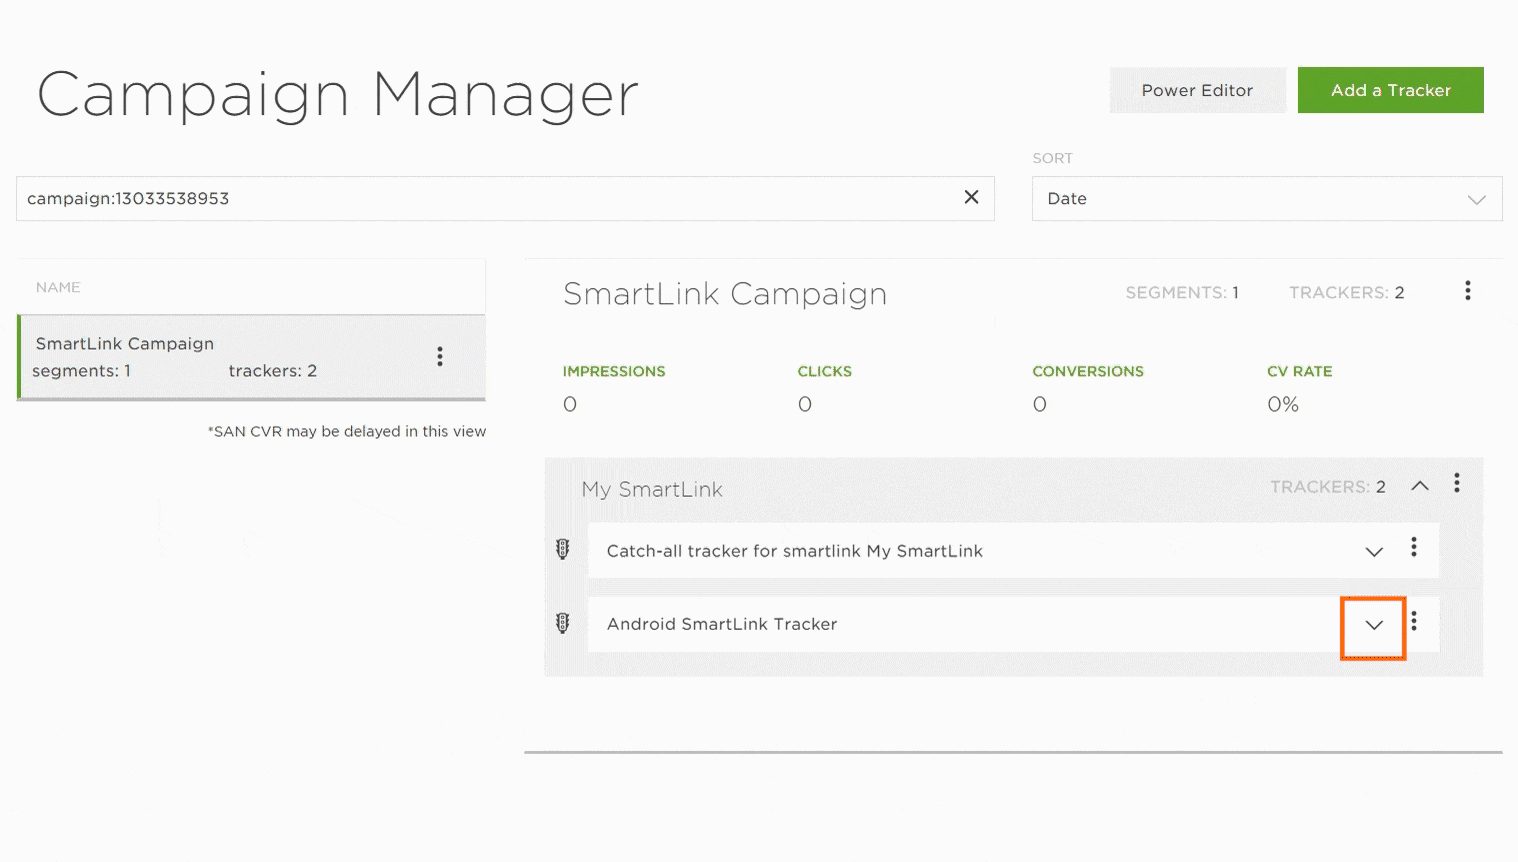
- Click the SmartLink™ Tracker expand button.
NOTE: The All Other Platforms (Catch-all) tracker will be located in the SmartLink™ App for Targeting (i.e., Android or iOS).
A. Click to Expand.
B. Click to be taken to the associated campaign.
NOTE: Clicking on the Jump to Campaign button will navigate you to the SmartLink™ campaign located within the associated app.
NOTE: The “Catch-all” tracker will be located with the Target App (For Tracking) tracker.
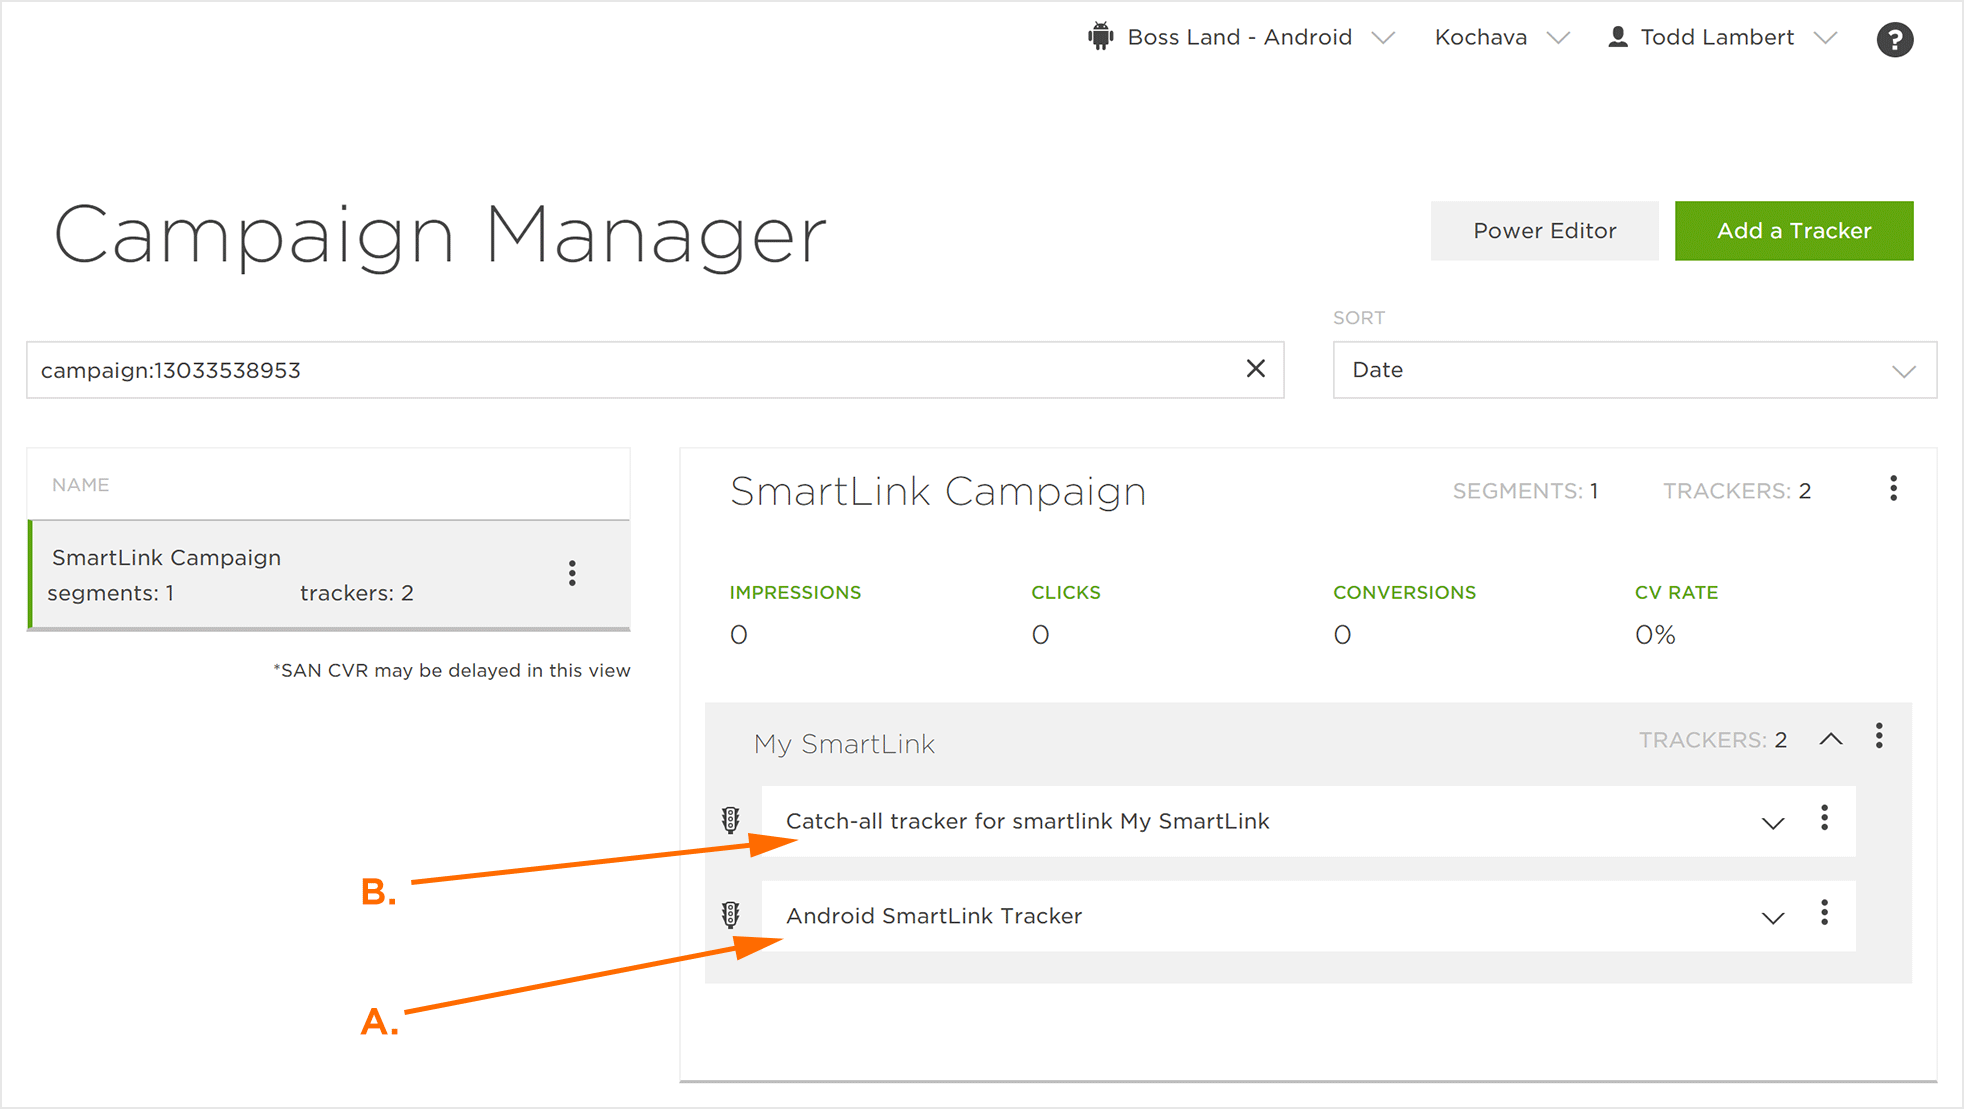
A. SmartLink Tracker
B. Catch-All Tracker
NOTE: By expanding the SmartLink™ Tracker, data such as Impressions, Clicks, Click Rate, Conversions and CV Rate are displayed.
NOTE: By selecting Tracker Tools > Edit SmartLink, the UI will be redirected to the SmarkLink edit page.
NOTE: By clicking on Jump to SmartLink will navigate you to the associated SmartLink™.
NOTE: By expanding the Default Destination “Catch-All” tracker, data such as Impressions, Clicks, Click Rate, Conversions and CV Rate will be displayed.
NOTE: The trackers associated with a SmartLink™ are not editable. Any changes that are required, need to be made at within the SmarkLink interface
Locating QR Code Data
Once Kochava has started receiving data associated with the QR codes, that data will be propagated in the following ways:
Reporting:
- Summary Reports (Campaign/Network): traffic > optional qr_code.
- Install Report: optional click column click_from_qr_code — true or blank
- Click Report: optional column click_from_qr_code — true or blank
- Event Report: optional click column click_from_qr_code — true or blank
- Reengagement Report: optional column click_from_qr_code — true or blank
- Click Multi-Touch Attribution Report: included by default clickwin_from_qr_code — true or blank
Two new fields will be added to the report install_matched_to_click_from_qrcode_count and click_from_qrcode_count. The volume in these two fields is a subset of the install_matched_to_click and click_count.
NOTE: The click volume for the QR Code(s) will always be included in the install_matched_to_click and click_count columns. Adding qr_code as a traffic option simply controls whether the two additional QR Code specific columns are added to the report.
Analytics:
- Events Volume: Split by > QR Code — true or false
- Event Detail: Split Event Volume By > QR Code — true or false
- Cost & ROI: Split by > QR Code — true or false
- LTV: Split by > QR Code — true or false
- Retention: Split by > QR Code — associated retention data displayed
- Retention Advanced: Split by > QR Code — associated retention data displayed
- Explorer: Dimensions > QR Code — true or false
Query:
- Click Primary Table: qr_code — true or false
NOTE: The qr_code value will be blank previous to, as well as part of, May 14th 2020.