
Data Needed Before Beginning Process:
- Tubi Ads Product ID.
- Tubi Ads Event Name.
Create a Tracker for a Tubi Ads Install Campaign
- Log in to Free App Analytics.
- Select the desired Account and App.
- Select Links > Campaign Manager.
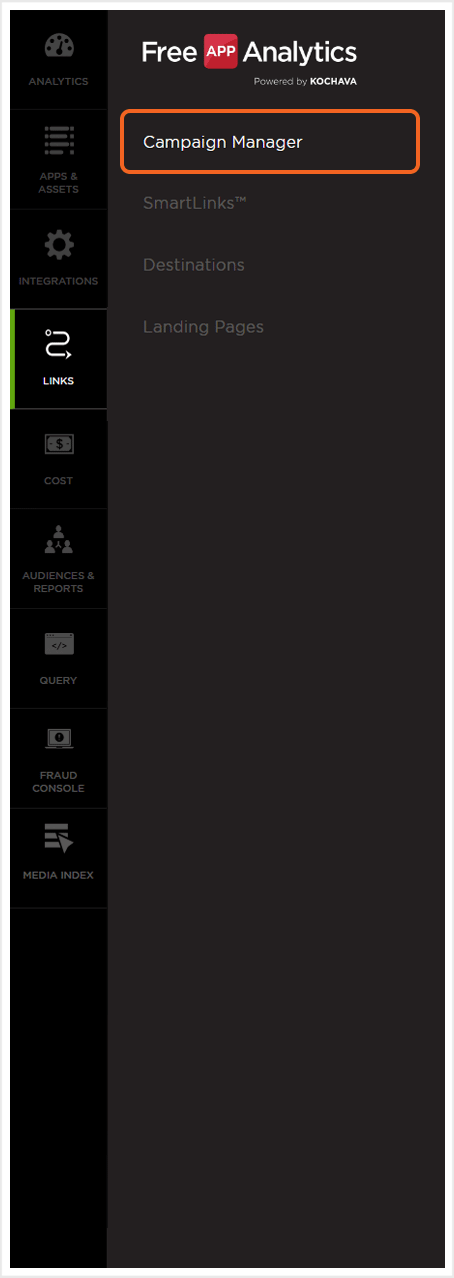
- Click Add a Tracker or Select Segment Tools (⋮) > Add a Tracker.
- Select the Campaign.
- Select the Segment.
- Enter the Tracker Name.
- Select Tracker Type > Acquisition. (default setting)
- Select Media Partner > Tubi – SAN.
- Select Agency Partner. (optional)
- Enter the Destination URL.
- Enter a Deep Link. (optional)
- Enter any Custom Parameter(s). (optional)
- Click Save. (If no further trackers need to be created)
- Click Save & Add Another Tracker. (If additional trackers need to be created)
- Click Save & Create Postback (to navigate directly to the Partner Configuration page).
NOTE: In order to streamline the Campaign/Segment/Tracker creation process a feature has been added to allow the creation of campaigns and segments while creating a new tracker. For more information about creating a campaign or segment while adding a new tracker, refer to our Create an Install Campaign support document.
![]()
NOTE: When a Tracker is created, Free App Analytics automatically generates a name for the Tracker. We recommend that you replace the Tracker name at this point with a clear name of your choosing.
NOTE: The Destination URL is not relevant and should simply be your website.
![]()
Install Postback Configuration
- Select Apps & Assets > Partner Configuration.

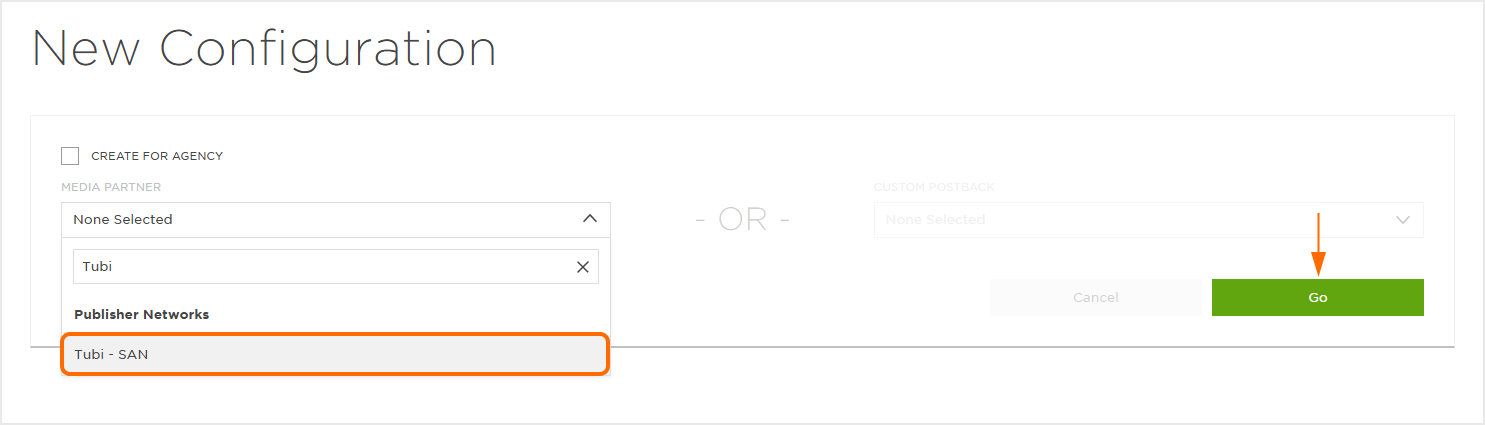
- Click Add a Configuration.
- Select Media Partner > Tubi – SAN.
- Click Go.
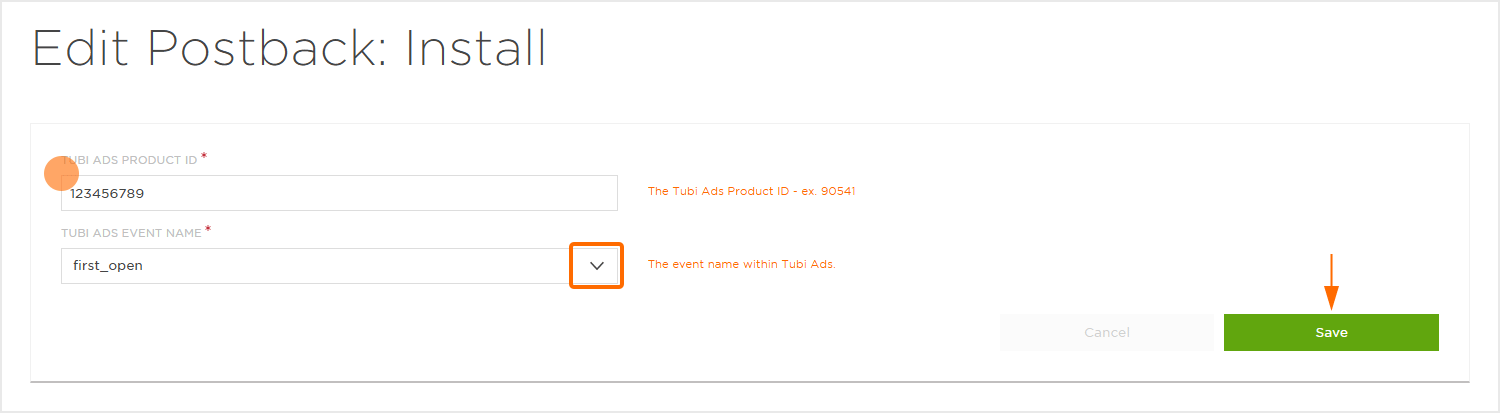
- Select Install > Postback Tools (⋮) > Edit.
- Enter the Tubi Ads Product ID.
- Enter the Tubi Ads Event Name for the product.
- Click Save.
Reengagement Configuration
The information within this section provides the steps necessary to establish a reengagment campaign. If a reengagment campaign does not need to be created, the information in this section may be disregarded.
NOTE: If a reengagement campaign does not need to be set up, but the data associated with post-install events needs to be sent to Tubi Ads follow the steps within the Create a Postback Section below.
Create a Reengagement Segment:
- Locate the desired Campaign.
- Select Campaign Tools (⋮) > Add a Segment.
- Enter a Segment Name.
- Enter a Segment Description. (optional)
- Click Submit.
Create a Reengagement Tracker:
- Click Add a Tracker or Select Segment Tools (⋮) > Add a Tracker.
- Select the Campaign.
- Select the Segment.
- Enter a Tracker Name.
- Select Tracker Type > Reengagement.
- Select Media Partner > Tubi – SAN.
- Select an Agency Partner. (optional)
- Select ALL the Tubi Ads Events (including _Install).
- Click Save (If no further trackers need to be created).
- Click Save & Create Postback (to navigate directly to the Partner Configuration page).
NOTE: A Reengagement event can be added by clicking on the “+” and removed by clicking “X“.
![]()
Post-Install Event Postback Configuration:
- Select Apps & Assets > Partner Configuration.
- Select Tubi – SAN > Network Tools (⋮) > Postbacks.
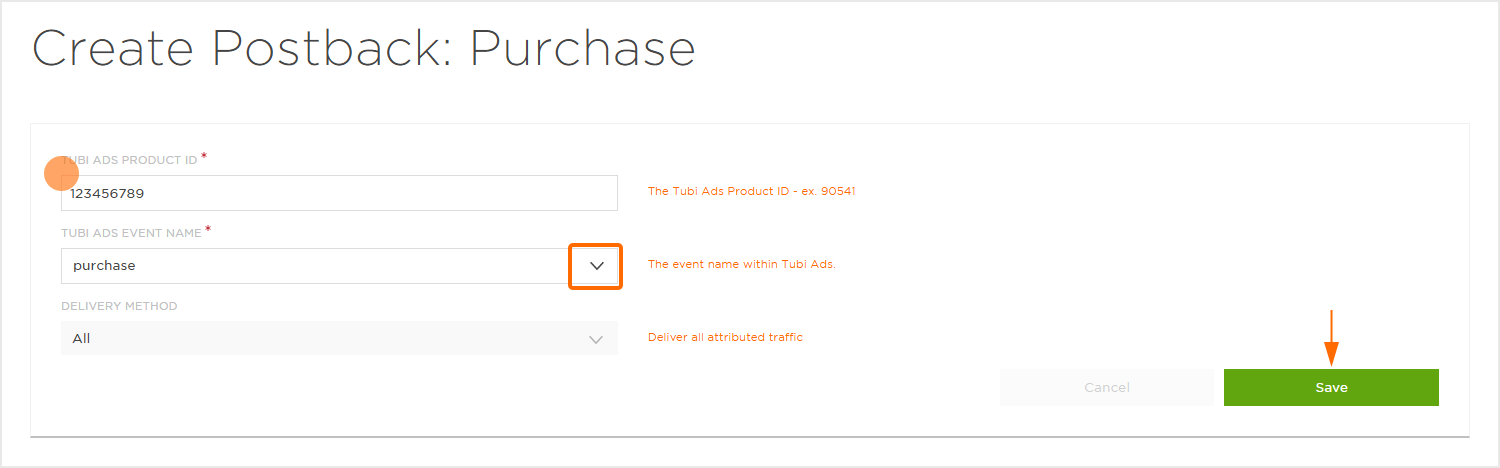
- Locate the desired event and Click Create for a new configuration or Edit for an existing configuration.
- Enter the Tubi Ads Product ID.
- Enter the Tubi Ads Event Name.
- Click Save.
Standard Post-Install Event List:
| Key | Description |
|---|---|
| page_visit | User lands on a webpage. |
| page_visible | Page becomes visible (foregrounded). |
| page_hidden | Page becomes hidden (backgrounded). |
| engaged_visit | User spends quality time or interacts. |
| item_view | User views a product or item detail page. |
| click_on_page | User clicks on a specific element. |
| purchase | A successful transaction/order is placed. |
| add_to_cart | Item is added to shopping cart. |
| add_to_wishlist | Item is saved to wishlist. |
| sign_up | User completes sign-up or registration. |
| checkout | Checkout process starts or completes. |
| lead | Form submitted or interest expressed. |
Click and Impression Attribution Macros:
Click-through attribution, also known as click tracking, is the term used when a click leads to a user action within a certain attribution window. View-through attribution, also known as impression tracking, is the term used when an impression leads to a user action within a certain attribution window. The attribution window is supported for 30 day click lookback and 14 day impression lookback to meet your business needs.
| URL Parameters |
Description | Type |
|---|---|---|
| device_id_type | The device ID type that served the impression or completed the click. | string |
| timestamp | Timestamp of impression and click. | integer |
| campaign_name | The campaign name associated with impression and click. | string |
| campaign_id | Campaign ID of impression and click. | string |
| creative_name | The creative name associated with impression and click. | string |
| creative_id | Creative ID of impression and click (Tubi Ads). | string |
| country | Country of click or impression. | string |
| traffic_source | The traffic source from which the ad was served | string |
| ad_type | The ad type that was served. | string |
| source | The source from which the impression or click was received. | string |