NOTE: This product is currently in a Google Beta program and requires Google Whitelisting/Approval to receive a valid ‘link_id’ for this integration function.
Data Needed Before Beginning Process:
- App Bundle ID (Obtained from app developer, app manager or app store)
- Advertiser ID (Provided by DoubleClick ‘src=’ parameter of your floodlight tag)
- Activity Tag (Provided by DoubleClick ‘cat=’ parameter of your floodlight tag)
- Group Tag (Provided by DoubleClick ‘type=’ parameter of your floodlight tag)
- Authorization Token (Provided by DoubleClick)
Floodlight Tag Example –
https://ad.doubleclick.net/ddm/s2s/appactivity/src=1234567;cat=fghij456;
type=abcde123;u1=[friendlyname1];ord=1312312312
- src is the advertiser ID that is the source of the Floodlight activity.
- cat is the activity tag string, which Floodlight servers use to identify the activity group to which the activity belongs.
- type is the group tag string, which identifies the activity group with which the Floodlight activity is associated.
- u1, u2 … (if available) are the custom Floodlight variable key-values.
For more information on tracking DBM/DCM campaigns via Free App Analytics have a look at this site:
https://developers.google.com/app-conversion-tracking/third-party-trackers/doubleclick-integration
Use Cases for DoubleClick Campaign:
- An app marketing campaign with Google DoubleClick has been created.
NOTE: The DoubleClick setup process for iOS and Android is similar and therefore this document will cover the setup for both operating systems, with specific differences noted.
NOTE: DoubleClick is one of Free App Analytics’ integrated partners which claims its own installs, this type of integration is known as a SAN (Self Attributing Network). DoubleClick will always claim its own installs, with the exception of mobile web inventory or any inventory that does not have access to a device ID. This means that conversions claimed by DoubleClick may subsequently be attributed by Free App Analytics to other networks. It is therefore expected for Free App Analytics to show fewer installs than are shown in the DoubleClick system. It also means that Free App Analytics does not impose the lookback window setup within Free App Analytics on install claims, so the effective lookback window for post-impression and post-click installs will be the settings configured within the DoubleClick UI.
NOTE: Free App Analytics must receive a valid device ID on every install.
NOTE: For mobile web inventory Free App Analytics recommends using a smartlink and serving it via the DoubleClick ad server. For more information about smartlinks, refer to our Create a Smartlink support documentation.
Create a DoubleClick Campaign
- Log in to Free App Analytics.
- Select the desired Account and App.
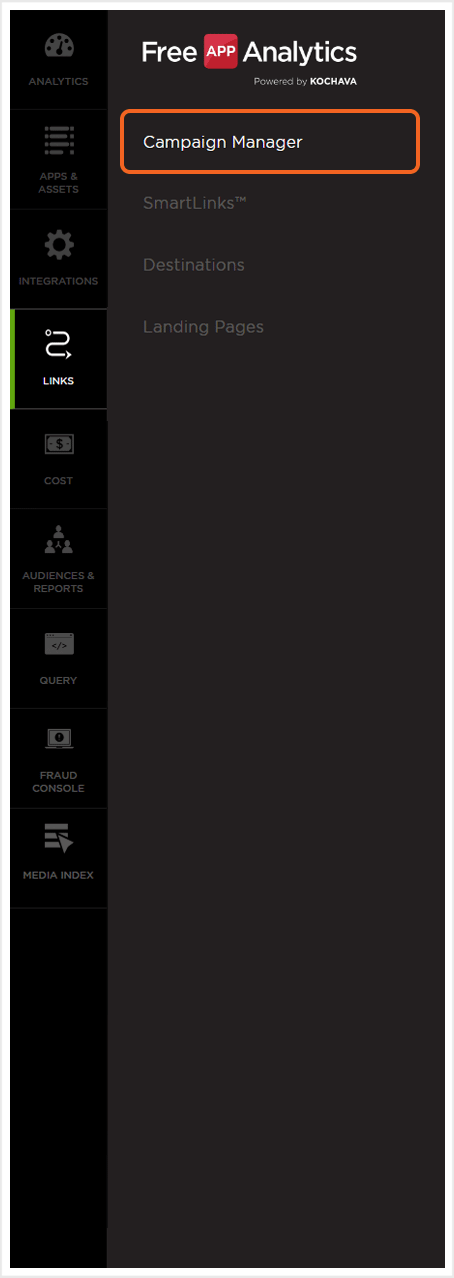
- Select Links > Campaign Manager.
- Click Add a Tracker or Select Segment Tools (⋮) > Add a Tracker.
- Select the Campaign.
- Select the Segment.
- Enter the Tracker Name.
- Select Tracker Type > Acquisition. (default setting)
- Select Media Partner > Doubleclick.
- Select an Agency Partner. (optional)
- Enter a Deep Link. (not required)
- Custom Parameters. (not required)
- Enter Pricing. (optional)
- Click Save. (If no further trackers need to be created).
- Click Save & Add Another Tracker. (If additional trackers need to be created).
- Click Save & Create Postback. (To navigate directly to the Partner Configuration page).
NOTE: In order to streamline the Campaign/Segment/Tracker creation process a feature has been added to allow the creation of campaigns and segments while creating a new tracker. For more information about creating a campaign or segment while adding a new tracker, refer to our Create an Install Campaign support document. support documentation.
![]()
NOTE: When a Tracker is created, Free App Analytics automatically generates a name for the Tracker. We recommend that you replace the Tracker name at this point with a clear name of your choosing.
![]()
A. Campaign and Segment selection/creation section.
Create an Install Postback Configuration
NOTE: For Google DoubleClick to receive post-install event information, a re-engagement tracker must be created for the events you wish to pass to Google DoubleClick.
- Select Apps & Assets > Partner Configuration.

- Click Add a Configuration.
- Select Network Partner > Doubleclick.
- Click Go.
- Select Install > Postback Tools (⋮) > Edit.
- Enter the App Bundle ID.
- Enter the Advertiser ID.
- Enter the Activity Tag.
- Enter the Group Tag.
- Enter the Authorization Token.
- Enter desired U Parameters. (default values listed below)
- U1 Parameter Mapping: event_name
- U2 Parameter Mapping: item_id
- U3 Parameter Mapping: item_name
- U4 Parameter Mapping: item_quantity
- U5 Parameter Mapping: items_in_basket
- U6 Parameter Mapping: item_added_from
- U7 Parameter Mapping: revenue, sum
- U8 Parameter Mapping: currency
- U9 Parameter Mapping: duration
- U10 Parameter Mapping: hours_played
- U11 Parameter Mapping: achievement_name
- U12 Parameter Mapping: level_name
- U13 Parameter Mapping: level_number
- U14 Parameter Mapping: referral_from
- U15 Parameter Mapping: sessions_played
- Select the Delivery Delay. (optional)
- Select the Retry Attempts. (optional)
- Add Floodlight Tags. (optional)
- Click Save.

NOTE: For Android the Bundle ID is easily located in the URL of the app on the Google Play store (id=com.packagename). For iOS, refer to our Locating the Apple Bundle ID support documentation.
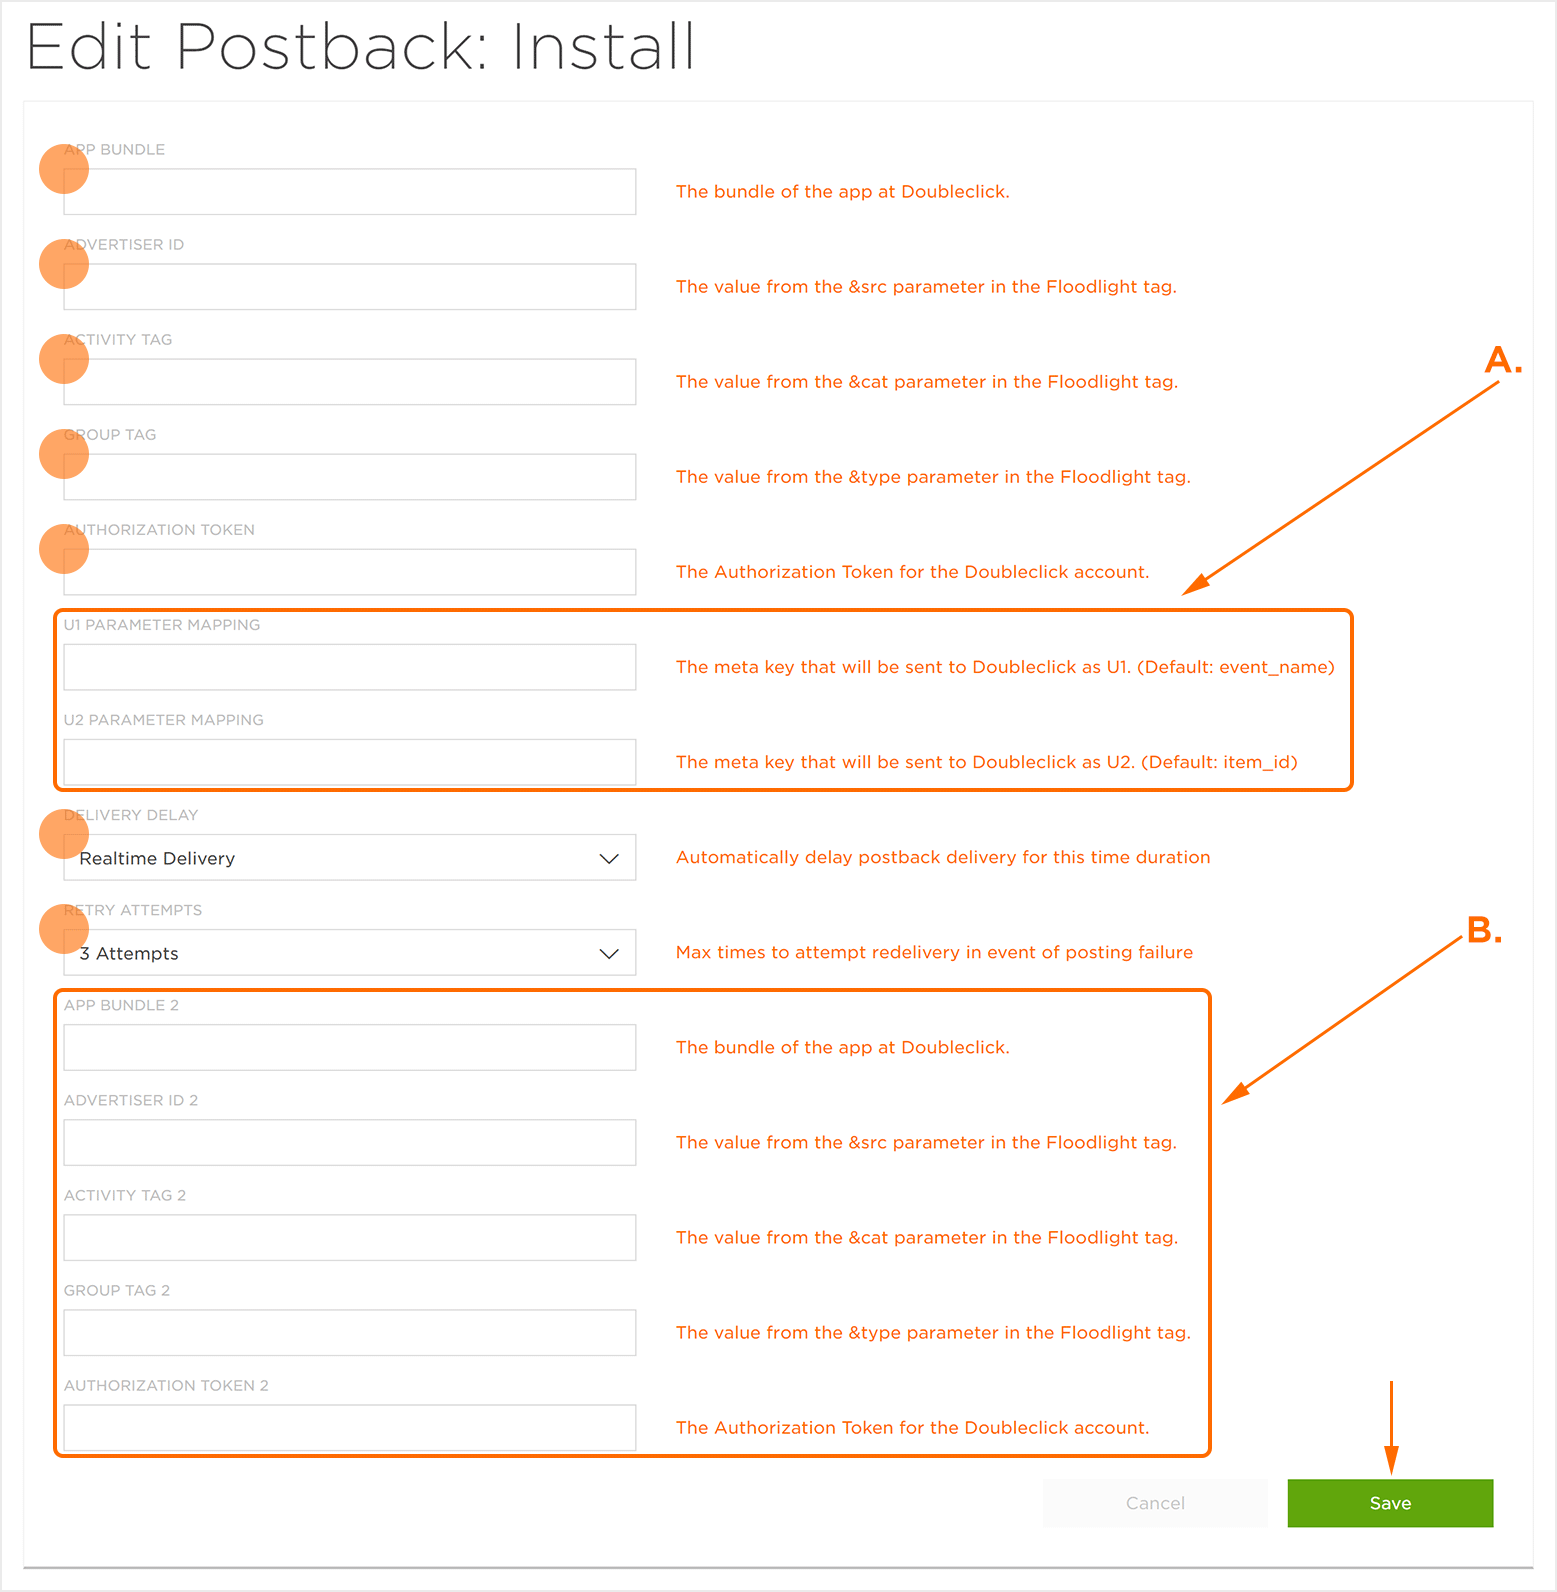
A. Up to 15 U Parameters may be added. In order to conserve space, the above image has been shortened.
B. Up to 10 floodlight tags may be added.
NOTE: With our integration we support multiple floodlight tags to be entered.
Create a Post-Install Postback Configuration
- Select Apps & Assets > Partner Configuration.

- Click Add a Configuration.
- Select Network Partner > Doubleclick.
- Click Go.
- Locate the desired Post-Install Event and Click Edit Postback.
- Enter the App Bundle ID.
- Enter the Advertiser ID.
- Enter the Activity Tag.
- Enter the Group Tag.
- Enter the Authorization Token.
- Enter desired U Parameters. (default values listed below)
- U1 Parameter Mapping: event_name
- U2 Parameter Mapping: item_id
- U3 Parameter Mapping: item_name
- U4 Parameter Mapping: item_quantity
- U5 Parameter Mapping: items_in_basket
- U6 Parameter Mapping: item_added_from
- U7 Parameter Mapping: revenue, sum
- U8 Parameter Mapping: currency
- U9 Parameter Mapping: duration
- U10 Parameter Mapping: hours_played
- U11 Parameter Mapping: achievement_name
- U12 Parameter Mapping: level_name
- U13 Parameter Mapping: level_number
- U14 Parameter Mapping: referral_from
- U15 Parameter Mapping: sessions_played
- Select the Delivery Delay. (optional)
- Select the Retry Attempts. (optional)
- Add Floodlight Tags. (optional)
- Select the Delivery Method. (optional)
- Click Save.

NOTE: For Android the Bundle ID is easily located in the URL of the app on the Google Play store (id=com.packagename). For iOS, refer to our Locating the Apple Bundle ID support documentation.

A. Up to 15 U Parameters may be added. In order to conserve space, the above image has been shortened.
B. Up to 10 floodlight tags may be added.
NOTE: With our integration we support multiple floodlight tags to be entered.
Reengagement Configuration
The information within this section provides the steps necessary to establish a reengagment campaign.
NOTE: If visualizing results of your DoubleClick re-engagement efforts in Free App Analytics is not desired, but you would like to configure event data to send to DoubleClick, follow the steps within the Create a Postback section below.
NOTE: Meta-data being sent to DoubleClick is required to be in a specific format which maps to “U” values within DoubleClick. Post-Install event examples have been detailed within our Post-Install Event Examples support document which maps the meta-data correctly to the “U” values within DoubleClick.
Create a Reengagement Segment:
- Locate the desired Campaign.
- Select Campaign Tools (⋮) > Add a Segment.
- Enter a Segment Name.
- Enter a Segment Description. (optional)
- Click Submit.
Create a Reengagement Tracker:
- Click Add a Tracker or Select Segment Tools (⋮) > Add a Tracker.
- Select the Campaign.
- Select the Segment.
- Enter a Tracker Name.
- Select Tracker Type > Reengagement.
- Select a Network > Doubleclick.
- Select Destination URL Type > Custom. (default setting)
- Click URL. (not required)
- Add Reengagement Event(s).
- Click Save. (If no further trackers need to be created).
- Click Save & Add Another Tracker. (If additional trackers need to be created).
- Click Save & Create Postback. (To navigate directly to the Partner Configuration page).
NOTE: Reengagement events may be added by clicking on the “+” and removed by clicking “X“.
![]()
A. Campaign and Segment selection/creation section.
Create a Postback Configuration:
- Select Apps & Assets > Partner Configuration.

- Select Doubleclick > Network Tools (⋮) > Postbacks.
- Locate the desired event and Click Edit Postback.
- Enter the App Bundle.
- Enter the Advertiser ID.
- Enter the Activity Tag.
- Enter the Group Tag.
- Enter the Authorization Token.
- Enter desired U Parameters. (default values listed below)
- U1 Parameter Mapping: event_name
- U2 Parameter Mapping: item_id
- U3 Parameter Mapping: item_name
- U4 Parameter Mapping: item_quantity
- U5 Parameter Mapping: items_in_basket
- U6 Parameter Mapping: item_added_from
- U7 Parameter Mapping: revenue, sum
- U8 Parameter Mapping: currency
- U9 Parameter Mapping: duration
- U10 Parameter Mapping: hours_played
- U11 Parameter Mapping: achievement_name
- U12 Parameter Mapping: level_name
- U13 Parameter Mapping: level_number
- U14 Parameter Mapping: referral_from
- U15 Parameter Mapping: sessions_played
- Select the Delivery Delay. (optional)
- Select the Retry Attempts. (optional)
- Add Floodlight Tags. (optional)
- Click Save.
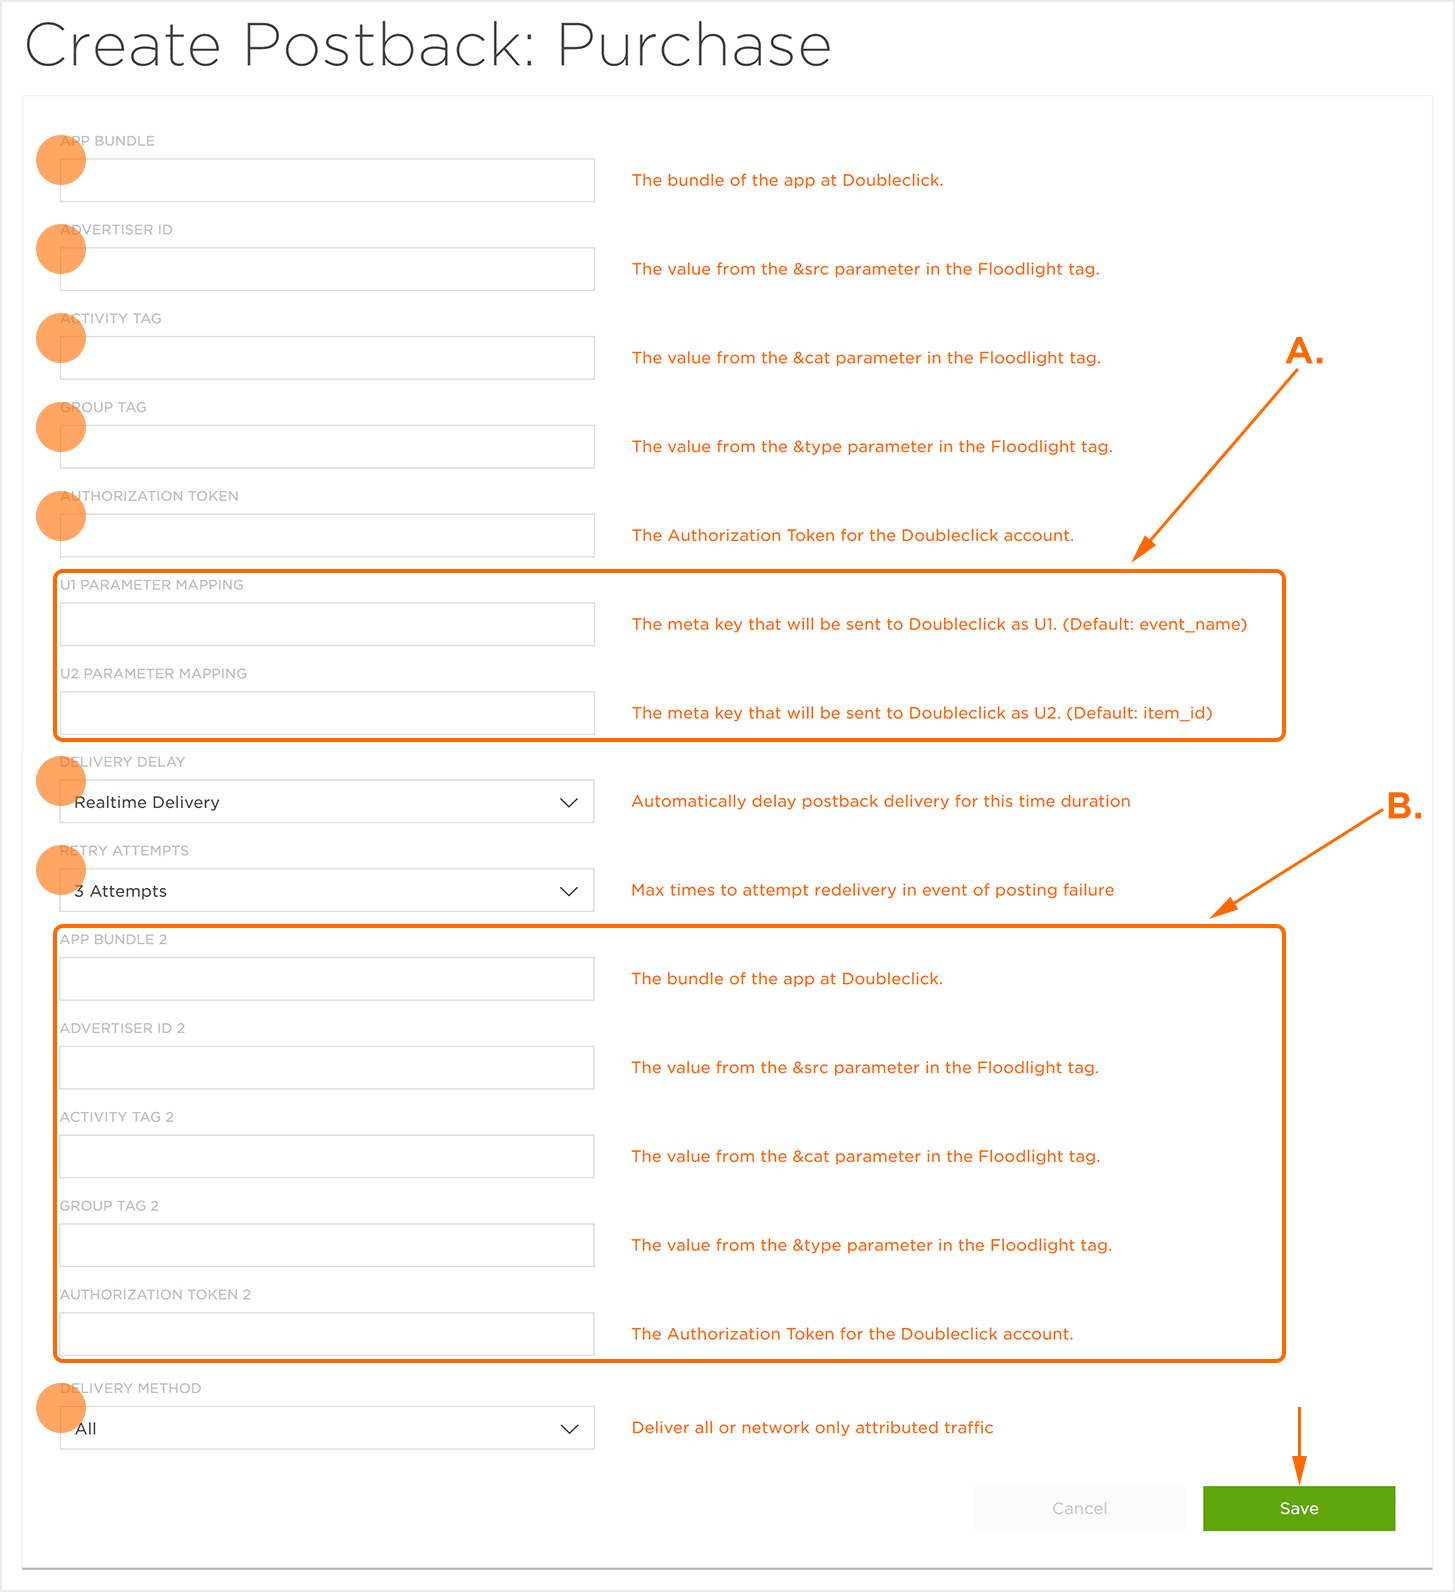
A. Up to 15 U Parameters may be added. In order to conserve space, the above image has been shortened.
B. Up to 10 floodlight tags may be added.
DCM – DoubleClick Campaign Manager
DoubleClick Campaign Manager supports multiple methods of tracking.
DCM Supports claiming via the DDM SAN Infrastructure (mobile inventory only) as outlined above. It also supports click tracking through one of the following three methods:
Site-Supplied Click Strings:
Site-Supplied Click Strings are click-tracking URLs provided by the network when requesting an ad from DCM. This is a great solution for displaying ads, as it allows the
network/publisher to provide the click tracker, as well as the network can send pre-populated macros allowing the use of their own tracking links. To implement Site-Supplied Click Strings:
- Create a new tracking URL for the publisher in the Free App Analytics Campaign Manager.
- Give the click tracker to the network/publisher that will be serving the ads. The network/publisher will send the click tracker (pre-population) to DCM when requesting an impression.
NOTE: Utilizing SSCS is the best method to track display clicks when working with DCM. They allow the publisher to define their click URL, which permits publisher level tracking.
Event Tags:
DCM allows the Advertiser to embed click trackers as event tags. This method is particularly useful if the tracker will be served over a large number of ads or an entire campaign, which relies on DCM Macros to be embedded in the click or impression. For more information on how to implement event tags in the DoubleClick interface, refer to the Google documentation.
NOTE: The above links will only function if a valid Google DoubleClick Manager account is logged in.
Landing Page Redirection:
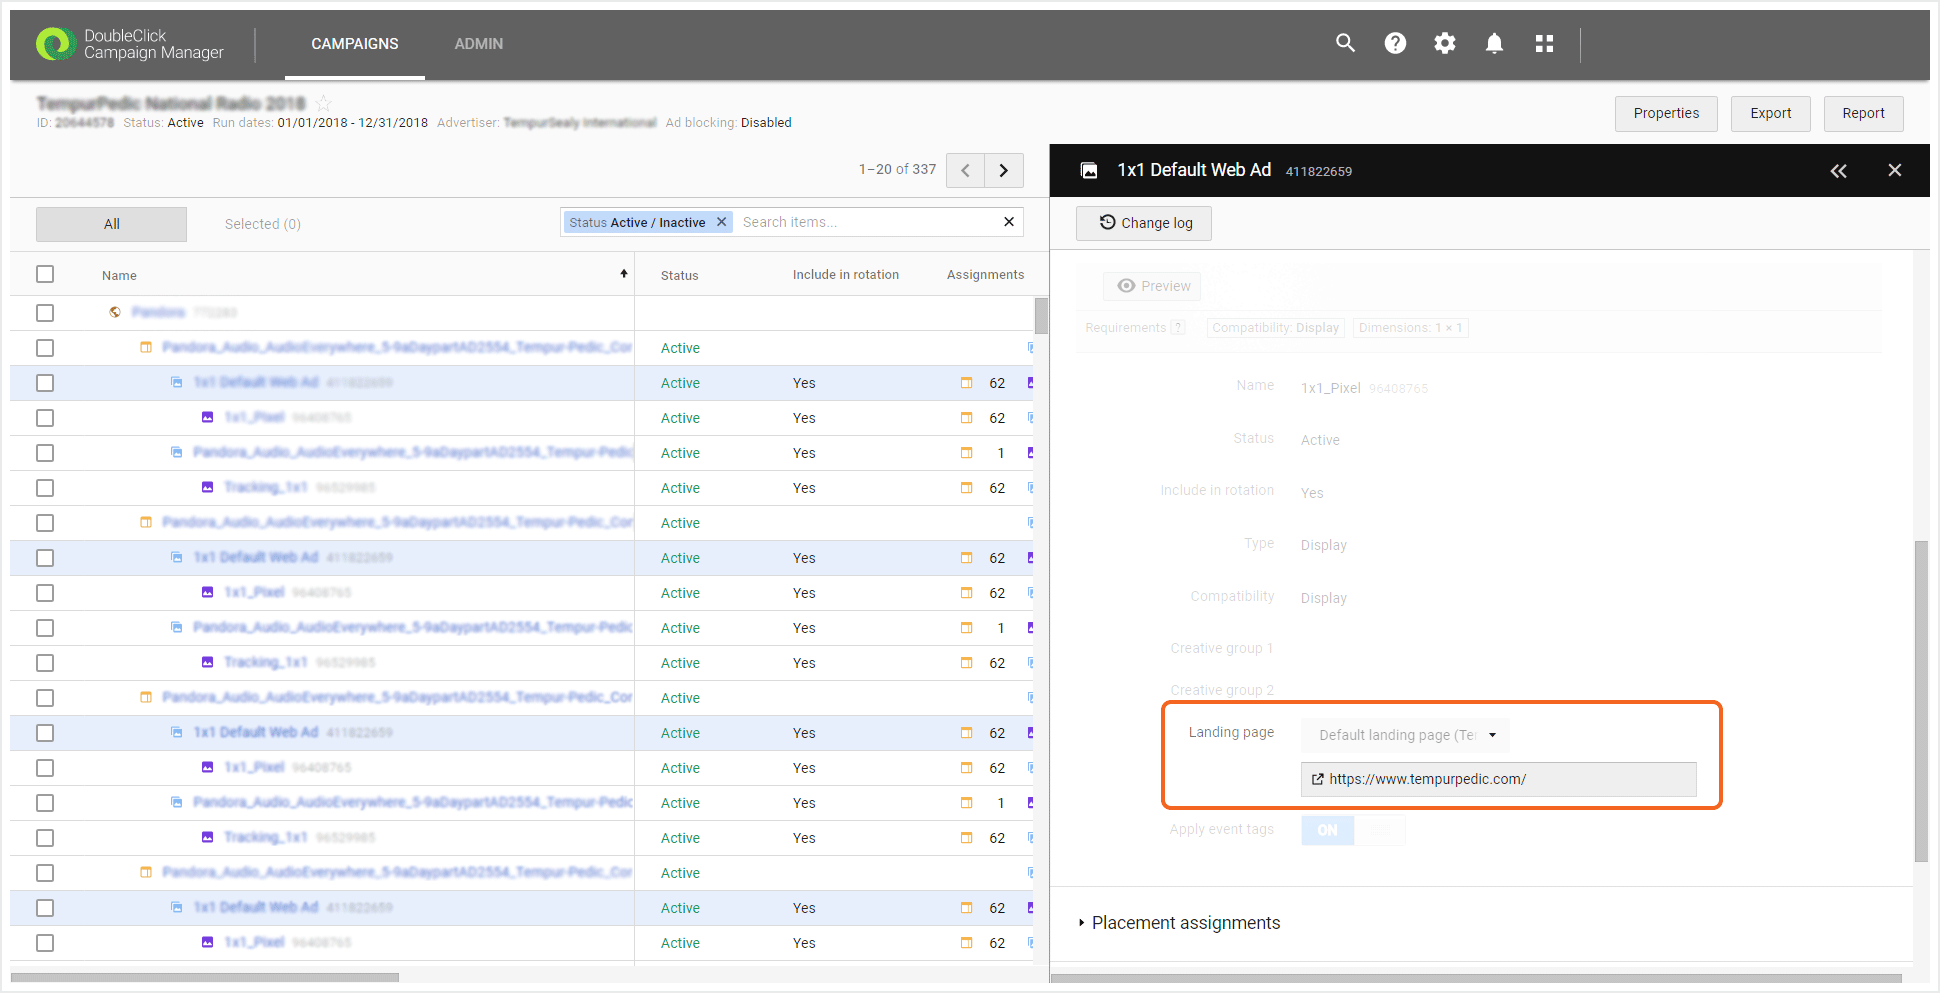
DCM allows the advertiser to place a redirecting Click-Tracker as the landing page URL in the DCM Dashboard. This is convenient if several ads have to be set up, rather than an entire campaign.
- Create a Smartlink in the Free App Analytics UI.
- Append any DCM Macros to the click tracker as Key:Value pairs, which relies on DCM Macros to be embedded in the click.
DBM – DoubleClick Bid Manager
DBM supports claiming via the DDM SAN Infrastructure (mobile inventory only) as outlined above. It also allows click tracking as below
Smartlink Tracking:
Smartlink tracking uses a click-tracker placed in the DBM dashboard, which relies on DBM Macros.
- Create a Smartlink in the Free App Analytics UI.
- Append any DBM Macros to the click tracker as Key:Value pairs.
- Place the resulting URL into the DBM Campaign Manager.
DS – DoubleClick Search
DoubleClick Search does not support the SAN claiming infrastructure. It has to use an embedded click tracker.
URL Tracking Template:
DS supports click-tracking via click-tracking templates placed in the DoubleClick Search dashboard, which uses the URL Template in the DoubleClick Search dashboard.

NOTE: Depending on your account setup, the URL template might be defined in a different location. Please contact your D3S Account Manager to learn more about the best way to place the redirect URL.
NOTE: To get the most Granular tracking, DoubleClick Search should not be used. Instead, work with each of the search engines individually. If that is not an option, then make sure a click-tracker URL template embedded properly in the URL Template for the campaign.
DFP – DoubleClick for Publishers
DoubleClick for Publisher Partners should be integrated as a stand-alone network on the Free App Analytics side; please contact integrations@kochava.com to get the partner integrated. Once integrated, they will be able to be selected in the drop-down, and will appear as a standard Free App Analytics Certified partner.
Display and Video 360
Part of the Google Marketing Platform, Display & Video 360 (formerly DoubleClick Bid Manager) is a tool that helps creative, data and media teams work together to execute end-to-end campaigns.
NOTE: Parallel tracking is now available for Video campaigns and is mandatory for DV360 campaigns. Parallel tracking brings users to a landing page directly while Free App Analytics measurement happens in the background.
In Google Display and Video 360:
- Log in to Google Display & Video 360.
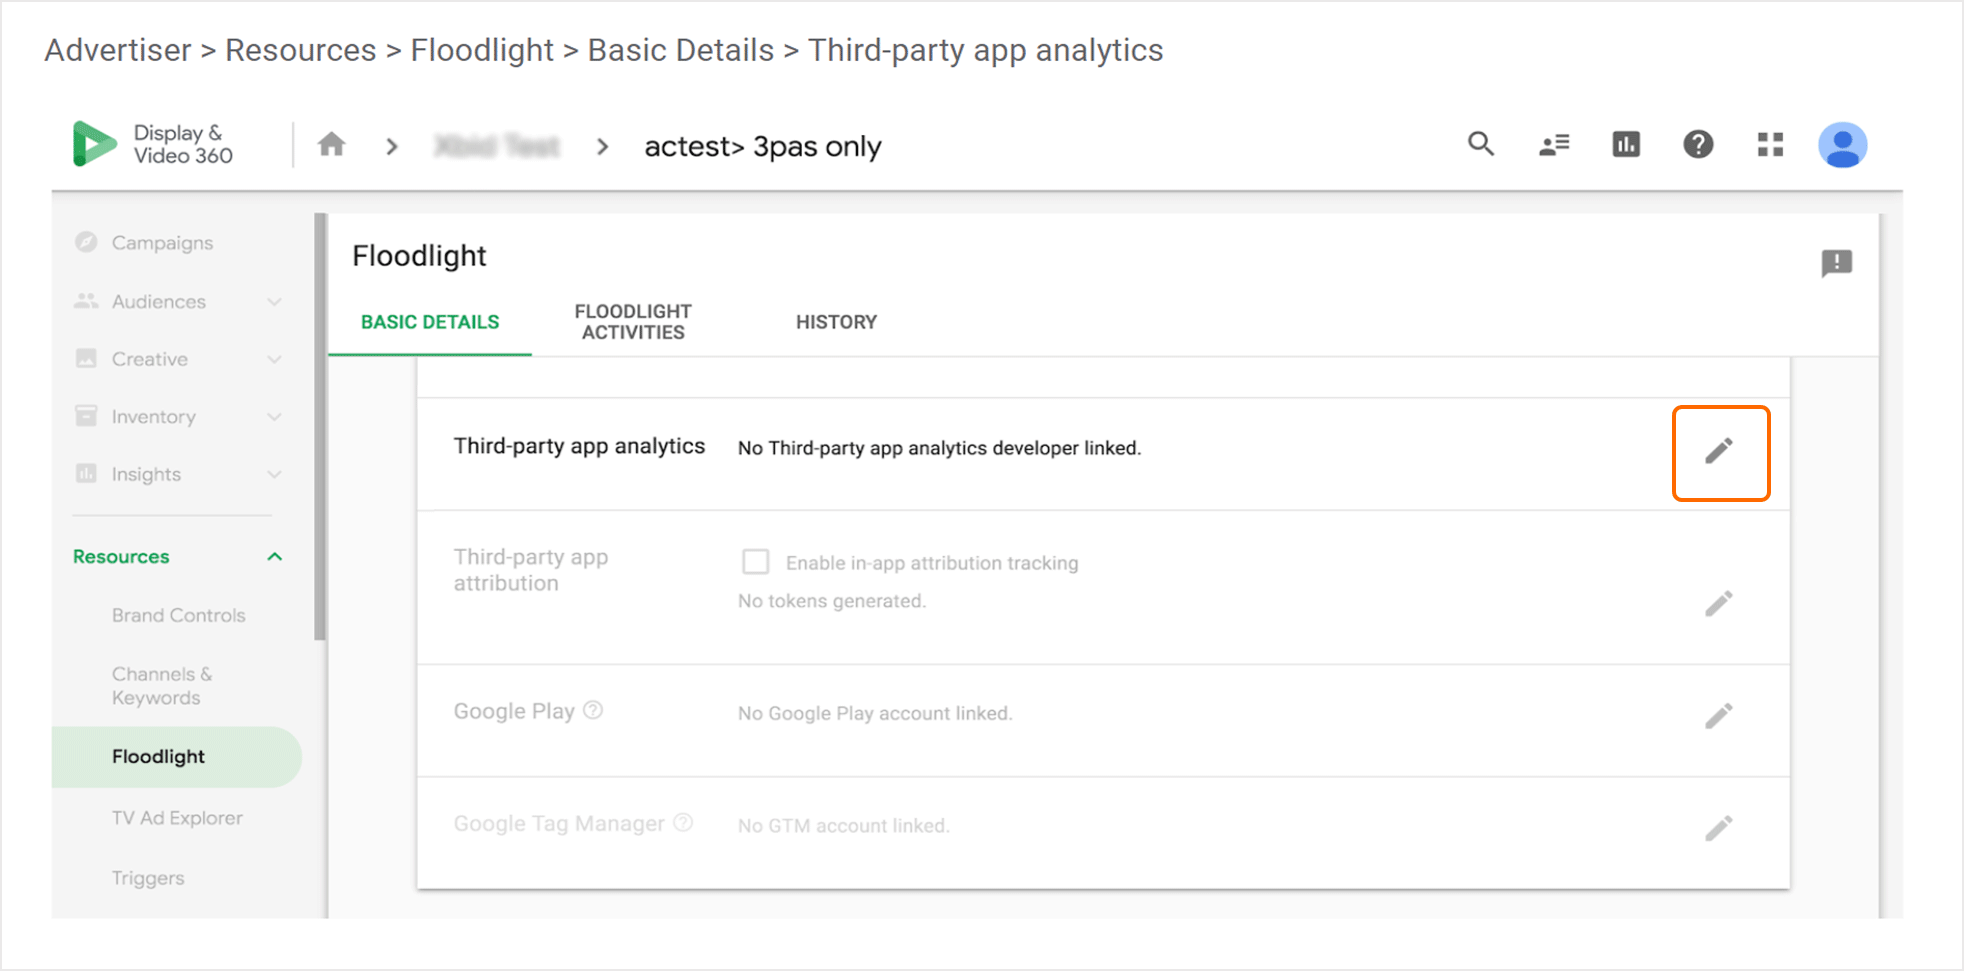
- Navigate to Advertiser > Resources > Floodlight > Basic Details.
- Edit Third-party app analytics.
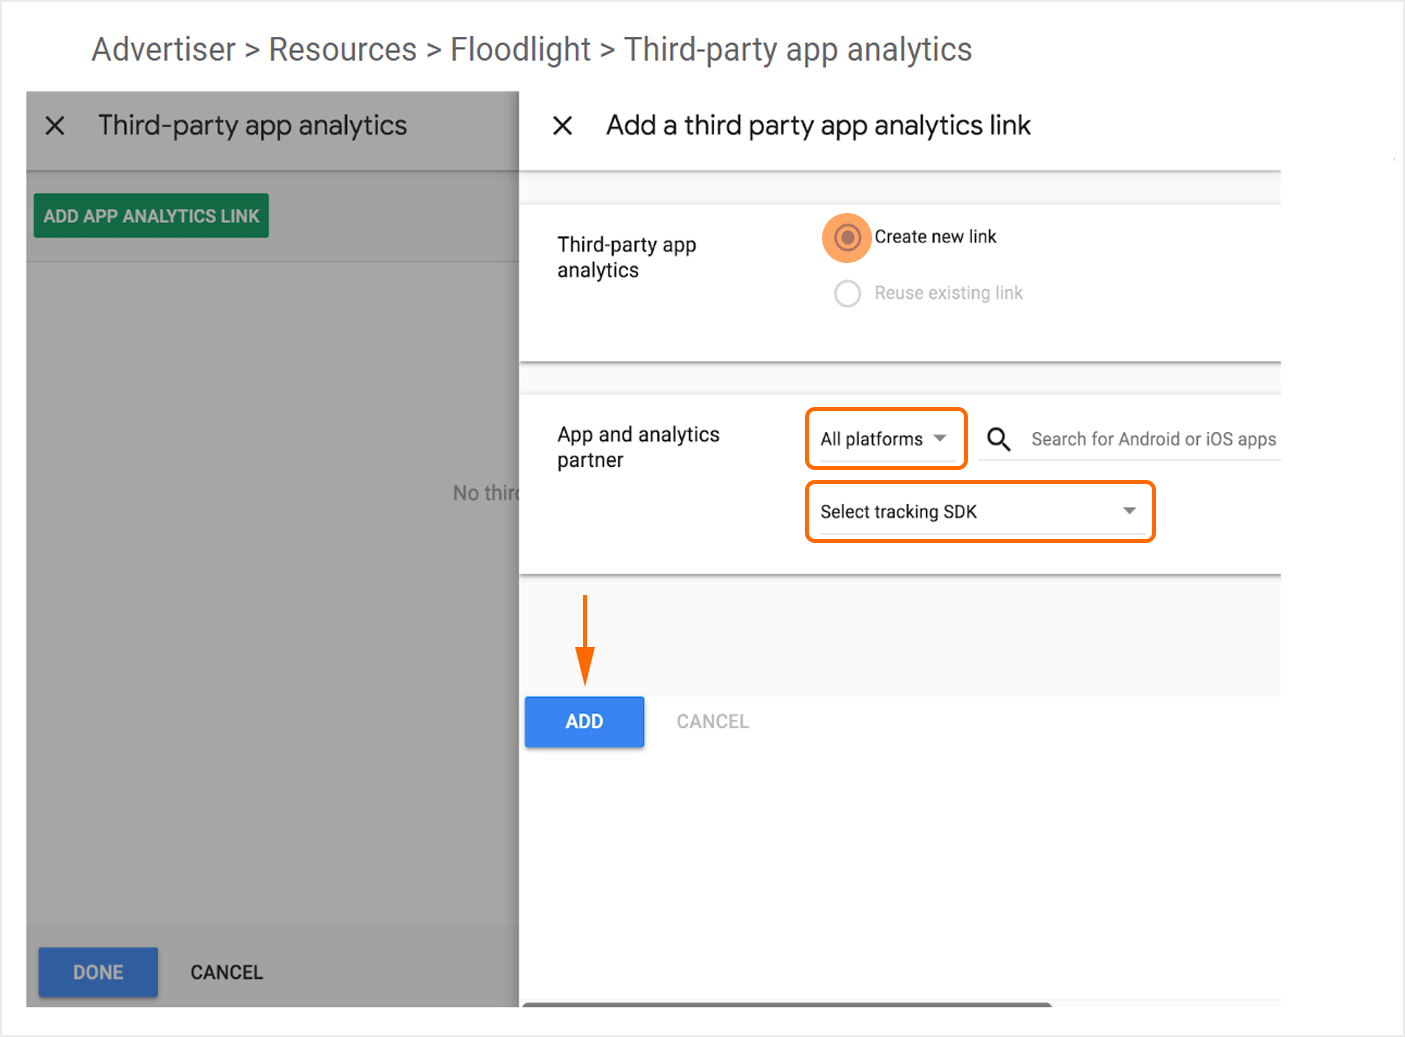
- Select Create new link.
- Select iOS or Android.
- Select the desired app.
- Select Kochava
- Click Add.
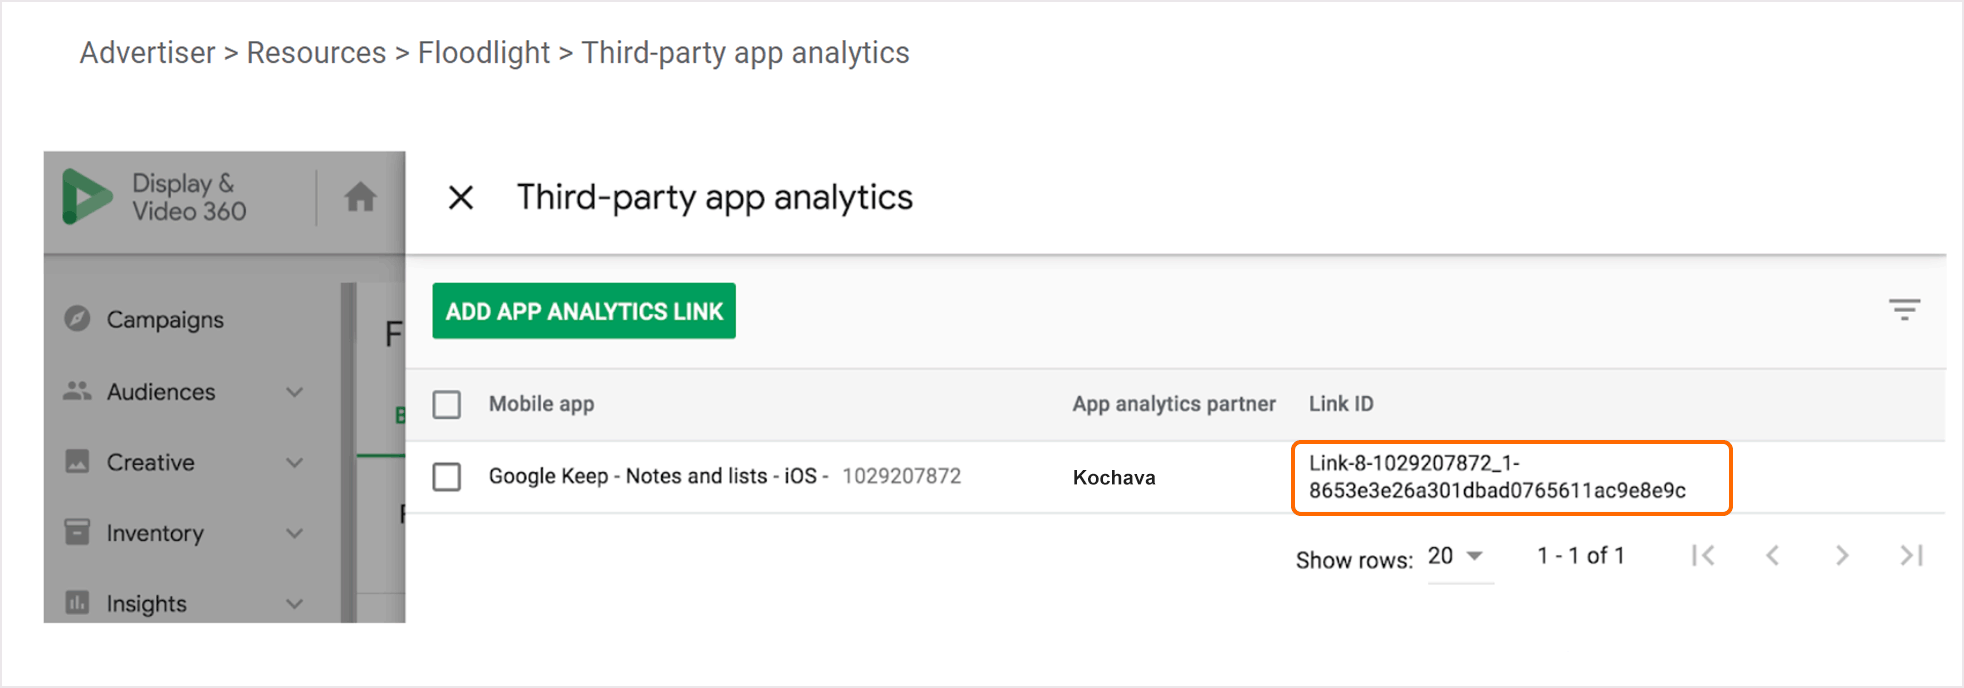
- On the next window, Click Done.
- On the next window, Click Save.
- Copy the Link ID.
In Free App Analytics:
- Create a Tracker in Free App Analytics for Display and Video 360.
- Create a Postback in Free App Analytics for Display and Video 360.
- Insert the Link ID into the partner configuration for DV360.
NOTE: For more information on creating a Tracker for Display and Video 360, refer to our Creating an Install Campaign support documentation.
NOTE: For more information on creating a Tracker for Display and Video 360, refer to our Create a Kochava-Certified Postback support documentation.
DV360 Entity Response
Conversion Tracking Response for DBM Campaign:
{
    "ad_events": [{
    "product_type": "DBM",
    "ad_event_id": "Q2owS0VRancwZHk0QlJDdXVMX2U1TQ",
    "interaction_type": "click",
    "campaign_type": "Display",
    "line_item_id": 123456789,
    "line_item_name": "Network-1 ROW global APAC",
    "external_customer_id": 2555,
    "creative_id": 512333,
    "exchange_id": 132,
    "insertion_order_id": 523423,
    "timestamp": 1432681913.123456
  }
Conversion Tracking Response for DCM Campaign:
{
    "product_type": "DCM",
    "ad_event_id": "oanwe0VRancwZ1k0PPJDdUD4222",
    "interaction_type": "click",
    "campaign_type": "Display",
    "placement_id": 9342323,
    "placement_name": "Network-1 ROW PLACEMENT FALL’16",
    "external_customer_id": 7480555,
    "creative_id": 8234234,
    "timestamp": 1432681913.123456
  }
],
    "errors": [],
    "attributed": true
}
