Data Needed Before Beginning Process:
- Valid Snapchat account.
- The App Store ID. (Obtained from app developer, app manager or app store)
- Snapchat Partner ad account ID(s). (optional)
Use Cases for Snapchat Campaign:
- An app marketing campaign with Snapchat has been created.
- An app marketing campaign with a Snapchat Partner has been created.
NOTE: For Snapchat to receive post-install event information, a reengagement tracker must be created for the events that need to pass to Snapchat. If attribution does not need to be tracked, ensure that the proper options are configured in the postback configuration for Snapchat. For more information about creating a reengagement tracker, refer to our Create a Snapchat Reengagement Campaign support documentation.
Create a Snapchat Campaign
- Once a tracker has been created, navigate to Campaign Manager.
- Locate and click on the desired Campaign.
- Located the desired Segment, and click on the expand arrow.
- Locate the desired Tracker, and click on the expand arrow.
- Locate and copy the Tracker ID.
![]()
- Log in to Free App Analytics.
- Select the desired Account and App.
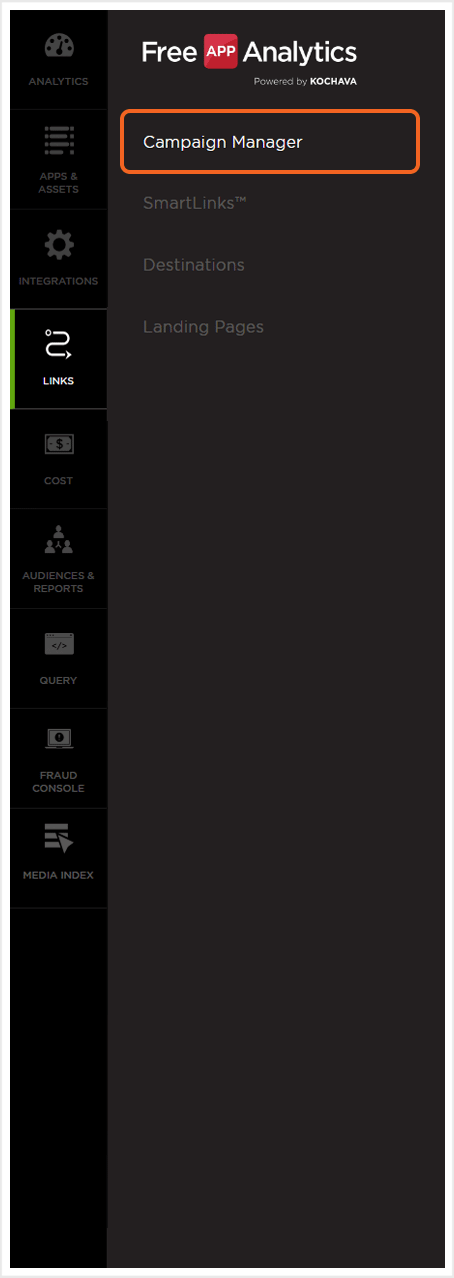
- Select Links > Campaign Manager.
- Click Add a Tracker or Select Segment Tools (⋮) > Add a Tracker.
- Select the Campaign
- Select the Segment.
- Enter the Tracker Name.
- Select Tracker Type > Acquisition. (default setting)
- Select Media Partner > Snapchat.
- Select an Agency Partner. (optional)
- Select Default Tracker:
- On
- Off (default)
- Enter the Install Destination URL.
- Enter a Deep Link. (optional)
- Enter Custom Parameters. (optional)
- Click Submit. (If no further trackers need to be created).
- Click Save & Add Another Tracker. (If additional trackers need to be created).
- Click Save & Create Postback. (To navigate directly to the Partner Configuration page).
NOTE: In order to streamline the Campaign/Segment/Tracker creation process a feature has been added to allow the creation of campaigns and segments while creating a new tracker. For more information about creating a campaign or segment while adding a new tracker, refer to our Create an Install Campaign support documentation.
NOTE: As Snapchat is a SAN , Free App Analytics does not handle the click redirect therefore a Destination URL is not required.
![]()
NOTE: When a Tracker is created, Free App Analytics automatically generates a name for the Tracker. We recommend that you replace the Tracker name at this point with a clear name of your choosing.
NOTE: Selecting On will allow SAN network traffic to funnel to the default tracker when no tracker ID is present. If a default tracker is not set up and the tracker ID is not appended to the partner campaign name, that data will be bucketed in the most recently set up tracker for that network.
![]()
A. Campaign and Segment selection/creation section.
Create a Postback Configuration
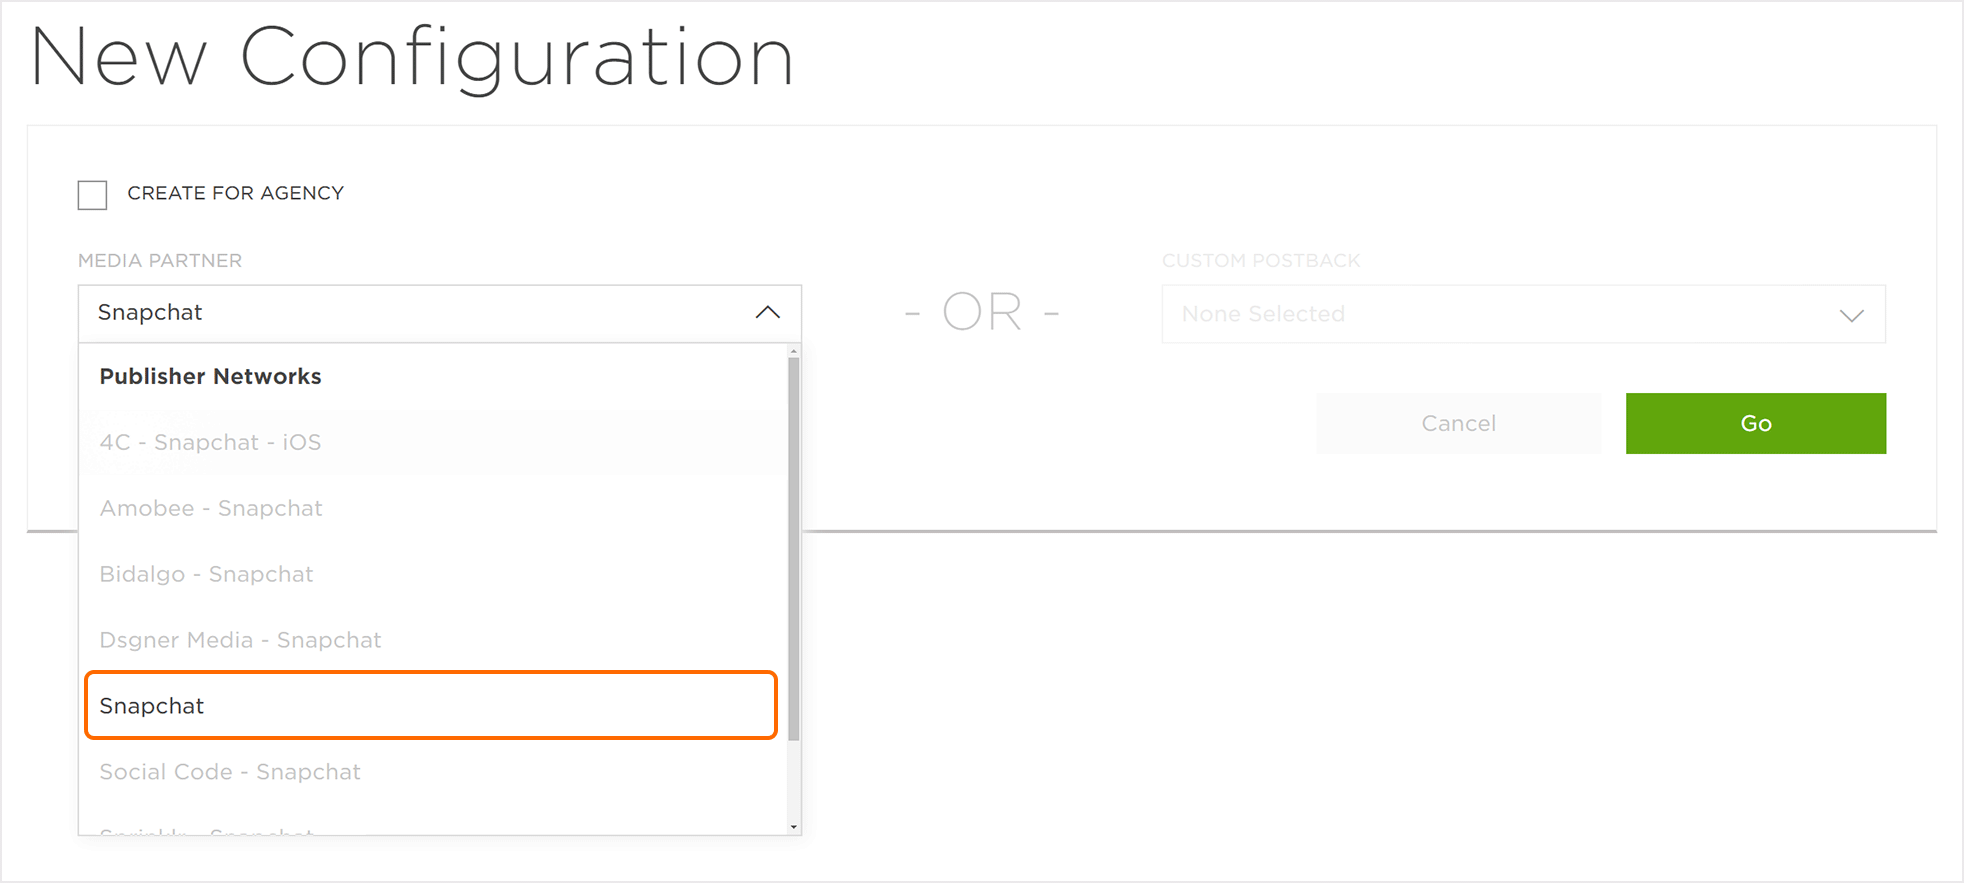
- Click Add a Configuration.
- Select Network Partner > Snapchat.
- Click Go.
- Select Install > Postback Tools (⋮) > Edit.
- Enter the App Store App ID.
- Enter the (SnapKit App ID). (optional)
- Enter the Adquant Snap Ad Account ID. (optional)
- Enter the Webpals Mobile Snapchat Ad Account ID. (optional)
- Enter the Dsgner Media Snap Ad Account ID. (optional)
- Enter the Amobee Snap Ad Account ID. (optional)
- Enter the Sprinklr Snap Ad Account ID. (optional)
- Enter the Brand Networks Ad Account ID. (optional)
- Enter the Bidalgo Ad Account ID. (optional)
- Enter the Kochava Transaction ID. (optional)
- Enter the 4C – iOS Ad Account ID. (optional)
- Enter the 4C – Android Ad Account ID. (optional)
- Select the Delivery Delay. (optional)
- Select the Retry Attempts. (optional)
- Review and Accept the Snapchat Terms & Conditions.
- Click Save.
NOTE: Snapchat advertisers who run ads for an app from multiple Business Manager Organizations will need to create a Snap App ID for their app within each. Each of the Snap App IDs will then need to be entered into the MMP form field separated by commas. For example: My app is named “City Boutique” but my company has a Business Manager Organization account for the US market, and one for the UK market with different organization admins. Both of the accounts will need to create a unique Snap App ID for the “City Boutique” app. For more information contact your sales representative or learn more on the Snap Business Help Center.
NOTE: The Kochava Transaction ID field will be used for deduplication by Snap.
NOTE: This setting informs Kochava what transactional app data can and can not be transmitted to Snap.
NOTE: If a campaign with a Snapchat partner will be set up, ensure that the corresponding Ad Account ID has been entered.
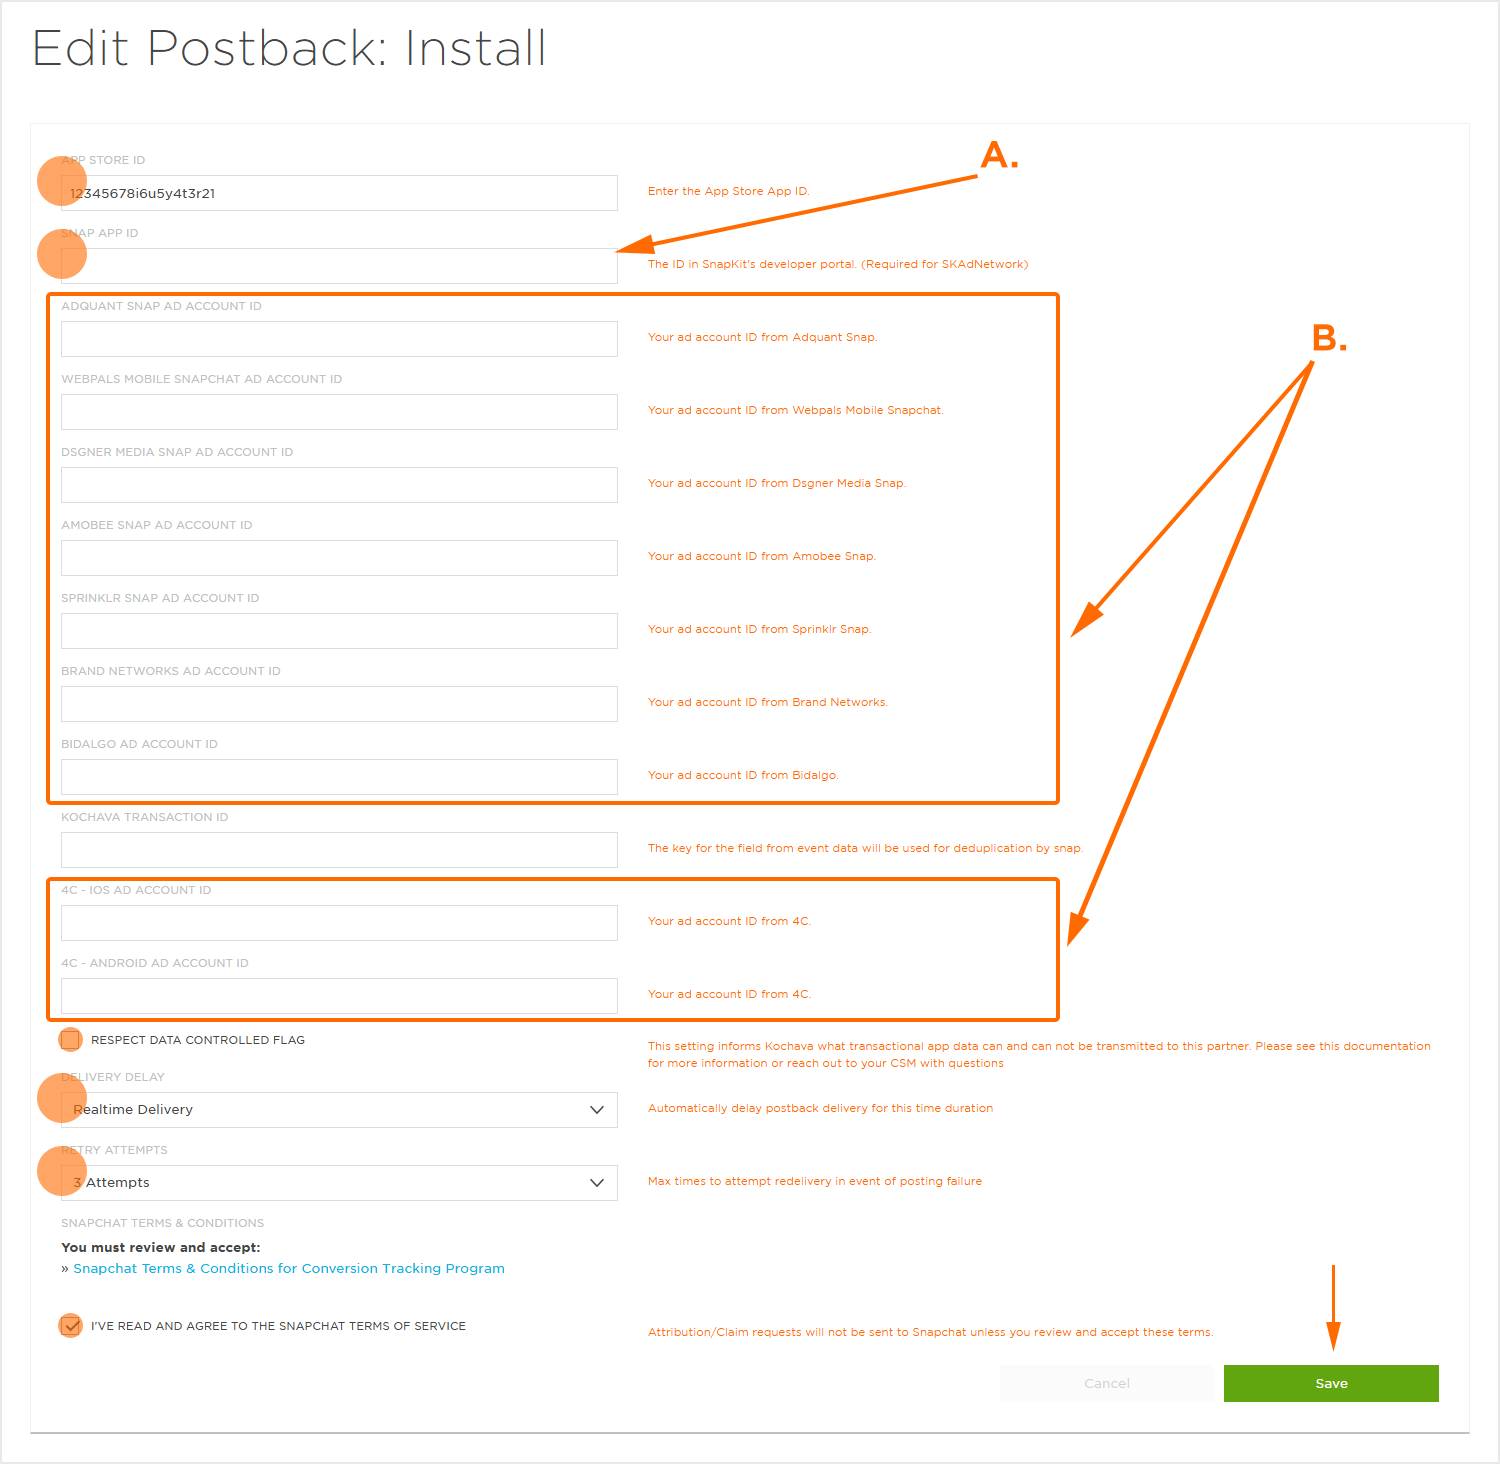
B. Enter the optional Snapchat partner account ID(s).
Enriched SAN Settings :
- Select Apps & Assets > Partner Configuration.

- Search for a Snapchat.
- Select Partner Configuration Tools (⋮) > Reconciliation.
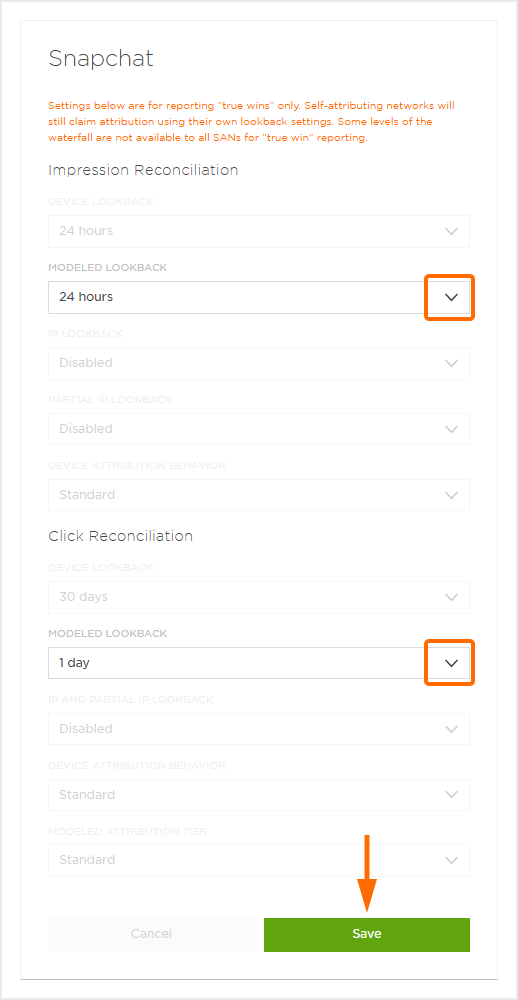
NOTE: The Reconciliation Settings are for reporting “true wins” only. Self-attributing networks will still claim attribution using their own lookback settings. Some levels of the waterfall are not available to all SANs for “true win” reporting. Select the desired Impression Reconciliation settings. For more information, refer to our Partner Reconciliation Settings support documentation.
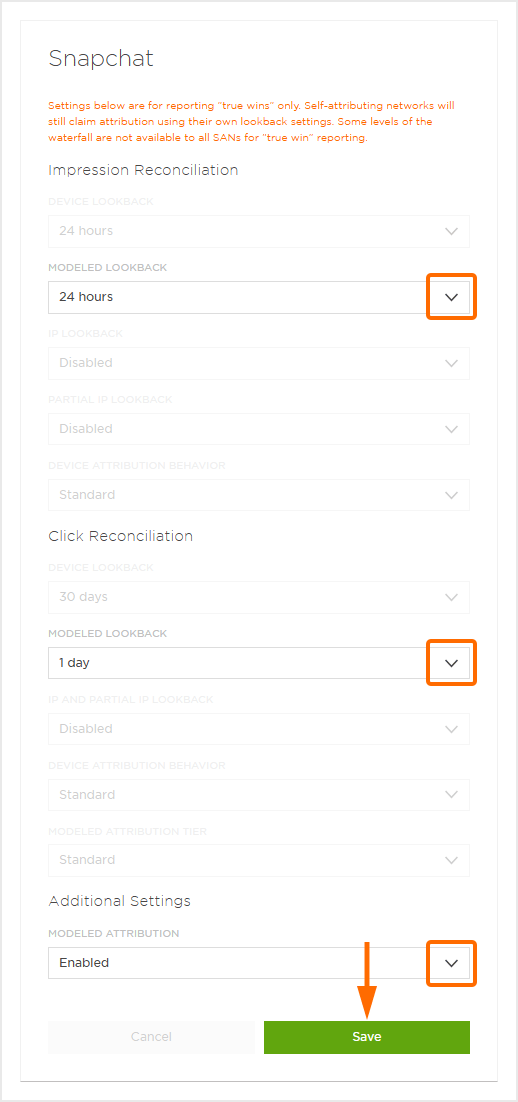
The following settings can be selected, modified or disabled for modeled attribution.
Enabling Modeled Attribution —
- Select the desired Impression Reconciliation > Modeled Lookback timeframe.
- Select the desired Click Reconciliation > Modeled Lookback timeframe.
- Select Additional Settings > Modeled Attribution > Enabled.
- Click Save.
Disabling Modeled Attribution —
- Select Additional Settings > Modeled Attribution > Standard.
- Click Save.
The following settings can be selected, modified or disabled for modeled attribution.
Enabling Modeled Attribution —
- Select the desired Impression Reconciliation > Modeled Lookback timeframe.
- Select the desired Click Reconciliation > Modeled Lookback timeframe.
- Click Save.
Disabling Modeled Attribution —
- Select Impression Reconciliation > Modeled Lookback > Disabled.
- Select Click Reconciliation > Modeled Lookback > Disabled.
- Click Save.
SKAdNetwork
Under Apple’s SKAdNetwork Snapchat will receive the postbacks directly from Apple, and then forward those SKAdNetwork postback to Kochava with some additional metadata for reporting.
NOTE: For more information about setting up a SKAdNetwork Campaign within Snapchat, refer to their support documentation.
NOTE: Snapchat requires the successful configuration of a Snap App ID with the MMP dashboard to access SkAdNetwork within Snapchat Ads Manager. Setup instructions for Snap App ID here. Please configure a Snap App ID for each of your apps you wish to advertise on Snapchat.
NOTE: The Kochava – SNAP API hooks programmatically pull in your conversionValue model and schema.
Integration Update: As of 9/13/21, Snap is making the following changes as part of a larger initiative to give advertisers more flexibility in activating and optimizing SKAdNetwork campaigns on Snap, such as increased SKAdNetwork Ad Set limits.
The following fields will be removed from forwarded SKAdNetwork postbacks:
– transaction-id
– campaign-id
– attribution-signature
– re-download.
Lastly, the timestamp field will no longer correspond to the time when Apple sent Snap the postback. Going forward, it will correspond to midnight (12:00am) Pacific Time of the day that Apple sent Snap the postback.
While Snap is introducing a new field, snap-transaction-id, that can be used to de-dupe postbacks, it CANNOT be used to dedupe against the mirrored postbacks sent by Apple to a second location. It is also important to note that these changes will result in Kocahva inability to validate these forwards with Apple’s Store Kit.
If these fields are important to you, we recommend setting up an endpoint to receive a copy of winning postbacks after iOS15 releases per Apple’s documentation. Please reach out to your Kochava rep or your Snap rep with any questions on functionality moving forward.
| Attribute | Description |
Format
|
Forwarded on Postback
|
|---|---|---|---|
| version | Version of install validation postback. Will be 1.0 if source app uses pre-iOS14 SDK and 2.0 for all apps running iOS14. |
str | ✔ |
| ad-network-id | Network ID registered with Apple. | str | ✔ |
| campaign-id | Can be a value from 1 – 100. | str | |
| transaction-id | Unique ID used for deduplication tied to a conversion. | str | |
| app-id | ID for the advertised app. | str | ✔ |
| attribution-signature | Snapchat-generated signature tied to an ad interaction, used to verify conversion using Apple’s public key. This will not be passed for Snapchat Audience Network conversions. Please see below table for more details. |
str | |
| redownload | Flag for a reinstall. | boolean | |
| source-app-id | ID of app where ad was served. Snapchat’s App ID for Snap Ads inventory. This will not be passed for Audience Network conversions (which would cause validation of the postback to fail for conversions driven by Snapchat Audience Network). |
str | ✔ |
| conversion-value | 0-63, must be sent in incremental values by the advertised app. This will be null for v1 postbacks or v2 postbacks without a conversion value due to Apple’s privacy minimum threshold. |
str | ✔ |
| ad_campaign_id | Snapchat campaign ID. | str | ✔ |
| ad_campaign_name | Snapchat campaign clean name. | str | ✔ |
| ad_squad_id | Snapchat ad squad ID. | str | ✔ |
| ad-squad-name | Snapchat ad squad name. | str | ✔ |
| timestamp | Postback timestamp in milliseconds. | str | ✔ |
| snap-channel | Channel of impression or engagement (ie. Snap Audience Network or Snapchat). |
str | ✔ |
Parameter Mapping:
- ad_squad maps to sub_campaign_name
- ad_squad_id maps to sub_campaign_id
- campaign name maps to partner_campaign_name
- campaign maps to partner_campaign_id
- snap_channel (Snapchat Audience Network or Snapchat) maps to site_id
- timestamp maps to midnight (12:00am) Pacific Time of the day that Apple sent Snap the postback
Cost
Kochava Cost provides access to daily spend reports across all of your (Kochava Cost-integrated) network partners, all in one place. Once a configuration has been established with an API-connected partner, Kochava Cost records and displays the daily spend in an easy-to-consume graphical representation – so your team can get a quick view of the overall Cost across apps, platforms, partners or campaigns. For more information about Kochava’s Cost product, refer to our support documentation.
Snapchat Advanced Conversions:
Advanced Conversions is Snapchat’s approach to privacy-centric digital advertising. Advanced Conversions enables marketers to meet their business objectives while respecting users’ ad tracking preferences via Apple’s ATT policy. For more information about Advanced Conversions, refer to Snapchat’s support documentation.
Free App Analytics’ advertisers can leverage Advanced Conversions by enabling the relevant settings in Privacy Profiles or by enabling ‘Modeled Attribution’ to transmit Attribution Data Points, such as IP and User Agent, to Snapchat.
